Quantcast
Channel: Telerik Blogs | .NET
Viewing all 1954 articles
Browse latest View live

Integrate Assembly Diff in Your Build Using JustAssembly

$
0
0

JustAssembly has gained a command line interface in the assembly diff tool, making it easy to generate an easily analyzed XML file to test your build.

We have recently added a command line interface to our JustAssembly assembly diff tool. One can use the command line to generate an XML file describing the differences between the output of the previous and the latest build. That effectively makes it possible to use JustAssembly in an automated build pipeline to control the scope of the changes in future releases.

Command line usage of JustAssembly is straightforward:

justassembly.commandlinetoool.exe Path\To\Assembly1 Path\To\Assembly2 Path\To\XMLOutput.xml

The resulting XMLOutput.xml is also structured intuitively:

<AssemblyName="Telerik.Pivot.Core, Version=2013.2.923.45, Culture=neutral, PublicKeyToken=5803cfa389c90ce7"DiffType="Modified">
 
  <ModuleName="Telerik.Pivot.Core.dll"DiffType="Modified">
 
    <DeclarationDiffs>
 
      <AssemblyReferenceName="Telerik.Windows.Controls, Version=2013.2.724.45, Culture=neutral, PublicKeyToken=5803cfa389c90ce7"DiffType="Deleted"/>
 
    </DeclarationDiffs>
 
<TypeName="Telerik.Pivot.Core.CalculatedAggregateDescription"DiffType="Modified">
 
      <DeclarationDiffs>
 
        <DiffItemDiffType="Modified">Member is more visible.</DiffItem>
 
      </DeclarationDiffs>
 
      <PropertyName="CalculatedField"DiffType="Modified">
 
        <MethodName="get"DiffType="Modified">
 
          <DeclarationDiffs>
 
            <DiffItemDiffType="Modified">Method changed to virtual.</DiffItem>
 
          </DeclarationDiffs>
 
        </Method>
 
      </Property>
 
      <MethodName="CreateAggregate()"DiffType="Deleted"/>
 
    </Type>
 
……………..
 
  </Module>
 
</Assembly>

It converts the assembly hierarchical structure to XML hierarchy. The assembly contains modules and the modules contain types which in turn contain members. Each entity is decorated with a DiffType attribute that specifies the type of difference found.

XMLOutput.xml can be further analyzed with any of the great number of XML tools out there and the results of this analysis can mark an automated build as a success or failure depending on what changes are considered admissible.

Got Feedback?

JustAssembly is a free and open-source product that helps you ensure version compatibility, and contributors are welcome! Head on over to Github to find out more, and let us know what you think there or in the comments below.


How To Submit a Support Ticket

$
0
0

After reviewing demos and documentation (and scouring the forums for threads relating to your issue) you’re still unable to implement an app requirement, or determine if you’re dealing with a bug, don’t despair! If you’re a licensed developer covered by a valid support contract, or within the evaluation period, you have the option to work directly with knowledgeable Progress staff by submitting a support ticket.

What You’ll Need

Prior to submitting the ticket, you should gather the specifics of your development environment. These will be needed for our developers to better understand the context of your issue. Depending on the platform, this usually includes the following:

  • Full version number of the Telerik control or product being used
  • Operating system details of your development machine/server
  • Browser type and version number (when applicable)
  • .NET Framework version (when applicable)
  • Visual Studio (or other IDE) edition (including Service Packs)
  • Preferred coding language (C#, VB.NET, Java, PHP, etc.)

Identify all applicable code that is required to clarify the issue. We strongly recommend that, whenever possible, you take the time to isolate the problem in a sample project. A simplified, runnable, standalone application that demonstrates the issue allows our developers to immediately focus on resolving your issue and saves the time needed to first reproduce it. This helps avoid excessive back and forth correspondence, which extends the time required to resolve the issue, and improves the chance of solving it immediately.

Finally, you should prepare a clear written overview of the issue, and create applicable screenshots or video captures that visualize hard-to-describe behaviors or layouts.

Creating the Ticket

Log in to your Telerik Account and using the dropdown menu provided, click on "Support Tickets".

support tickets

Then, click the "Contact Support Team" button and choose the product for which you need support.

If, after reviewing the most popular support resources for the given product, you still have a support question, you may start typing it in using the dialog provided:

type support question

After submitting this form, you'll see that we do a quick search to find any relevant support resources for you. Assuming there are no matches (be sure to look closely!) you can click the "Submit Support Ticket" button to proceed.

At this stage, you can classify your ticket as a Support Ticket, Bug Report, or Feature Request:

support bug feature

Once you've chosen the type of ticket, you’re ready to provide a suitable title for the issue and to add the concise but complete overview required for the developers to understand it clearly.

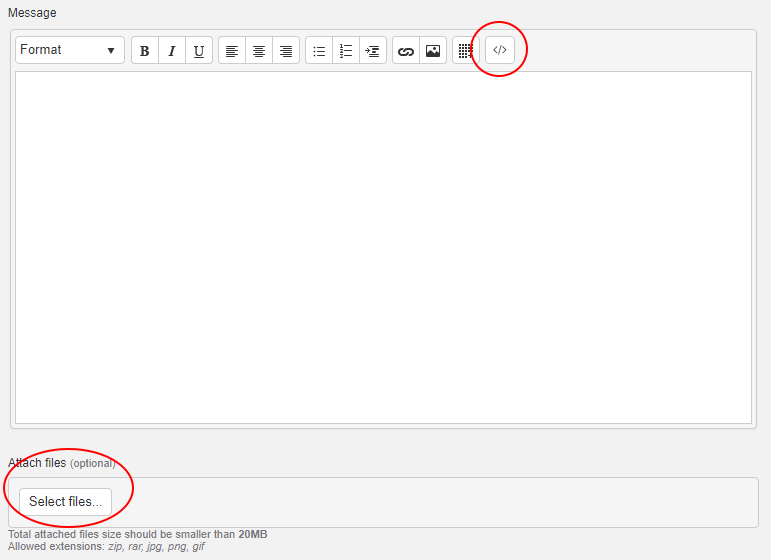
You can insert inline code snippets by taking advantage of the “Format Code Block” button (see circled area below), which allows you to properly format markup, JavaScript or C#/VB.NET code blocks.

support ticket message

Don’t forget to use the “Attach files” button to upload your supporting files which should include your code and/or screen captures. The allowed extensions are .zip, .rar, .jpg, .png, and .gif, and the total combined size of the upload cannot exceed 20MB (feel free to contact us for help in uploading larger files). Finally, users holding our DevCraft Ultimate License have the option to “submit ticket for pre-screening” which means that we’ll do a quick check and tell you if you've provided sufficient information for the developers to understand your issue and provide helpful insights.

Once you've double-checked that all is in order, simply click the “Submit Ticket” button to initiate the ticket.

Follow Up

You should receive an immediate email confirmation of the ticket in the inbox of the registered email account, featuring a copy of the ticket details. Then, you can monitor your inbox for an email notification of the reply that has been added directly in the ticket by the Telerik support team. This can be expected within the ticket’s time frame as specified in your support contract (typically 24 hours), or evaluation agreement (typically 72 hours). You can reference the time frames offered by the various support plans here.

In the response to your ticket, you may be asked to provide additional insights or supporting files. You can reply to the ticket accordingly. If the response provided does not solve the issue, you can continue the thread until a resolution is found. Any new, unrelated issue should be logged in a separate ticket. Once you've resolved the issue, please use the “Mark as Resolved” button/link to close the thread.   

Editor's note: This post was originally written by Georgi Tunev in 2013, and has been updated for completeness and accuracy.

Security Alert for Telerik UI for ASP.NET AJAX and Progress Sitefinity

$
0
0

We have identified a security vulnerability affecting UI for ASP.NET AJAX that exists in versions of Telerik.Web.UI.dll assembly prior to 2017.2.621, as well as Sitefinity versions prior to 10.0.6412.0. We have addressed the issue and have notified customers and partners with details on how to fix the vulnerability.

For details, please review the respective KB articles:

Our sincere thanks to Erlend Leiknes, security consultant with Mnemonic AS, for disclosing this issue and helping in its resolution. We also wish to thank Thanh Van Tien Nguyen for his assistance and for providing further essential details.

Awesome Features of Our Reporting Engine

$
0
0

What makes a reporting solution shine? We take you through the key features of Progress Telerik Reporting and how our solution solves your business challenges.

Reporting solutions are created with the purpose of quickly making data visualizations from various data sources for previewing, printing, sharing and archiving.

In this article, I will focus on some of the nifty features that make our Reporting solution shine when data visualizations are needed.

WYSIWYG Report Designers

WYSIWYG Report Designer - Progress Telerik Reporting

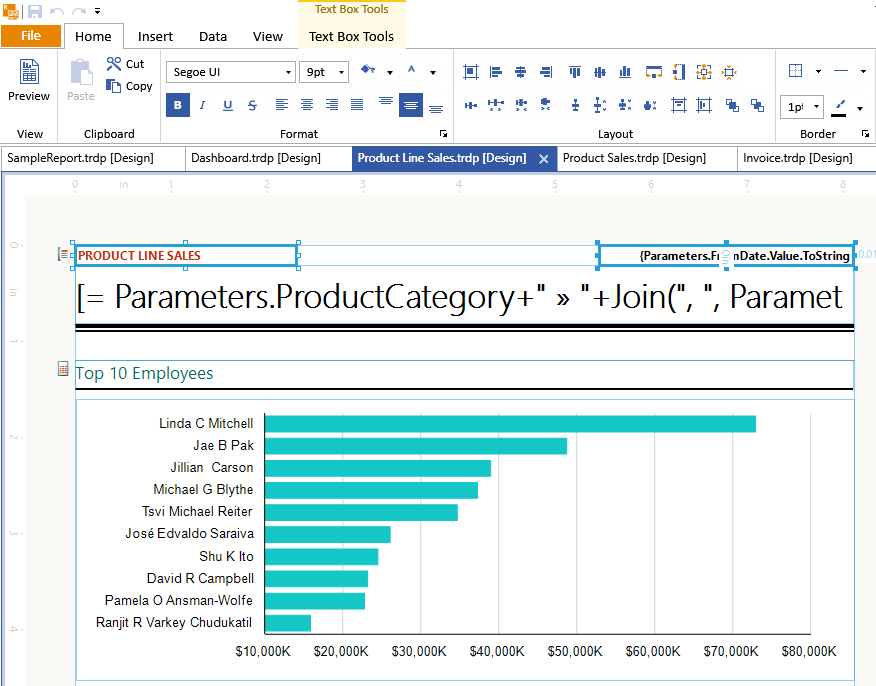
Progress Telerik Reporting provides two report designers—a Standalone Report Designer for a code free report authoring experience, and a Report Designer embedded in Visual Studio for all die hard Visual Studio users. If you can't spare skilled developers to design and implement reports, you can use professionals with basic data operations and/or business understanding and utilize the easy to learn Standalone Report Designer. The designer is free, so a user that only authors reports will not require additional licensing.

Declarative Report Definitions

Report designers output a report definition. The declarative definition is one of the reporting advantages. Just as a programming language lets a programmer tell a computer how and what output to produce to the end user, the report definition tells the report engine what data to use and how to lay it out.

Now, there is a little trick: Most programming languages define the what and how of doing something. The report definition describes what the output will look like and where the source data is coming from. This leaves the application free to decide how to generate the defined look and feel, regardless of the programming language or underlying architecture. This is a declarative model. The benefit is that you get an easy coding free option to create complex and beautiful reports with a data driven report layout.

Data Items

Data Items - Progress Telerik Reporting

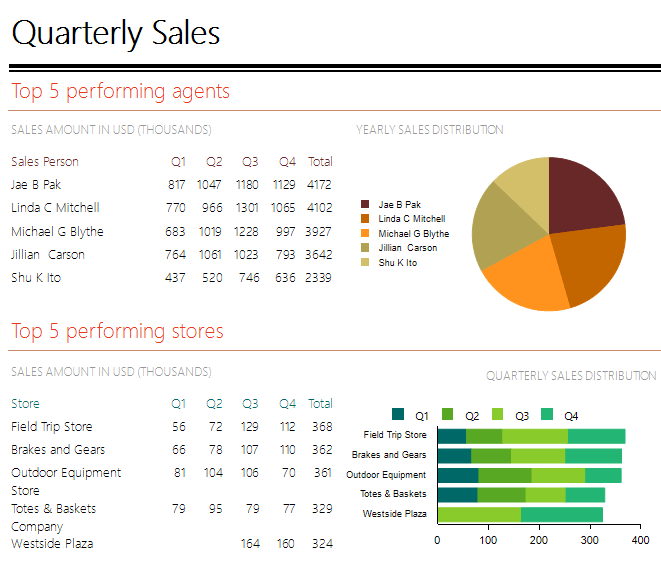
Reporting supports both the band reports paradigm and separate data items such as Graph (Chart), Crosstab (Pivot), Table and List items. This is combined with the flexible report data binding and with powerful grouping/sorting/filtering expressions. The reporting handles all data scopes generation and the corresponding data presentation repetition for you, making it much easier to produce analytical, master-detail, form reports or whatever your data visualization need is.

Nested Data Items

Telerik Reporting fully supports nesting data items. That means you can nest any data item in a table cell or report section. After you have created your impressive layout with nested data items, it's time to data bind them. Here you have two options—data bind to the parent item data context or bind with a data source component. The returned data rows from the data source component can be filtered based on the current data scope of the parent data item context. Based on the data item placement in a specific report band or in a crosstab/table cell, the binding will provide the appropriate data: detail data if the data item is in detail section, or table cell or grouped data for a group section or table cell representing a group.

Nesting data items is very useful when you want to: combine detail and aggregate data with graphics in the form of Sparklines, Databars or full Charts. Present hierarchical data in the form of either static hierarchies and even dynamic hierarchies.

Present Data with Dynamic Hierarchies or Recursive Layout

Presenting data that is in a tree hierarchy with a random depth is one of the scenarios that shows the flexibility of Reporting. This is accomplished with the use of a self-referenced SubReport to achieve the recursive visiting on all the nested levels.

Reusability

Once defined, you can reuse the same report definition in any of the supported viewers/platforms without any modifications to the reports. The reporting engine will do all the heavy lifting and produce what's required by the platform output (HTML, XAML, EMF). Once reviewed in report viewer, the report definition can then be rendered in any of the popular document formats including PDF, XPS, Word, Excel, PowerPoint and so on.

Data and Styles in Unison for Great Reports

Data and Styles in Unison for Great Reports - Progress Telerik Reporting

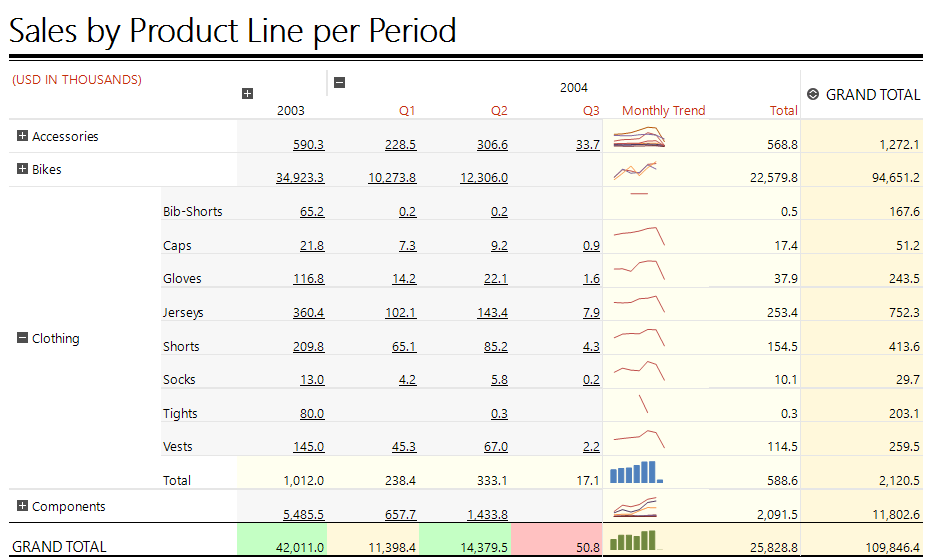
Reports don't have to mean ugly and boring data presentations. Instead, every mature reporting solution should offer not only granular and reusable CSS-like styling, but also data driven styling options like Reporting's conditional formatting and bindings. For further reading on the styling topic, consider the Beautiful Reporting whitepaper. 

Telerik Reporting

Telerik Reporting is an embedded reporting solution that can be easily embedded in your application. For more information see: http://www.telerik.com/reporting.

Progress Telerik Report Sever

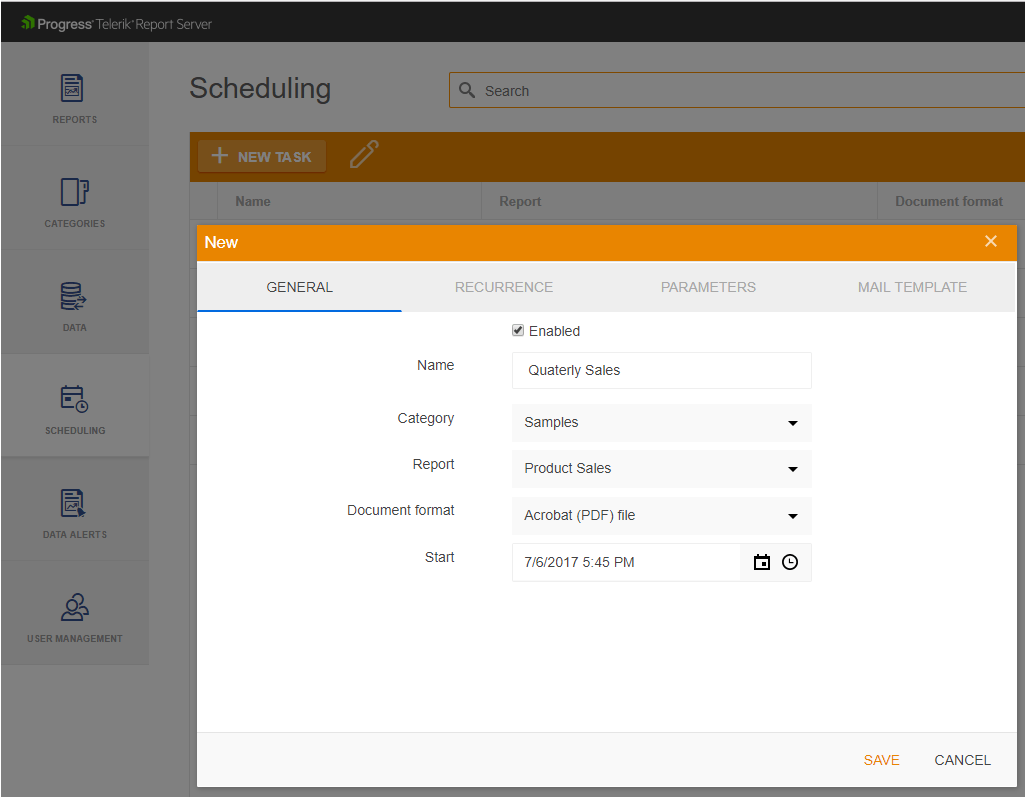
Telerik Report Sever - Progress Telerik Reporting

Managing a vast collection of reports may be challenging, and therefore we have introduced the Telerik Report Server solution to efficiently store, create and analyze reports in a single server-side repository. Report Server leverages the feature-rich Telerik Reporting engine and supports all must have report server features like scheduling, data alerts, versioning, report caching, authentication with AD FS support, ready to use report server web portal with enabled white labeling and complete REST API for integration with your desktop and web applications. For more information on the report server solution see: http://www.telerik.com/report-server

Try for Free Today

Are you excited to utilize the best reports for your apps? Start a free trial of Reporting and Report Server today.

How to Migrate from StyleManager to Implicit Styles

$
0
0

Оur customers definitely love the whole look and feel of their enterprise business applications, using our ready-to-use built-in themes for both WPF and Silverlight platforms.

The purpose of this blog post is to describe how you can easily migrate your existing projects from using StyleManager to using the Implicit Styles theming mechanism in a few easy steps.

Why Implicit Styles?

To display a Silverlight or WPF component, you need to apply a default ControlTemplate for it. Therefore, all our components come with a default set of styles and ControlTemplates. The assemblies (located in the [install dir]\Binaries folder) that come with the suite include the implementation of the components along with these default styles. However, as our assemblies contain multiple components, they also contain all relevant styles for these components for all themes which makes the assembly size larger. Since some of our users use only a few controls in their applications with a single or several themes, we decided to give them the option to choose which style resources they want to include in their projects.

For the purpose, we have created NoXaml assemblies which do not include any XAML code - no default styles, brushes or ControlTemplates. Consequently, these assemblies do not specify a default ControlTemplate for the components, hence the RadControls have no default visualization and there is nothing displayed runtime or design-time.

To have a visual representation of a control with NoXAML binaries you would have to manually add a style with a ControlTemplate for the RadControls you are using in your application. We have provided several different options for that:

  1. Use the theme assembly of the desired theme, which can be found in the [install dir]\Binaries.NoXaml folder (Telerik.Windows.Themes.Office2016.dll, Telerik.Windows.Themes.Material.dll, etc.)
  2. Use the resource dictionaries by assembly name from the Themes.Implicit folder:
    …/Themes.Implicit/<platform>/Windows8/Themes/Telerik.Windows.Controls.Navigation.xaml.
  3. Use the design time theme change option introduced with R2 2016.

If you go with the first option, you will include all RadControls styles for the chosen theme in your solution through the theme assembly. It contains ResourceDictionaries from which you will also have to merge the ones you need in the resources of your window or application.

If you choose the second option, you should create a Themes folder in your project and copy the corresponding XAML files from .../Themes.Implicit/../Windows8/../Themes/ folder to your project’s folder. Then you need to merge these ResourceDictionaries in the App.xaml file. This also allows you to further edit the ResourceDictionaries and remove any styles and resources that you would not need thus further reducing the size of your application.

As for the third option, when you refer the NoXAML assemblies in your project and add a control in XAML, in the designer window there should appear a theme selection button, which opens a window with the available themes. After that the configurator will add the chosen theme’s assembly and merge the needed ResourceDictionaries in your application resources (in App.xaml). You can find more information about this here. (http://docs.telerik.com/devtools/wpf/styling-and-appearance/how-to/styling-apperance-switching-themes-design-time )

To summarize all this—StyleManager uses a set of standard binaries, which contain XAML mark-up for all controls and themes included separately in each assembly. Implicit styles rely on a set of NoXAML binaries, which do not contain any mark-up within the control assembly. Each of the themes is isolated either in separate assembly or in a direct XAML file reference. Since the implicit styling approach is the most natural way of theming, we strongly encourage our clients to use it. We will not get in details about the other great advantages it has compared to StyleManager, but one significant advantage is that it is much easier to create custom theme with it and themes are easily changed at runtime. If you want to read more about the pros and cons of these approaches, you may take a look at the following blog post "XAML Theming – Implicit Styles versus StyleManager" .

How to Migrate?

Our customers often ask how to migrate their existing projects from StyleManager to Implicit Styles. Here I will explain how to easily migrate existing projects in just a few steps. Let’s say that you already have RadGridView control styled with our Windows8 theme, being set either as instance-specific built-in theme or as an application specific theme.

1. Remove all RadGridView related assemblies from your project.

  • Telerik.Windows.Controls.dll
  • Telerik.Windows.Data.dll
  • Telerik.Windows.Controls.Input.dll
  • Telerik.Windows.Controls.GridView.dll

*For Silverlight you should also remove theme reference to Telerik.Windows.Themes.Windows8 assembly

2. Remove any existing StyleManager related settings from your project:

telerik: StyleManager.Theme=”Windows8”
StyleManager.SetTheme (gridViewInstance, new Windows8Theme ());
StyleManager.ApplicationTheme = new Windows8Theme ();

3. Add references to the following Telerik UI for WPF NoXAML assemblies.

They are usually located in NoXAML folder with the following path C:\Program Files (x86)\Telerik\UI for WPF[version]\Binaries.NoXaml *

Path for XAML binaries in .NET 4.5 environment
how-to-migrate-stylemanager-to-implicit-styles001

Path for NoXAML binaries in .NET 4.5 environment
how-to-migrate-stylemanager-to-implicit-styles002

*Respectively for Silverlight the NoXAML binaries are located in C:\Program Files (x86)\Telerik\UI for Silverlight[version]\Binaries.NoXaml) .

  • Telerik.Windows.Controls.dll
  • Telerik.Windows.Data.dll
  • Telerik.Windows.Controls.Input.dll
  • Telerik.Windows.Controls.GridView.dll
  • Telerik.Windows.Themes.Windows8.dll

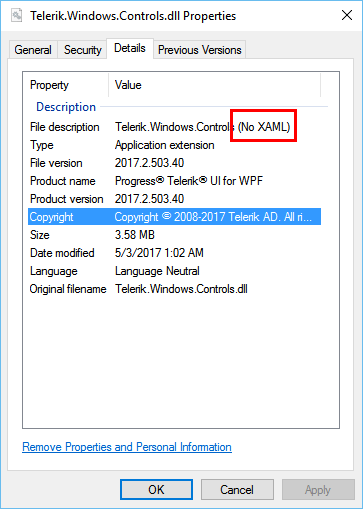
You can easily check if you are using NoXAML binaries from the Details Info Tab of the corresponding assembly:
how-to-migrate-stylemanager-to-implicit-styles003

4. Merge needed .xaml files for RadGridView in your application’s global resources (App.xaml):

<Application.Resources>
<ResourceDictionary>
<ResourceDictionary.MergedDictionaries>
<ResourceDictionarySource="/Telerik.Windows.Themes.Windows8;component/Themes/System.Windows.xaml"/>
<ResourceDictionarySource="/Telerik.Windows.Themes.Windows8;component/Themes/Telerik.Windows.Controls.xaml"/>
<ResourceDictionarySource="/Telerik.Windows.Themes.Windows8;component/Themes/Telerik.Windows.Controls.Input.xaml"/>
<ResourceDictionarySource="/Telerik.Windows.Themes.Windows8;component/Themes/Telerik.Windows.Controls.GridView.xaml"/>
</ResourceDictionary.MergedDictionaries>
</ResourceDictionary>
</Application.Resources>

Please note that the order of merging the resources matters.

You can find more info on this in our online documentation by following this link.

5. (optional) Add a BasedOn reference in any custom style you have in your application. The general convention for the naming of the styles that we provide is <control>Style – e.g. RadGridViewStyle, RadTabControlStyle. This is necessary if you have a custom style where you have changed only a few properties and rely on the others (such as ControlTemplate, borders etc.) to be “inherited” from the default style for the controls.

6. Build and run the project.

Give it a Try

As you will see there are no custom styles or templates applied to the RadGridView as we don’t want to complicate the desired scenario. Feel free to modify the provided sample project as you wish and don’t hesitate to contact us with any feedback that you might have. Happy coding!

Try the Sample Project

[Editor’s Note: This blog post originally appeared in September 2014. It has since been updated for accuracy and comprehensiveness.]

Meet Scott Addie, Developer Expert for Kendo UI and UI for ASP.NET

$
0
0

This post is part of a series featuring our Developer Experts—community members who represent the best of our products. Feel free to read about our other featured experts and meet more DEs.

Scott Addie, a developer expert for Kendo UI and UI for ASP.NET, is our latest interviewee. An evangelist at Microsoft for Azure, Scott discusses writing great docs and remaining passionate about Open Source in a world where ever new JavaScript libraries rain down...

scott_addie
Scott Addie

What is your background, professionally?

I've been doing .NET development professionally since 2005. Nearly a decade of that experience came from working in the financial services and insurance industries. I also spent some time in leisure travel, building booking engines for hoteliers, airlines, and tour operators. Web technologies have been my focus and are my passion.

Where are you based and why?

Madison, Wisconsin is the place I call home. I relocated from Milwaukee in 2007 for a job change and slowly warmed up to the city. The cleanliness and affordability of the city are appealing, my family lives in the area, and the tech scene is impressive for a city of its size. Most importantly, my kids are comfortable here.

With whom are you working?

In June, I accepted a job at Microsoft as a member of the Azure Platform Evangelism Experiences (APEX) team's content development division. I consider myself very fortunate to be working with some industry giants who've helped shape my career.

What projects are you working on now?

My primary responsibility is producing content for ASP.NET Core on the docs.microsoft.com platform. At the moment, I'm focused on writing docs for the next major release of ASP.NET Core.

What’s the most interesting project you’ve done recently?

I recently added Yarn support to Mads Kristensen's popular NPM Task Runner extension for Visual Studio. The contribution was significant because it brings Yarn a step closer to being a first-class citizen in the IDE. A few months after completing the enhancement, several users reported an issue while using the extension with Yarn on Windows 7. Days of troubleshooting led me to a defect in Yarn. Accessing "process.stdin" in a win32 headless process like Visual Studio resulted in an exception. The Angular CLI suffered from the same bug, and that community fixed it just days before I adapted a similar solution to Yarn. It was this project that reminded me of what a beautiful thing open source software really is.

Which of our products do you use and why?

Kendo UI and UI for ASP.NET Core are the two products I use. As someone who's admittedly not a web designer, these tools aid in building rich user experiences which look and function well across virtually all form factors. The data management and visualization widgets offered in these products have saved me a significant amount of time throughout the years.

What are some challenges you are encountering now in your work?

The biggest challenge is writing docs that developers of varying backgrounds will find useful. I have the pleasure of working closely with the product units to understand the bits being produced for ASP.NET Core and related technologies. I'm expected to digest the concepts and determine what's salient to the target audience for completing a specific task.

From your experience, what’s the biggest software pain point that your partners/clients encounter?

Building anything for the web is a pain point. In a world where the sky rains JavaScript libraries and the tooling is constantly evolving, it's difficult to make informed decisions. The best you can do is move forward with what you know today. Along the way, you'll need to dodge distractions but also consider pivoting when some ground-breaking tech emerges.

Kendo UI DevChat: Export HTML and UI Widgets to PDF with JavaScript Recap

$
0
0

This week on our "Kendo UI DevChat" series on web development, we cover exporting HTML to PDF. If you missed it, check out the replay as we answer questions we couldn't get to live.

Continuing our popular Kendo UI DevChat webinar series, this week we took a look at a very popular framework feature of Kendo UI: Exporting HTML to PDF. During the webinar we covered how to export generic HTML, advanced UI widgets (like the ones found in Kendo UI), exporting the Kendo UI Grid and its full contents to PDF, and how to customize these PDF documents through various configuration options. This focused mainly on code written with jQuery, but we also took a look at how the core framework can be accessed within Angular.

Webinar Recording

If you were unable to join me for the live webinar (or maybe you just want to re-watch it since it was so great!) we have published the recording on our YouTube channel.

This time around there is no sample GitHub project as the demos were fairly simple, but I do want to highlight our PDF Export live demo (which covers exporting to PDF, Image, and SVG), our demo of exporting Grid content to PDF, and the PDF drawing documentation section.

Questions and Answers

As always there were a lot of good questions coming from the crowd during the dedicated Q&A section of the webinar, and while I answered quite a few during the webinar, I also wanted to answer them in this blog post since it's easier to have on hand!

Will the styling/CSS you use with your HTML be displayed correctly in the exported PDF?
Yes indeed! We take the HTML elements and their applied styles into account when creating the HTML that is being exported. We try to make it as faithful as possible to your current state of HTML.

Can you export your own HTML using Kendo UI?
Yes, you can definitely export your own HTML! I took a bit of HTML that is generic to showcase how it can be done without being Kendo UI specific, but this can go beyond simple HTML elements.

Can you exclude HTML elements from the drawing area?
This is an interesting question, but right now there is no automatic way to take child elements within the overall HTML element you're passing and exclude them from the export.

What you could get away with is applying some "display: none;" styles throughout your document during the export phase (before you call drawDOM) and then use the promises (.done() is a good time to do this) to revert these styles again.
Are Chinese characters also supported?
Yes! This falls under the ability to use custom fonts in the PDF document that you're exporting, and this documentation section covers how you can include these fonts.

How about unicode characters?
Unicode characters are also supported but they are dependent on including the fonts they are a part of of like mentioned above.

What is needed for the proxy server used with proxyURL
There is nothing Kendo UI specific that we do with the proxy and it is not tied to a specific server-side technology. You can add this proxy as an end point to your existing REST API if desired. All that is needed is to accept three parameters coming from Kendo UI (contentType, base64, and fileName). Then the proxy should return the decoded file with the "Content-Disposition" header set. More information on what is needed in this implementation can be found under the saveAs documentation section.

Is RTL text supported?
During the webinar I mentioned that this should be possible, however I was mistaken—sorry for misleading anyone about this! Currently RTL is not supported in the PDF exportation feature of Kendo UI. If you'd like to see this added in the future please vote and comment on this feedback portal item.

What was the configuration of the Grid to export all of its data?
All the code was taken from this Export to PDF demo from the Kendo UI Grid demos.

Is it just toolbar: ["pdf"]? Is more code needed?
Honestly it's just as easy as setting the toolbar configuration option and including "pdf" in there. If you want more control over the resulting document you can use the "pdf" configuration option as well, like in the demo linked in the previous question.

Let's say I need to export page no 12, how can I do that?
You would have to programmatically go to the desired page of the Grid by using the underlying DataSource object's page method. Once that has been done you can export the rendered Grid page!

How does Kendo UI deal with a Grid having too many columns to fit in the pdf width wise?
We follow whatever is provided on the page currently. So, if no specific changes are made ahead of time and if no templates are used then whatever is currently displayed on the Grid (and however it is displayed) will be exported.

One could define a template like we do in our Grid PDF Export demo and help make things a bit more customized through CSS to ensure that everything fits nicely.

Beyond that you could also show and hide columns of the Grid to only export the most important columns of the Grid.

Does Kendo UI provide any headless browser, so that the UI can be exported to PDF in scheduled scenarios
While the export to PDF feature does not require one of our UI components, just the framework feature itself, we do not have anything specific around scheduling to help in this scenario. You would have to trigger this JavaScript code in some way to export the content currently displayed in the web page.

Can you generate PDF files on the server side with Kendo/Telerik?
Yes you can! This uses RadPdfProcessing which is available within all of our .NET UI product suites. Here, for example, is a demo that showcases the integration with UI for ASP.NET AJAX. One would need to have this .NET assembly included as a reference on the server in order to export PDF on the server-side—even with Kendo UI on the front end!

Is it possible to have grouping server side export for Excel using for large data sets?
This would be done through RadSpreadProcessing, the Excel-equivalent of the PdfProcessing library. It is certainly possible, but when it comes to large data sets one has to consider memory on the server-side as well. Nonetheless, offloading this to the server is a great way to deal with large data sets!

If you want a quick introduction, this first blog post in a series can help give you insight in to RadSpreadProcessing.

Is it compatible with Angular 4?
Yes! Later in the webinar I showcase how Angular (2+) is supported as well.

Is there a way to just have a single header and footer for the entire document, not on each page?
Currently the template functionality that we showcased is on a page-by-page basis. If you'd like to export a single header and footer on a document (header on the first page, footer on the last page) this is currently not something that is supported. Feel free to submit this as feedback for future iterations of the framework!

Are there limitations around size of exporting to PDF?
One has to keep in mind that all of this is being done on the client and the proxyURL isn't a offloading of the PDF generation to the server - it's just there to start the automatic download of the PDF file in browsers that do not support the File API. Due to this the limitations around exporting mainly comes from the browser being used and how well it can handle all of this JavaScript in memory. If you are running in to specific performance issues I recommend submitting your specific scenario in a support ticket for help from our support team!

Cooking with ASP.NET Core and Angular

$
0
0

In this guide, learn how to create an ASP.NET Core application using Kendo UI for Angular from scratch.

Using cutting edge technology means overcoming that initial learning curve. Many times, we would like to just jump in and get started without starting from scratch. But as we all know the best meals are the ones that are well prepared, and rushing into things too quickly ends up making someone sick or leaving an entire meal in the trash.

In this article, we'll find a happy medium—we'll look at how to get started with Angular using ASP.NET Core by following a simple recipe with clearly defined ingredients. We'll start by walking through all of the ingredients necessary to make a successful project. Next we'll follow the recipe, learning where each ingredient fits. Finally, the application will be fully baked and ready to serve with all of its cutting edge goodness.

The Ingredients

Prepping the ingredients is the most important part of any recipe. Let's look at what we'll need to be successful and why each item is important to our project.

ASP.NET Core

ASP.NET Core 1.1 is a next generation architecture for building scale-able .NET web applications that run on any platform. Web API was consolidated with MVC in ASP.NET Core, making it a great platform to host endpoints for our application's data.

ASP.NET Core will act as the server component for the application. The responsibility of ASP.NET Core is to power core business logic, interact with a database and provide application services like: email, authentication, and SMS to name a few.

Node Package Manager (npm)

Many of the ingredients for this application will come from the JavaScript community. The dependencies needed for frontend development are all easily managed through npm either from the Command Line Interface (CLI) or from within Visual Studio.

Angular, TypeScript & Webpack

ASP.NET Core is capable of generating HTML for the client-side of the application on its own, but with the addition of Angular we can do so much more. Angular allows us to build rich interactive client-side applications using a component based architecture.

Using Angular requires some additional tooling since it relies heavily on TypeScript. To support Angular, we'll be using Webpack to compile TypeScript, as well as to bundle and minify static resources.

dotnet CLI

Typically one would expect to use Visual Studio's File > New project template to begin a new project. However, because of the cross platform nature of ASP.NET Core development we'll be using the dotnet CLI, a command line tool used to generate .NET project templates. Since the command line is ubiquitous, it suits ASP.NET Core development because it can be used anywhere.

Kendo UI for Angular

Like any great chef would tell you, presentation matters. We'll use Kendo UI for Angular to finish out the look of the application. With beautiful UI controls, Kendo UI for Angular delivers high performance Angular UI components without any jQuery dependencies.

Prep Work

Let's begin by putting all of our ingredients in place. Some quick prep work can make sure that we stay clear of any hangups. This is critical, as the last thing you want to do is waste hours of precious time troubleshooting problems that have already been addressed by using newer versions.

Before beginning your next project, make sure the following tools are installed and you're running the latest bits. You can find everything you'll need below:

The Recipe

We'll start by installing the Microsoft ASP.NET Core JavaScript Services. JavaScript Services is a set of technologies for ASP.NET Core developers built by the ASP.NET team. It provides infrastructure that you'll find useful if you use Angular/React/Knockout/etc. on the client, if you build your client-side resources using Webpack, or if you otherwise want to execute JavaScript on the server at runtime. We'll be using a JavaScript Services project template installed by the dotnet CLI. The template will take care of the Angular, TypeScript and Webpack dependencies for us.

From the command line install the JavaScript Services templates:

dotnet new --install Microsoft.AspNetCore.SpaTemplates::*

JavaScript Services Templates

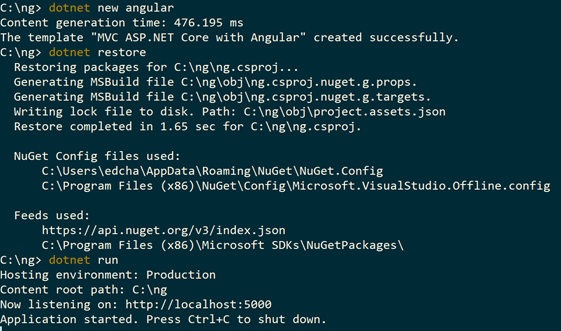
Next, run the dotnet new angular command—using the angular parameter will specify the Angular template. The template will create a fully functioning starting point for your new application. Once the template has run, the dependencies will need to be restored by running dotnet restore. Once the dependencies are restored you can start up your new ASP.NET Core Single Page from within Visual Studio, or from the command line by calling dotnet run.

using dotnet cli

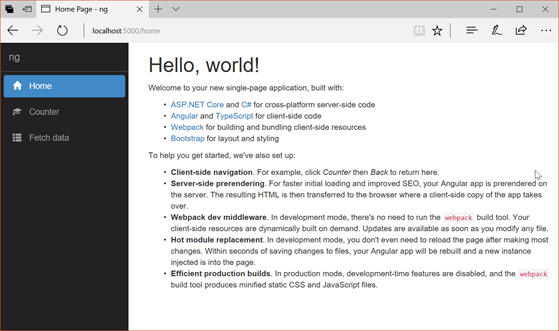
Navigating to the app in our browser shows us the template in action.

our template

The Template

The JavaScript services template is pre-configured with Angular, TypeScript and Webpack. The application back-end is powered by ASP.NET Core, with Angular taking almost all responsibilities for the client-side. You'll notice very little in the way of Views or .cshtml.

The client-side application source files are found in the ClientApp directory. Each folder under ClientApp contains the parts to a single component, a template (.html), component logic written in TypeScript (.ts), and optionally component styles (.css). These files will be compiled by Webpack prior to run-time. Webpack configuration files are included in the template. These configuration files define compilation, bundling and deployment to wwwroot.

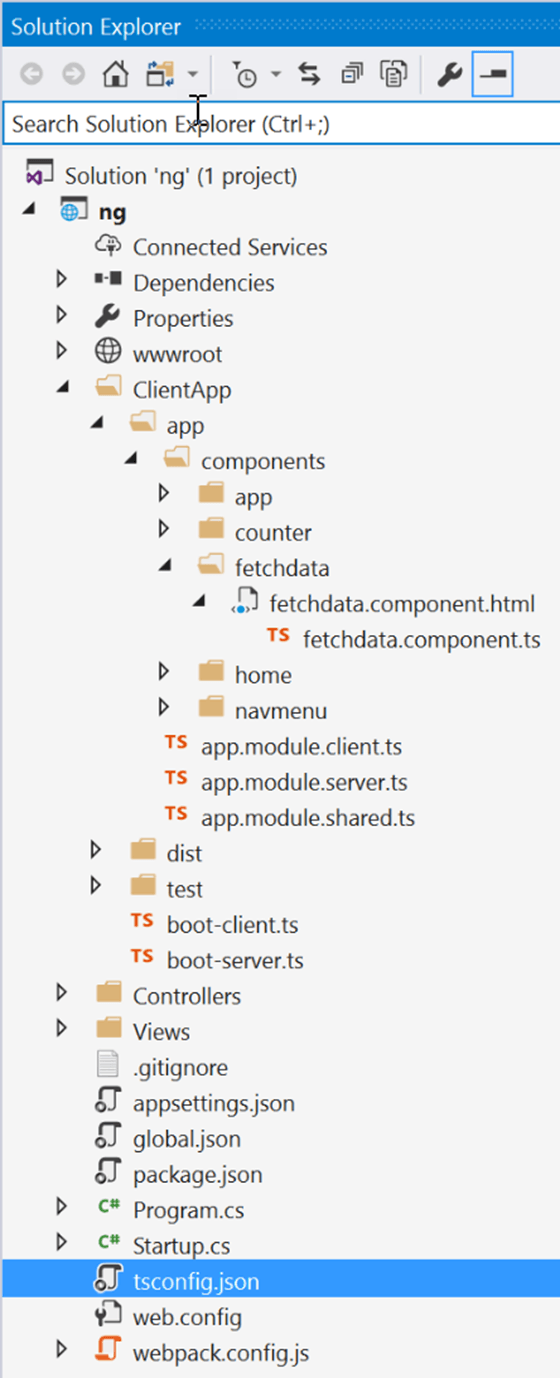
Solution Explorer

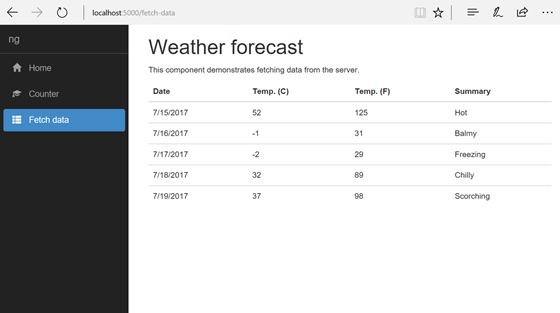
In ClientApp a few sample components demonstrate how to use Angular. The counter is a component that shows how to wire up a button that increments a counter. Also included is a fetch-data component, this component shows how to consume data from an API endpoint.

Fetch data

Time to Bake

With the project scaffolding ready let's modify some components. Working with components will get us familiar with the app's structure and work-flow of the tooling. We'll add robust UI components using Kendo UI for Angular to the existing app components.

First, Kendo UI works best with the latest version of Angular, so let's update our Angular references:

npm install --save @angular/animations@latest @angular/common@latest @angular/compiler@latest @angular/core@latest @angular/forms@latest @angular/http @angular/platform-browser@latest @angular/platform-browser-dynamic@latest @angular/platform-server@latest @angular/router@latest

Next, we'll add the Kendo UI dependencies to the project. Kendo UI for Angular is packaged and distributed as a set of discrete, scoped npm packages, which are available from npm.

It's time to add Kendo UI components to the project. We'll add the Kendo UI Button and Grid components from the command line using npm.

npm install --save @progress/kendo-angular-buttons @progress/kendo-angular-l10n @angular/animations

npm install --save @progress/kendo-angular-grid @progress/kendo-angular-dropdowns @progress/kendo-angular-inputs @progress/kendo-angular-dateinputs @progress/kendo-data-query @progress/kendo-angular-intl @progress/kendo-angular-l10n @progress/kendo-drawing @progress/kendo-angular-excel-export @angular/animations

Next we'll import the component directives into our source code. Because Kendo UI for Angular uses Ahead-of-Time Compilation (AoT), we'll declare the modules in the app's shared module. Open ClientApp/App/app.module.shared.ts and add the following declarations:

...;
import { ButtonsModule } from '@progress/kendo-angular-buttons';
import { GridModule } from '@progress/kendo-angular-grid';
 
imports: [     
     ButtonsModule,
     GridModule, ...,

Kendo UI just wouldn't be complete without some nice styling. Let's add the default Kendo UI theme to our project via npm.

npm install -S @progress/kendo-theme-default@2.38.1

The npm package deploys to our node_modules folder, however we'll need the CSS file referenced in our project. To do this we'll add a reference in webpack.vendor.config.js to the CSS that our app requires. Webpack is pre-configured to bundle CSS files into a single vendor.css file which is output to the wwwroot folder for deployment.

entry: { vendor: [ ..., '@progress/kendo-theme-default/dist/all.css',

Once the reference is added, we'll need to run Webpack to rebuild vendor.css.

In package.json we'll add the Webpack command for rebuilding vendor dependencies for the application.

"scripts": {
  "test": "karma start ClientApp/test/karma.conf.js",
  "webpack:vendor": "webpack --config webpack.config.vendor.js",
  ...

To run the script from npm execute npm run webpack:vendor from the command line.

Now that Kendo UI for Angular is installed, let's replace a few components that are part of the samples. One of benefits of Kendo UI is that a single theme controls the style of all Kendo UI components, even simple controls like the button. Let's modify the sample to use a Kendo UI button.

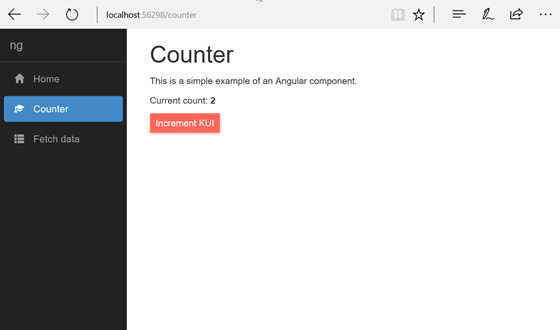
In ClientApp/app/components/counter/counter.component.html you'll find a button that increments a counter. Replace the standard button with a Kendo UI Button.

<buttonkendoButton (click)="incrementCounter()" [primary]="true">Increment KUI</button>

Counter with Kendo UI Button

Next, we'll modify the fetch-data sample by utilizing the Kendo UI grid. Since Kendo UI has robust data binding capabilities this will be an easy task. In ClientApp/app/components/fetchdata/fetchdata.component.html a table has been explicitly defined using Angular templates.

<tableclass='table'*ngIf="forecasts">
  <thead>
    <tr>
       <th>Date</th>
       <th>Temp. (C)</th>
       <th>Temp. (F)</th>
       <th>Summary</th>
    </tr>
  </thead>
  <tbody>
 
  <tr*ngFor="let forecast of forecasts">
    <td>{{ forecast.dateFormatted }}</td>
    <td>{{ forecast.temperatureC }}</td>
    <td>{{ forecast.temperatureF }}</td>
    <td>{{ forecast.summary }}</td>
  </tr>
  </tbody>
</table>

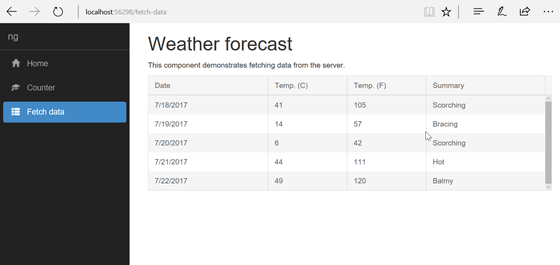
We can replace the entire template with a single kendo-grid component. At the absolute minimum we can bind the data property and the grid will generate the columns and headings.

<kendo-grid[data]="forecasts"></kendo-grid>

To further enhance the UI we can customize each column.

<kendo-grid[data]="forecasts">
  <kendo-grid-columnfield="dateFormatted"title="Date"></kendo-grid-column>
  <kendo-grid-columnfield="temperatureC"title="Temp. (C)"width="150"></kendo-grid-column>
  <kendo-grid-columnfield="temperatureF"title="Temp. (F)"width="150">
  </kendo-grid-column> <kendo-grid-columnfield="summary"title="Summary"></kendo-grid-column>
</kendo-grid>

Weather forecast Kendo UI Grid

Time To Serve

The ASP.NET Core JavaScript Services dotnet CLI template, combined with Kendo UI for Angular, provide a solid platform for dishing out modern web applications. Using the JavaScript Services generator makes short work of starting a new Angular project. It comes with everything needed for client and server side development and excellent samples to get you started. The growing library of Kendo UI for Angular components with world class features like data binding, internationalization and themes make a full course meal ready to serve. The completed starter project can be viewed on GitHub. Please remember this app requires the scoped Progress NPM registry to restore dependencies.

Editor's note: This post was originally published in November 2016, and has been updated for completeness and accuracy.


How a Reporting Solution Can Solve Your Business Needs

$
0
0

A reporting solution can provide key business intelligence for your business at a manageable cost, but there are many factors that go into choosing the right one.

There is little doubt that Business Intelligence (BI) is integral to the successful management of your business enterprise, whether large or small. In today’s fast paced and highly competitive environment, an in-depth understanding of the state of the business can be crucial to your company’s ability not only to survive, but also to thrive.

BI provides the capability for viewing and monitoring key indicators, as well as to forecast significant events that can impact your business. It also allows your management team to crystalize business trends and to make informed decisions and implement strategies to adapt quickly to internal or external forces.

A full-featured Business Intelligence platform can be extremely costly and complex to integrate, requiring extensive hardware and IT resources to set up and maintain, as well as a steep learning curve for administrators and end users. A more economical and flexible alternative may be to make use of a Line of Business (LOB) Reporting Solution that can be more easily integrated into existing applications and processes. The solution should provide flexible report authoring and viewing, as well as print and export options to enable report sharing.

Here are 10 Key Considerations for effectively choosing a Line of Business (LOB) Reporting Solution for your business needs.

  1. Flexibility

    Being able to easily and quickly embed reporting functionality into existing line-of-business desktop or web applications without having to undergo a major restructuring of the application provides huge savings. It avoids the need to provision additional hardware and allows in-house developers, already familiar with the application, to add the reporting functionality.

  2. Economical Licensing Model

    A licensing model that is purely developer-centric and which avoids runtime fees based on report creation, viewing and usage will help in budgeting the cost of adding reporting functionality in existing applications. You should be able to limit licensing requirements to the developers working specifically on implementing reporting functionality in the apps, and to reassign existing, or add new ones when staffing changes are needed. In this way, the licensing costs can scale as reporting requirements and application usage grows.

  3. Extensive Data Binding Capabilities

    In the complex business environment, data that feeds reports often originates from a myriad of sources: Relational or NoSQL databases, Business Objects, OLAP cubes or Web Services. Reports often need to merge data from one or more of these sources. Connections need to be easy to implement and carefully secured to insure the safety of proprietary data.  

  4. Easy Report Authoring

    Empowering business users to create and analyze ad hoc reports without having to jump through hoops to secure costly licensing or to rely on developer assistance provides crucial time and cost savings. The designer should be easily accessible, intuitive, and require minimal training. It should be easily configured with secure access to line-of-business data and have options for publishing and sharing the reports.

  5. “Feature-Rich” Reports

    Management expects reports that crystallize business results and trends and that allow them to understand the underlying causes and circumstances. This often requires carefully formatted and highly stylized reports that present rich graphics with dashboard-like displays, and which support interactive features such as filtering, sorting and drill down and drill through actions to supporting data in linked reports. The ability to embed sub-reports is a must-have, while the option to combine a collection of reports within a single report book delivery is certainly a big plus.

  6. Embedded Report Access

    Being able to embed reports within your line-of-business desktop applications, as well as within your websites is a must. Reports need to be easily accessible by end users from whatever device they use to access your application. Field staff, remote workers and commuters often employ a tablet or a smartphone to access data. Having the ability to access and interact with reports from within a responsive viewer is crucial. This minimizes scrolling requirements and maximizes the report viewing area based on screen size.

  7. Extensive Export Options and Faithful Printing

    Reports should support export to all widely-used formats, and especially to Excel, PDF, and Word. When designing reports, you must have tooling to ensure that, when printed or exported, they render exactly as formatted. Layout, paging and print options need to be definable and faithfully preserved in the output.

  8. Optimal Performance

    Generating large and complex reports that contain rich graphics can be resource intensive. It is crucial to have a highly-optimized report engine that can build the report on the server with minimal memory and processor usage. A reporting solution that provides caching support for commonly requested reports can help to minimize server resources and expedite loading time.

  9. Accessibility Compliance

    Every user, regardless of physical, sensory and cognitive disabilities, constraints and/or technological barriers should be able to access and interact with reports. This is becoming a mandate for many financial and healthcare concerns, in addition to the longer standing requirements for governmental departments.

  10. Report Management Framework Options

If you have an existing framework that handles user authentication and manages report availability and distribution options, you should be able to seamlessly integrate reporting within. But, if not, you should have the option to employ a “turnkey” end-to-end report management solution. This report server should be able to act as a secure repository for reports, and should provide role-based access to features such as report authoring and editing, viewing, and scheduling reports for delivery to a subscriber base.

Looking for a Reporting Solution?

If your desktop or web application is running in a .NET environment, you should certainly consider Progress Telerik Reporting and Progress Telerik Report Server.

Reporting is a mature and robust reporting solution that is flexible and performant, offering an economical per-developer based licensing with no end-user costs. Your in-house developers can quickly integrate reports in responsive HTML5 and .NET web apps (ASP.NET, MVC, Core), Azure, WPF and WinForms desktop apps. It offers a complete feature set for report creation, styling and interactivity. You can export the reports in more than 20 formats, including Word, Excel, PDF, PPT, image, CSV and more. And, the powerful, yet intuitive desktop and Visual Studio integrated designers, insure “pixel-perfect” printing and rendering.

Date Items - Progress Telerik Reporting


With Reporting you get sophisticated features like conditional formatting, report books with table of contents, custom interactivity actions, PDF security, events in all viewers, great report rendering, private fonts, continuous form paper printing and more. Plus, the featured HTML5 Report Viewer is both fully responsive and accessibility compliant.

Report Server can be used alone or in association with Reporting to provide an end-to-end report management solution.Report Server provides a full framework for enabling in-house developers and/or business users to create, publish, version and manage access to Telerik Reports. Its extensive and highly configurable security features control authentication to the server, and fine-tuned role-based permissions limit access to features such as data source implementation, report creation and sharing.

The intuitive Integrated Report Designer is feature-rich, allowing for richly styled, template-based and ad-hoc report creation, editing and publishing. The report scheduling and “Smart” data alerts features enable immediate and timely access to reports that can help to crystalize data insights needed by Enterprise officers and managers to make informed decisions and implement strategies to insure the Enterprise’s success.

Get your fully functional free 30-days trial of Reporting now. Enjoy! 

8 Questions to Ask about 3rd Party Software

$
0
0

Free and open source software can be a convenient and inexpensive way to add functionality and reduce development time, but only if you make right choices.

Without the reuse of blocks of existing design components, or “IP” (Intellectual Property), we would constantly be reinventing the wheel. On each new design project we’d have to start from scratch and design the entire system from the ground up. Using existing components lets us build added value with new functionality, while re-using the components that we have designed before.

Every design field does this, whether it’s a mechanical design for a new engine that reuses an existing turbine assembly, or an electrical hardware design that reuses an existing USB interface, or a software design that reuses a module that handles encryption. Productivity is enhanced, designs are advanced, and everyone wins.

But it's important to make this choice carefully, because if you make the wrong choices it can have the exact opposite effect. There are a number of important factors to take into account when considering the use of someone else’s design component.

1) Will it actually help?

One of the first considerations is to explore whether the function you’re looking to add actually helps differentiate your product. This might mean creating that component yourself and adding in features that no one else has, or it might just mean using the best available 3rd party component you can find. In some cases it might not be possible to create a better component than what is currently available, and in others it might not be worth the effort because that component is not part of your core functionality. Think carefully about what parts of your product makes sense to design yourself, and what parts are best outsourced.

2) Where does it come from?

The next consideration is the source of any 3rd party components. In the software world, probably more than any other design discipline, there are a lot of options available. In addition to actual open source, there are many alternatives that are provided free of charge, even if the source code is not actually available. Free is obviously good from a budget perspective, but you need to consider the actual cost of a component that might require customization, or work-arounds, or support and bug fixes. In any case, not all the components you might want will be available for free.

One key aspect to consider when looking at open source components is what organization is behind it? A component driven by a handful of individual users may be very different than something driven by a company (like Angular backed by Google) or well established development project (like jQuery backed by the JS Foundation).

3) Does the license meet your needs?

Once you have decided to use an existing component, one key aspect to consider is exactly what type of license it comes with. There are licenses like the Apache 2 license, used by the Android operating system, that allows you to use a component in your product and still charge money for your product.   The MIT License, used by jQuery and Ruby on Rails, is similar but requires a copyright notice to be included in the end product. The GNU General Public License (GPL), used by the popular GNU operating system and other projects, is based on the idea of a “copyleft”, which means that all derivative work must also adhere to the same licensing rules.

There are licenses that allow for educational use, personal use, non-commercial use... and even with regular paid licenses there are composed of royalty and non-royalty licensing (do you need to pay a royalty on each copy of your product sold?). Another important part of the licensing discussion is the existence of any patents that might impact your ability to use the component.

The point is that you have to be very careful when you look at any component source to make sure that the license lines up with your intended use. You’d be surprised how many times this gets overlooked, especially in start-ups and smaller companies.

4) How much risk can you afford?

Another key consideration is the level of quality you require for your application. Obviously we would all like perfect quality in everything, but quality usually comes with a cost, and higher levels of quality are not always required. If you are working on a classroom project, or a website for your son’s Boy Scout troop, you can afford to take on a little risk. If there is a problem with your application in situations like those, the impact is minor.

If, however, you are creating an application that people will use to access their financial information or control a nuclear power plant, you will have very little tolerance for risk and will need to make sure the components are high quality. This is one area where software has an upper hand on physical designs like integrated circuits or mechanical parts. Software designs can usually be updated easily and quickly if needed, although significant damage can still occur before the bug is found and fixed.

5) How do you judge the quality?

Unfortunately, there is no golden bullet for determining quality. Instead you will want to examine some parameters: how long has the providing organization been in operation, how many people use the product, how extensive is their testing, what are the perceptions from the other users, etc.

If you purchase a component from a company, then you have someone you can directly hold accountable for any quality issues, and whose actual job is to fix them. With an open source component you might be able to track down the contributor but whether or not they even acknowledge the issue let alone fix it is not a given.

6) Is there support?

The follow-on issue to quality is support. Support ranges from having someone to fix any problems that might arise to helping you use the components properly. Even if the component itself is perfect, it usually has to interface with a variety of other code. Those modules might change either in functionality or even in their interface, and then you might need to quickly fix your code to work with the new environment. Most of us have had experiences in the past where we have received an OS patch and suddenly had one or more programs, that worked fine until that point, develop bugs or stop working altogether. It is usually incumbent on the application provider, not the OS vendor, to make the fix.

7) What format do you need?

You will want to consider whether or not you have access to the original source code. With most interpreted languages (primarily client-side web languages like HTML and JavaScript) you can obfuscate the code but not actually compile it. Most other languages (C++, Java, etc.) can be compiled to protect the source code. If you have high confidence in the provider of the component, source code is neither required or even wanted in most cases. If you are using open source components, however, you might end up having to patch the component yourself and access to the source code can be important. You can compromise by having escrowed versions of the source code, but this extra overhead is usually more applicable to full applications and not individual components.

8) Does its roadmap match yours?

Finally, is your application a one-time creation, or will it grow with you? If it is going to be an ongoing product for your company or organization, you will probably want the source of your components to update and enhance their components as well. How much control will you have over their roadmap? How much insight? Do they even have a roadmap?

Open source components are often enhanced on an ongoing basis, but with less certainty. You can request that a new feature be added to an open source project, but you may have to develop it yourself.

These are all just a few of the considerations you need to think about when using design components from a third party. Making the wrong choice can decrease sales or even involve you in a lawsuit. Making the right choice can enhance your product, increase your product quality, and shorten your time-to-market.

Case study: Kendo UI

Let’s walk through an example evaluation of these eight points using Kendo UI, our platform for building beautiful and data-rich web applications.

Question

Answer

1) Will it actually help?

If you are building a web-based interface for your app, then most likely “yes”. Kendo UI components include some very advanced features that would have taken a substantial amount of time for a project to implement from scratch. You can obtain a free trial version for detailed evaluation.

2) Where does it come from?

Kendo UI is a commercial product developed by Progress, a large established software company.

3) Does the license meet your needs?

The Kendo UI license allows you to use the components in pretty much any way other than in a competing product.

4) How much risk can you afford?

There is minimal risk buying a well-resourced product from a large established software vendor like Progress.

5) How do you judge the quality?

Progress, and Kendo UI in particular, have a reputation as a provider of quality products. Kendo UI undergoes thorough regression testing before each release, and its users attest to the quality.

6) Is there support?

Progress provides support via live calls and online tickets. There is training and documentation available, and there are several forums including an active community on Stack Overflow.

7) What format do you need?

Kendo UI deploys as JavaScript source code that can technically be edited. However, for performance reasons, it has been minified which does also cause some level of obfuscation.

8) Does its roadmap match yours?

Progress is always working to add new features and support new technology, and has three major releases per year. There is a good chance that anything you need is either already available or on their roadmap. Users can submit feature requests and even vote on them.


A Long History of Supporting Developers

At Progress we have a strong track record of standing behind our products with world-class support for developers and continued innovation. Curious to try Kendo UI out for yourself with a free 30 day trial? You can learn more here.

Getting Started with Telerik UI for UWP

$
0
0

Looking to get started with Telerik UI for UWP? Take a deep dive into building apps with our free and open-source UI controls for Universal Windows Platform.

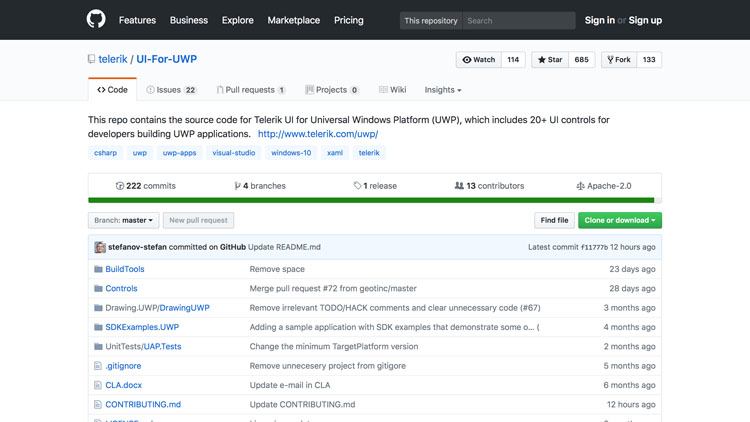
Have you heard of Telerik UI for UWP? It's a suite of UI controls for Universal Windows Platform (UWP). You can find the source code (Apache License v2.0) and the documentation on GitHub. What's more, we're now accepting pull requests and issues for bugs/feedback!

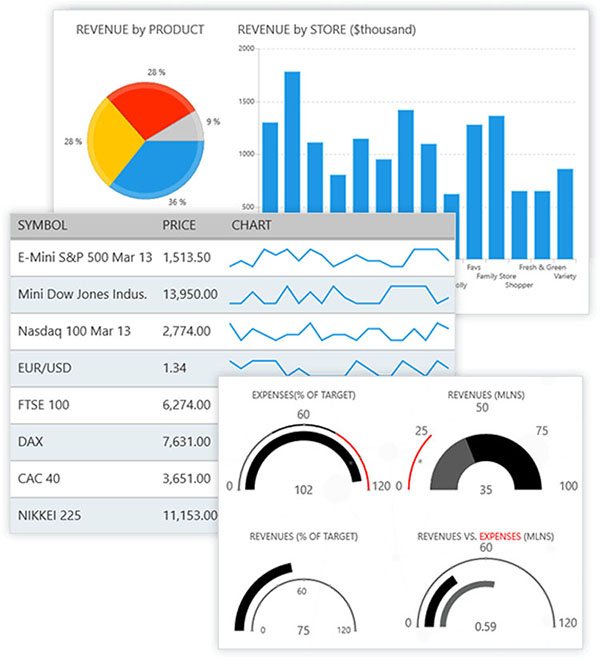
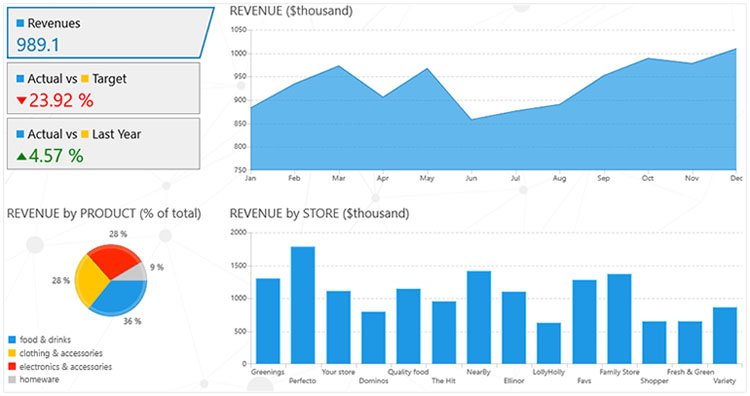
UI for UWP controls in action

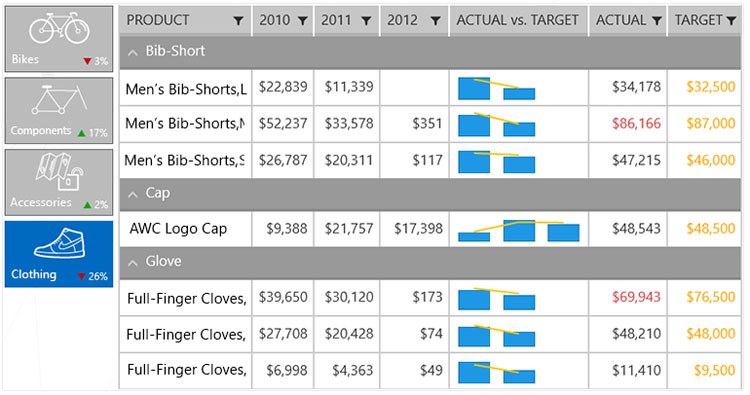
The suite contains controls that address common UI requirements in line-of-business (LOB) applications. These include data management (DataForm), scheduling (Calendar), navigation (RadialMenu), data visualization (Chart), and more. Actually, the list itself is rather long. Have a look:

Not bad, eh?

In this article, I'll walk you through the source code and show you how to build an application using the Grid and Chart controls as an example.

Understanding the Repository Structure

UI for UWP repository

The source code for Telerik UI for UWP is published on GitHub and is structured as follows:

  • BuildTools: contains scripts and configs for building Telerik UI for UWP as a local NuGet package
  • Controls: contains source files for Telerik UI for UWP
  • Drawing.UWP/DrawingUWP: Direct2D/C++ project used by the map component for rendering shapes
  • SDKExamples.UWP: contains over 190 examples of the Telerik UI for UWP control suite
  • UnitTests/UAP.Tests: contains unit tests for controls like the Chart and Grid

The repository has two solution files, UWPControls.sln and UWPMap.sln. These contain the source files of the control suite and map component. There's also a project file, SDKExamples.UWP.csproj that contains the SDK examples. I'd recommend walking through the XAML and C# source files. They contain many examples to help you understand how the controls operate.

Building from Source

Before you start getting your hands dirty with Telerik UI for UWP, it's important that you have the required software installed to build UWP applications. If you don't, Visual Studio will get angry and take the ball home (so-to-speak). Please note that both Visual Studio 2015 and Visual Studio 2017 are supported. That stated, I'd recommend using Visual Studio 2017 due to the recent improvements that have been added to the IDE. It's always best more fun on the latest and greatest anyway.

The easiest way to build the source of Telerik UI for UWP is to open the file, UWPControls.sln in Visual Studio and compile the solution from there. Under its default configuration, Visual Studio will restore the NuGet packages that are used by Telerik UI for UWP during this process. The same procedure should be followed for building the map component. This is located in the solution, UWPMap.sln. In both cases, assemblies (along with PDBs and compiled resource files) will be created in a folder labelled, Binaries after the build process completes.

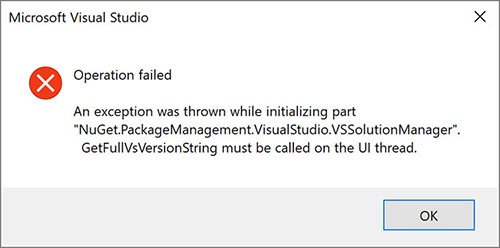
A Note on Building the Source Code

You may encounter an error when attempting to build the source with Visual Studio:

Build error NuGet UI for UWP

The following workaround will resolve this behaviour:

  1. Before opening a solution/project, open the NuGet Package Manager Settings
  2. Wait for the settings dialog to appear and click OK
  3. Open your solution/project and build it (NuGet will work until the next time Visual Studio is restarted)

Credit to Hrvoje Matić for discovering this workaround, which was posted to the NuGet issues list back in September 2016.

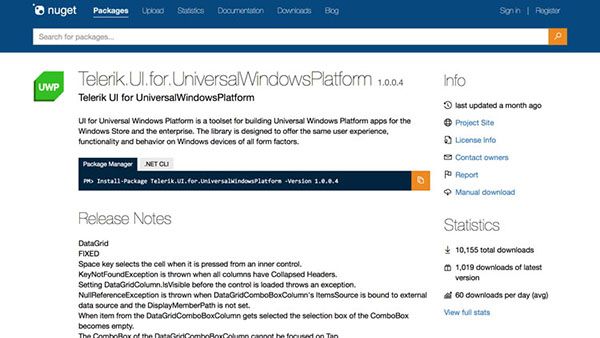
Using the Public NuGet Package

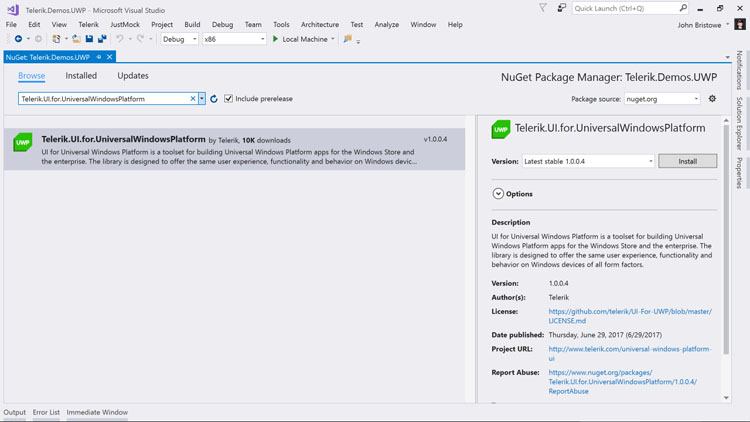
Telerik UI for UWP is available as a package on NuGet and can be incorporated into a new or existing product through Visual Studio:

Telerik UI for UWP on NuGet

You can add this package to a project through the Package Manager Console or the Solution Explorer:

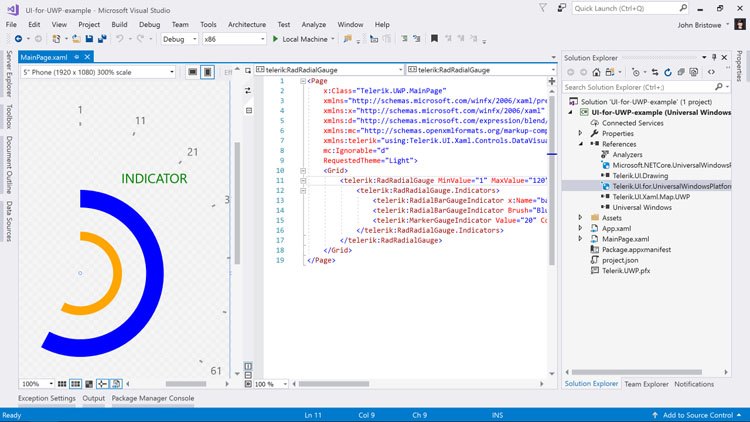
UI for UWP in Visual Studio

Once added, controls can be added and qualified in XAML pages through prefixes and namespaces. Here's an example using the RadialGauge control:

<Page xmlns:telerik="using:Telerik.UI.Xaml.Controls.DataVisualization">
  ...
  <telerik:RadRadialGauge>
    ...
  </telerik:RadRadialGauge>
</Page>

Adding Telerik UI for UWP to Visual Studio Toolbox

At the time of this writing, we don't have an installer to place the Telerik UI for UWP controls into the Visual Studio Toolbox. However, you can do this yourself by following these steps:

  1. Add the Telerik.UI.for.UniversalWindowsPlatform NuGet package to your application
  2. Open any XAML page and navigate to the Toolbox window of Visual Studio (Ctrl+Alt+X)
  3. Right-click in a blank area and select, "Add Tab"
  4. Specify the tab to something meaningful (i.e. "Telerik UI for UWP")
  5. Right-click in this tab and select, "Choose Items…"
  6. Click the Browse button in the Choose Toolbox Items dialog and navigate to the following folder on your machine: C:\Users\%USERNAME%\.nuget\packages\telerik.ui.for.universalwindowsplatform

Choose the folder name matching the version you have installed (i.e. 1.0.0.4), navigate to the lib\uap10.0 sub-folder and select the following files:

  • Telerik.UI.Xaml.Chart.UWP.dll
  • Telerik.UI.Xaml.Grid.UWP.dll
  • Telerik.UI.Xaml.Input.UWP.dll
  • Telerik.UI.Xaml.Primitives.UWP.dll
  • Telerik.UI.Xaml.Map.UWP.dll (located in the x86/x64 sub-folder)

Once added, these controls will be able in the Toolbox window of Visual Studio. This will allow you to drag & drag them onto the visual design surface of the XAML pages in your UWP application.

Let's Build an Application

Now, the fun begins: building an application that uses the Chart and Grid controls. These controls are well understood by developers so this is a good place to start.

Chart in UI for UWP

The Chart control is versatile charting component that you can use to visualize data in many different ways. Here, I'm going to build an application that uses it to represent a set of arbitrary data.

I'll start by creating a new UWP application in Visual Studio and add the Telerik UI for UWP NuGet package to the solution:

Getting started UWP-1

From here, I'll open up MainPage.xaml and add a RadCartesianChart element to the page:

<Page
  x:Class="Telerik.Demos.UWP.MainPage"
  xmlns="http://schemas.microsoft.com/winfx/2006/xaml/presentation"
  xmlns:x="http://schemas.microsoft.com/winfx/2006/xaml"
  xmlns:d="http://schemas.microsoft.com/expression/blend/2008"
  xmlns:mc="http://schemas.openxmlformats.org/markup-compatibility/2006"
  xmlns:telerik="using:Telerik.UI.Xaml.Controls.Chart"
  mc:Ignorable="d">
    <Grid Background="{ThemeResource ApplicationPageBackgroundThemeBrush}">
      <telerik:RadCartesianChart PaletteName="DefaultLight">
      </telerik:RadCartesianChart>
    </Grid>
</Page>

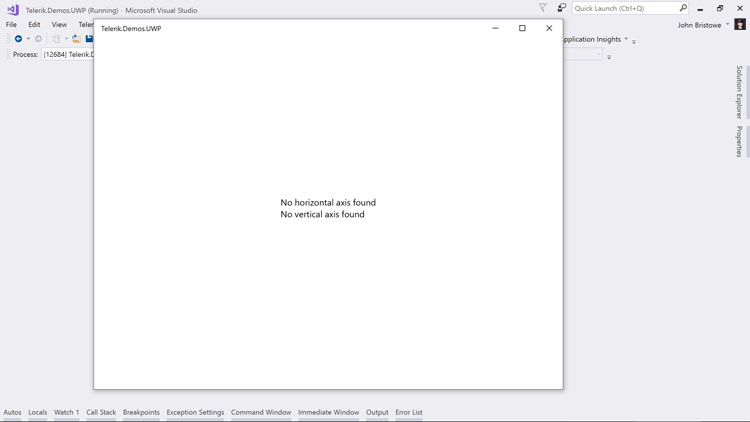
Running this application will display the chart with the following messages:

Getting started UWP-2

These messages are displayed by the Chart control if you don't define its horizontal and vertical axis. They are required (along with a series definition) to render the data that's associated with the chart at runtime.

The next task is to bind some underlying data and define the horizontal and vertical axis that will be used to display it. I'll define a model that will generate a collection of random values for Australian city names to which I can bind the chart:

public class City
{
  public string Name { get; set; }
  public double Value { get; set; }
}

public class CityManager
{
  private static Random random = new Random();
  private static string[] cityNames = new string[] { "Melbourne", "Sydney", "Brisbane", "Adelaide", "Perth" };

  public static List<City> GetCities()
  {
    List<City> cities = new List<City>();
    for (int i = 0; i < cityNames.Length; i++)
    {
      cities.Add(new City() { Name = cityNames[i], Value = random.Next(50, 100) });
    }
    return cities;
  }
}

Next, I'll add to the chart declaration to include the axis and a line series:

<Page
  x:Class="Telerik.Demos.UWP.MainPage"
    xmlns="http://schemas.microsoft.com/winfx/2006/xaml/presentation"
  xmlns:x="http://schemas.microsoft.com/winfx/2006/xaml"
  xmlns:d="http://schemas.microsoft.com/expression/blend/2008"
  xmlns:mc="http://schemas.openxmlformats.org/markup-compatibility/2006"
  xmlns:telerik="using:Telerik.UI.Xaml.Controls.Chart"
  mc:Ignorable="d">
    <Grid Background="{ThemeResource ApplicationPageBackgroundThemeBrush}">
      <telerik:RadCartesianChart PaletteName="DefaultLight">
        <telerik:RadCartesianChart.HorizontalAxis>
          <telerik:CategoricalAxis />
        </telerik:RadCartesianChart.HorizontalAxis>
        <telerik:RadCartesianChart.VerticalAxis>
          <telerik:LinearAxis />
        </telerik:RadCartesianChart.VerticalAxis>
        <telerik:LineSeries ItemsSource="{Binding}">
          <telerik:LineSeries.ValueBinding>
            <telerik:PropertyNameDataPointBinding PropertyName="Value"/>
          </telerik:LineSeries.ValueBinding>
          <telerik:LineSeries.CategoryBinding>
            <telerik:PropertyNameDataPointBinding PropertyName="Name"/>
          </telerik:LineSeries.CategoryBinding>
        </telerik:LineSeries>
      </telerik:RadCartesianChart>
    </Grid>
</Page>

In the XAML (above), I've defined a CategoricalAxis for the horizontal axis. This displays a range of categories whose values are displayed in the order defined by the underlying collection that's bound to the chart. The vertical axis uses a LinearAxis which represents a sequential list of numerical values. Other axis types for date/time values and logarithmic sequences are also supported. I've also indicated that I've like to generate a line chart based on the LineSeries that's declared. Notice that I've bound the value and category values to properties found on the City class I defined earlier. Other options to binding data are available, such as specifying the data points in the XAML directly:

<telerik:RadCartesianChart PaletteName="DefaultLight">
  <telerik:RadCartesianChart.Series>
    <telerik:LineSeries>
      <telerik:LineSeries.DataPoints>
        <telerik:CategoricalDataPoint Category="Melbourne" Value="55" />
        <telerik:CategoricalDataPoint Category="Sydney" Value="65" />
        <telerik:CategoricalDataPoint Category="Brisbane" Value="93" />
        <telerik:CategoricalDataPoint Category="Adelaide" Value="89" />
        <telerik:CategoricalDataPoint Category="Perth" Value="77" />
      </telerik:LineSeries.DataPoints>
    </telerik:LineSeries>
  </telerik:RadCartesianChart.Series>
  <!-- markup removed for brevity -->
</telerik:RadCartesianChart>

The final step is to bind the chart to the data that's generated by the CityManager class in the constructor of the page:

public sealed partial class MainPage : Page
{
  public MainPage()
  {
    this.InitializeComponent();
    this.DataContext = CityManager.GetCities();
  }
}

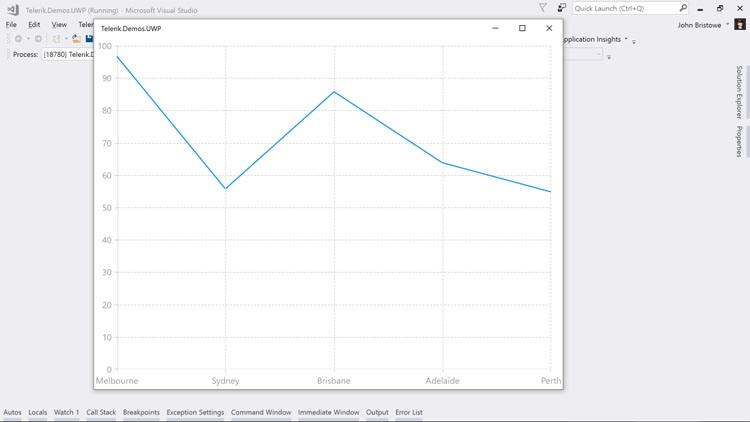
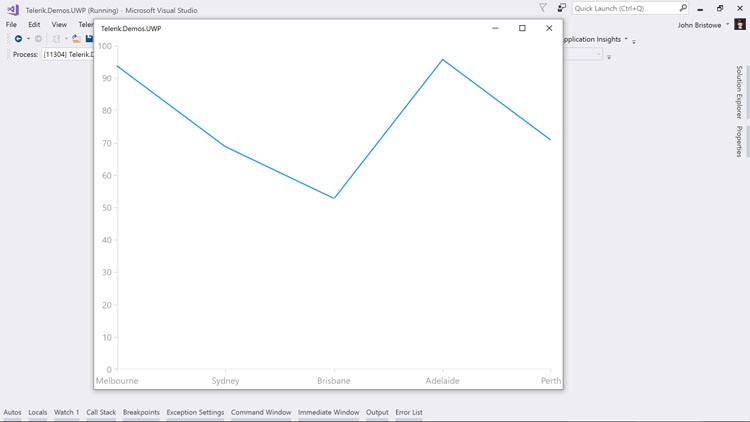
Running this application will display the chart of the data that's randomly generated:

Getting started UWP-3

It's important to note that the Chart control is highly customizable. There are a number of properties that I can target that will modify the chart that's generated. For example, I can add the following XAML to my chart declaration to draw lines for the major axis points:

<telerik:RadCartesianChart PaletteName="DefaultLight">
  <telerik:RadCartesianChart.Grid>
    <telerik:CartesianChartGrid MajorLinesVisibility="XY"/>
  </telerik:RadCartesianChart.Grid>
  <!-- markup removed for brevity -->
</telerik:RadCartesianChart>

This change will display the chart with the X and Y-axis major lines drawn:

Getting started UWP-4

From here, you can modify the XAML used to generate a chart to display an area chart:

<telerik:RadCartesianChart PaletteName="DefaultLight">
  <telerik:AreaSeries ItemsSource="{Binding}">
    <telerik:AreaSeries.ValueBinding>
      <telerik:PropertyNameDataPointBinding PropertyName="Value"/>
    </telerik:AreaSeries.ValueBinding>
    <telerik:AreaSeries.CategoryBinding>
      <telerik:PropertyNameDataPointBinding PropertyName="Name"/>
    </telerik:AreaSeries.CategoryBinding>
  </telerik:AreaSeries>
  <!-- markup removed for brevity -->
</telerik:RadCartesianChart>

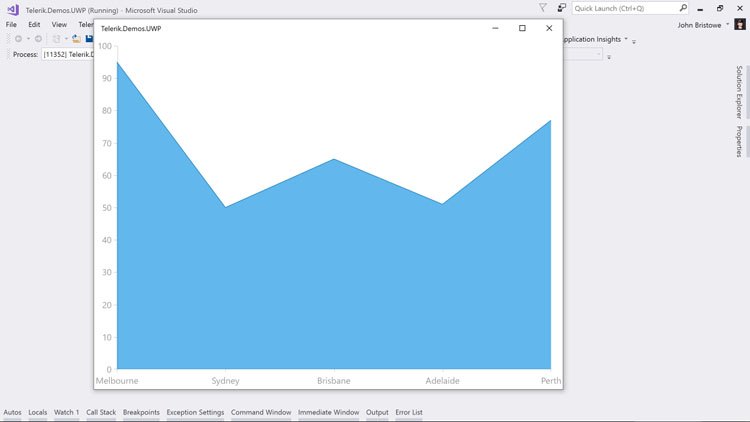
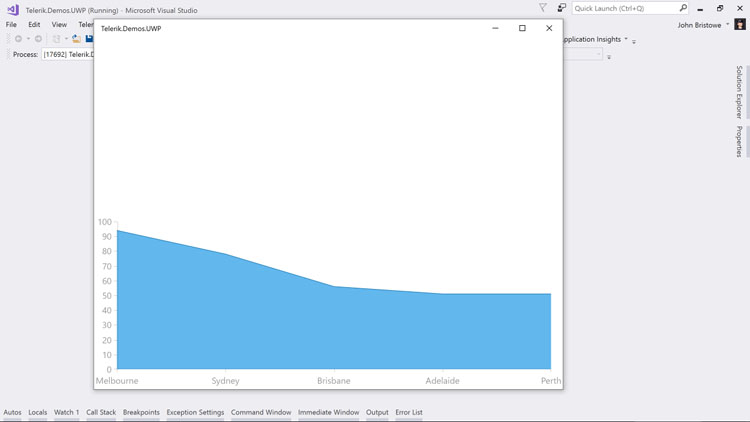
Running the application with this change will generate an area chart a different set of random data:

Getting started UWP-5

As you delve into the specifics of the Chart control from Telerik UI for UWP, you'll discover that it has many built-in features. You can read more about these features on the for the Chart control in our documentation.

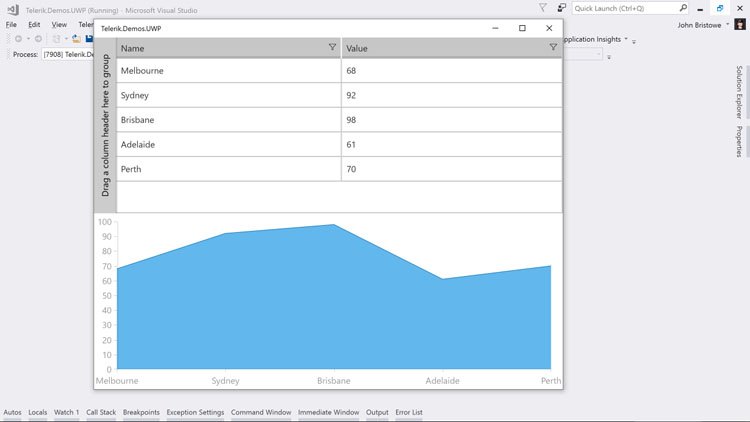
Now, let's see an example of the Grid in Telerik UI for UWP using the same underlying data.

Grid in UI for UWP

The Grid control enables you to display and manipulate vast amounts of data in a control that's fast, fluid, and responsive. It's also highly customizable for operations like filtering, paging, sorting, and grouping. Let's see how to get a Grid control up and running in my existing UWP application.

I'll start by making a few modifications to the XAML I defined earlier:

<Page
  x:Class="Telerik.Demos.UWP.MainPage"
  xmlns="http://schemas.microsoft.com/winfx/2006/xaml/presentation"
  xmlns:x="http://schemas.microsoft.com/winfx/2006/xaml"
  xmlns:d="http://schemas.microsoft.com/expression/blend/2008"
  xmlns:mc="http://schemas.openxmlformats.org/markup-compatibility/2006"
  xmlns:telerikChart="using:Telerik.UI.Xaml.Controls.Chart"
  mc:Ignorable="d">
    <Grid Background="{ThemeResource ApplicationPageBackgroundThemeBrush}">
      <!-- added: column definitions for layout -->
      <Grid.RowDefinitions>
        <RowDefinition />
        <RowDefinition />
      </Grid.RowDefinitions>
      <!-- I'll add the grid here -->
      <!-- added: specified column location -->
      <telerikChart:RadCartesianChart Grid.Row="1" PaletteName="DefaultLight">
        <telerikChart:RadCartesianChart.HorizontalAxis>
          <telerikChart:CategoricalAxis />
        </telerikChart:RadCartesianChart.HorizontalAxis>
        <telerikChart:RadCartesianChart.VerticalAxis>
          <telerikChart:LinearAxis />
        </telerikChart:RadCartesianChart.VerticalAxis>
        <telerikChart:AreaSeries ItemsSource="{Binding}">
          <telerikChart:AreaSeries.ValueBinding>
            <telerikChart:PropertyNameDataPointBinding PropertyName="Value"/>
          </telerikChart:AreaSeries.ValueBinding>
          <telerikChart:AreaSeries.CategoryBinding>
            <telerikChart:PropertyNameDataPointBinding PropertyName="Name"/>
          </telerikChart:AreaSeries.CategoryBinding>
        </telerikChart:AreaSeries>
      </telerikChart:RadCartesianChart>
    </Grid>
</Page>

In the XAML (above), I've made a couple of changes. First, I've changed the namespace prefix, telerik to telerikChart. I'll soon add another namespace for the Grid control and I want a better naming convention to identify my controls. And second, I've specified the layout of the grid used to contain my controls to include a couple of row definitions. Essentially, I want the Grid control to sit above the existing Chart control on my page.

Running this code displays our application with a modified layout:

Getting started UWP-6

Now let's add the Grid control.

As it turns out, this is a pretty simple task:

<telerikGrid:RadDataGrid Grid.Row="0" ItemsSource="{Binding}">
</telerikGrid:RadDataGrid>

This is all that's required to add to our existing markup in order to have a Grid control added to our existing application. Here's how the page looks with this change:

<Page
  x:Class="Telerik.Demos.UWP.MainPage"
  xmlns="http://schemas.microsoft.com/winfx/2006/xaml/presentation"
  xmlns:x="http://schemas.microsoft.com/winfx/2006/xaml"
  xmlns:d="http://schemas.microsoft.com/expression/blend/2008"
  xmlns:mc="http://schemas.openxmlformats.org/markup-compatibility/2006"
  xmlns:telerikChart="using:Telerik.UI.Xaml.Controls.Chart"
  xmlns:telerikGrid="using:Telerik.UI.Xaml.Controls.Grid"
  mc:Ignorable="d">
    <Grid Background="{ThemeResource ApplicationPageBackgroundThemeBrush}">
      <Grid.RowDefinitions>
        <RowDefinition />
        <RowDefinition />
      </Grid.RowDefinitions>
      <telerikGrid:RadDataGrid Grid.Row="0" ItemsSource="{Binding}">
      </telerikGrid:RadDataGrid>
      <telerikChart:RadCartesianChart Grid.Row="1" PaletteName="DefaultLight">
        <telerikChart:RadCartesianChart.HorizontalAxis>
          <telerikChart:CategoricalAxis />
        </telerikChart:RadCartesianChart.HorizontalAxis>
        <telerikChart:RadCartesianChart.VerticalAxis>
          <telerikChart:LinearAxis />
        </telerikChart:RadCartesianChart.VerticalAxis>
        <telerikChart:AreaSeries ItemsSource="{Binding}">
          <telerikChart:AreaSeries.ValueBinding>
            <telerikChart:PropertyNameDataPointBinding PropertyName="Value"/>
          </telerikChart:AreaSeries.ValueBinding>
          <telerikChart:AreaSeries.CategoryBinding>
            <telerikChart:PropertyNameDataPointBinding PropertyName="Name"/>
          </telerikChart:AreaSeries.CategoryBinding>
        </telerikChart:AreaSeries>
      </telerikChart:RadCartesianChart>
    </Grid>
</Page>

You can start to appreciate just how powerful these controls are when you run the application:

Getting started UWP-7

By default, the Grid auto-generates the columns based on the object that it's bound to. This includes built-in filtering, which you can use to drill down into the data. Furthermore, the Grid control has grouping enabled by default. This allows me to combine rows that have equal column values. Let's modify the code that's used to generate this data to see how this works:

public class City
{
  public string Name { get; set; }
  public double Value { get; set; }
  public bool Question { get; set; }
}

public class CityManager
{
  private static Random random = new Random();
  private static string[] cityNames = new string[] { "Melbourne", "Sydney", "Brisbane", "Adelaide", "Perth" };

  public static List<City> GetCities()
  {
    List<City> cities = new List<City>();
    for (int i = 0; i < cityNames.Length; i++)
    {
      cities.Add(new City()
      {
        Name = cityNames[i],
        Value = random.Next(50, 100),
        Question = random.Next(0, 2) == 0
      });
    }
    return cities;
  }
}

Here, I've added a Boolean property to the City class that I've given an arbitrary name. Its value will be randomly generated to be either true or false. When we run our application, notice that this new property is automatically displayed by the Grid control:

Getting started UWP-8

The Grid control knows that this new column's type is a Boolean so it also uses a checkbox to display its value. This is also reflected in the filter drop-down menu in the column header:

Getting started UWP-9

The Grid control has support built-in for primitives types (i.e. Boolean) for operations like filtering, sorting, and grouping. When binding to complex types, you can control how values are displayed and navigated through these operations as well. If left undefined, the Grid control will display the type name for complex types by default.

With grouping enabled by default, we can drag and drop a column header to the grouping area and have the rows grouped by the new property I've added:

Getting started UWP-10

Even when grouping is enabled, operations such as paging, filtering, and sorting remain intact.

Using Telerik UI for UWP in Windows Template Studio

As you've seen, incorporating Telerik UI for UWP into a UWP project is a manual process. Developers looking for a guided approach towards building applications with Telerik UI for UWP should check out Windows Template Studio:

Windows Template Studio

This extension for Visual Studio will generate a UWP application through templates. The goal is to get you up and running quickly with a project structure and source files that can be modified afterward.

Recently, Windows Template Studio added templates for the Chart and Grid controls from Telerik UI for UWP:

UI for UWP in WTS

Selecting either of those controls will generate pages will the necessary XAML and code needed to display them:

WTS UI for UWP Grid

WTS UI for UWP Chart

Wrapping Up

Telerik UI for UWP provides a suite of powerful controls that you can use in your UWP applications. These controls address common UI requirements in line-of-business (LOB) applications. You can find the source code (Apache License v2.0) and the documentation on GitHub.

Getting started is easy. You can build the source code yourself or pull down the bits from NuGet. Once downloaded, controls like the Chart and Grid can be easily incorporated and bound to data from underlying sources.

If you have feedback, please let us know through the Telerik UI for UWP issues list on GitHub or the Telerik UI for UWP Feedback Portal. In the meantime, I encourage you to check the controls, build a prototype, and/or start incorporating them into your UWP apps today!

Editor's Note: This post originally appeared on the Telerik Developer Network. Check it out for other great content for developers.

Progress Telerik UI for UWP Joins the .NET Foundation

$
0
0

We’re pleased to announce that the Progress Telerik UI for UWP project will be joining the .NET Foundation. The .NET Foundation is an open source organization dedicated to guiding the development of the .NET ecosystem, based on principles of openness, rapid innovation and community participation. As a huge investor in the .NET ecosystem, we’re excited to begin contributing our code and expertise to this project.

Why We are Joining the .NET Foundation

Simple—we want to support the community. It’s you who have made us what we are today, and this is one way we can give back (we have other open source projects too). Our goal as always is to make your lives as developers easier. It’s important to us to contribute to a strong .NET ecosystem, and when you’re getting work done better and faster, we know we’re doing our own jobs well.

What this Means for You

The Telerik UI for UWP suite was released to the community as open source earlier this year, and the code will now be contributed to the .NET Foundation, to make it even more accessible and visible to the worldwide .NET Community.

Telerik UI for UWP components can be used for both personal and commercial Windows 10 applications, and includes complex controls such as Grid and Chart. Rather than reinventing the wheel, you can save time and take advantage of our open source solution completely for free. Not only that, but the full source code is available for you to review. We’ve been developing .NET controls for a long time, and we hope that we can help the community learn the best practices that our developers have to offer.

The community of developers targeting Windows 10 and building UWP apps is constantly growing. One of the main advantages of open source projects has always been the ability to talk and discuss roadblocks with other professionals around the globe. Additionally, if you have any ideas and suggestions, feel free to contribute directly to the project on GitHub, guiding the future of the toolkit.


As a matter of fact, the first 20 top contributors will be getting a special surprise by the .NET Foundation and Telerik teams—a limited edition T-shirt.

T-Shirt-Mockup1.2.1

To qualify as a top contributor, you must either:

Afterwards, just tweet the link to your commit with #TelerikUIforUWP and @Telerik. We will review it and notify you over Twitter/GitHub if you scored one of the sweet shirts. Hurry up!


For those who need a more formal level of assistance, enterprise-class support is available as well, guaranteeing you rapid and professional support directly from the developers who built the project. Anyone can get a free trial of our full support by simply downloading the trial from our website.

Learn More

We’re thrilled to join the .NET Foundation and to formalize our commitment to the open source future of .NET in this way. It’s a future we strongly believe in, and one which we think will be awesome for developers, so we want to do our part.

Curious to learn more about the .NET Foundation, or even to get involved yourself? Check out their site or dive into the community forum.

To find out more about UI for UWP, you can check it out and contribute on GitHub, or learn all about it here. Lastly, if you want to start a new UWP project, check out this great tutorial by John Bristowe on Getting Started with Telerik UI for UWP.

We can’t wait to see all the great apps that will start popping up in the Windows Store!

Happy coding!

Native to Cross-Platform Xamarin Webinar Recap

$
0
0

We recap the Progress Xamarin webinar on native to cross-platform mobile development. Catch the replay and check out the extended Q&A we couldn't get to live.

For most parts of the world, summer is slowly coming to an end. You’ve made some memories and hopefully refreshed yourself with some travel. Time to get back to work with renewed energy and get things done. And if you have kids, they’re probably heading back to school, buying you just a little extra time each day. Perfect time to brush up on that hobbyist mobile app that you were plotting. Or get cracking on that enterprise LOB mobile app that your company desperately needs.

If you’re a .NET developer, Xamarin offers a really enticing way to build mobile apps. You get to write apps that are truly native and truly cross-platform—all from a single codebase of C# and XAML, if using Xamarin.Forms. And we at Progress, continue making the best Telerik UI for .NET ninjas, like yourself—we’re in the business of making developers successful. And sure enough, we love Xamarin and will help you augment your development experience to ship apps faster.

TelerikNinja


Relive the Content

On Aug 16th, Xamarin MVP Matthew Soucoup and yours truly Sam Basu, co-hosted a webinar for mobile developers—in particular, those on the Xamarin technology stack. Yes there were slides, but demo gods were happy with us as well. We talked about various mobile strategies, like Mobile Web, Native, Hybrid, JS Native and Xamarin. Mobile app UIs discussed ranged from native to completely cross-platform with platform abstractions—and solutions that straddle the line between two. As for Xamarin, we broke down some myths about Xamarin.iOS/Android vs Xamarin.Forms and talked about edge solutions like Native Embedding or Custom Renderers.

If you joined us for the webinar, a sincere thank you and hope you enjoyed the hour-long honest developer conversations. In case you missed it, you can relive the webinar in its entirety—high definition recording available now.


Recording


Prize Winners

What’s a Progress webinar without some awesome prizes? Most geeks are into aviation and it’s an awesome time to be alive when you can fly around your personal sophisticated drones. So our picks for prizes this time were two awesome drones—each with its own character.

  1. The Holy Stone Predator Mini RC Helicopter Drone
  2. HolyStone
    And the winner is Caden Sumner.

  3. Blade Nano QX RTF Quadcopter Drone
  4. BladeNano
    And the winner is John Matthesen.

Congrats winners. Hope you enjoy your prizes!

Additional Question/Answers

Hosting webinars is hard work. We did it because we’re excited about mobile development on Xamarin stack and want fellow developers to be successful. One of the most enjoyable aspects of our webinars is the audience interaction and Q/A all throughout. We appreciate developers bringing up real-world questions and concerns on the latest technologies.

While we tried to answer as many questions as we could on air, here’s an excerpt of some short Q/A topics that were important to resurface:

Q: What’s the difference between Xamarin and NativeScript?
A: Xamarin and NativeScript both have similar goals—build truly native cross-platform mobile apps from a single code base. They just arrive at the goal from different technology stacks: Xamarin does it from C#/XAML, while NativeScript uses JavaScript/Angular+TypeScript. Choose your stack based on whether you lean towards C# or web technologies.

Q: Do you fully support UWP platform?
A: Yes, Xamarin as a platform and Telerik UI for Xamarin suite both have full support for UWP. This means your Xamarin apps with polished Telerik UI can run on any Windows device.

Q: How do Xamarin apps handle platform-specific device sensor APIs?
A: Use the vast collection of Xamarin Plugins or grab reusable bits from the Xamarin Component Store.

Q: Is performance a concern for Xamarin apps?
A: Xamarin apps are truly native to each platform and performance shouldn’t be an impediment. Xamarin apps are cross-compiled down to native iOS/Android/Windows binaries for Store deployment and UI renders native controls for each platform. That said, developers should always be attentive to not add overheads with app’s business logic and UI that is complicated to render.

Q: Can I render web assets inside a WebView for Xamarin apps? 
A: Technically, yes, But you should not overdo it since that is not the purpose of Xamarin. If you are invested into web technologies, you should look at JS Native apps.

Q: Can I target BlackBerry with Xamarin?
A: While there are some solutions like MonoBerry, we also stand by to give you free hugs if you’re having to support BlackBerry devices.

Q: Can Native Embedding be done in Xamarin PCL projects?
A: For now, you can do Native Embedding from Shared projects for your Xamarin apps, since PCLs do not support platform-specific #if-defines.

Q: Is Xamarin.Forms only for simple LOB apps?
A: While that was the initial goal, Xamarin.Forms as a technology has come a long way and the community is stepping up as well. With native embedding and custom renderers, Xamarin.Forms can help you build sophisticated UI across platforms.

Q: Does Xamarin.Forms offer a GUI designer like Blend? 
A: No. However, there is now a pretty good XAML Previewer built into Visual Studio—helps to see the UI tree render as you type up XAML. GUI tools also have limitations when it comes to complex UIs, while XAML is very powerful.

Q: When will .NET Standard 2.0 be supported in Xamarin.Forms?
A: .NET Standard library consumption is already supported in Xamarin.Forms. .NET Standard 2.0 just came out and it covers a much larger API surface area. Expect Xamarin.Forms support to catch up soon.

Q: Are any of the demos shown hosted online?
A: Sure thing—here and here.

Q: Does Telerik UI for Xamarin support smart watches and TVs?
A: Telerik UI for Xamarin provides polished UI controls for Xamarin.iOS/Android and Xamarin.Forms, all rendering native UI for each platform. Xamarin, as a framework, supports smart watches and TVs—you just need to design your apps for the form factor, and yes, you can use Telerik UI everywhere.

Q: Thanks for your time! Webinar was really informative! #HeyTelerik – via tweet.
A: Appreciate the love.


Resources

There are tons of useful links to point out, but it is sometimes best to start @ the main technology pages. From there, you can drill down to features, demos and docs. So here goes:

That’s a Wrap

Xamarin has truly democratized mobile development for .NET developers. With the new .NET and cross-platform tools, you can target apps running on any platform and get code re-usability. With advancements in Xamarin.Forms, your app UI can be completely abstracted or straddle the line between native or cross-platform. Native embedding and custom renderers allows for versatility and building sophisticated UI for each mobile platform.

And as you are building professional Xamarin apps, Telerik UI for Xamarin is here to augment your development experience. Stop reinventing the wheel and ship your apps faster with polished performant UI out of the box. Stay classy and have fun building your mobile apps! 

FiddlerCore for .NET Standard and Fiddler Orchestra—the Future of Fiddler

$
0
0

It has been a while since a big change happened in the Fiddler world. The outside world is changing, though, so it is time to put Fiddler ahead of that change.

Today we released FiddlerCore (the engine behind Fiddler) beta for .NET Standard 2.0 (just download FiddlerCore and you'll find the beta inside; no dedicated download needed). It is the first small step but a great journey lies ahead. At the end of the journey we would like Fiddler to:

  1. Run on every major platform (possibly offering the same UI experience everywhere)
  2. Display data from and control any number of other Fiddler instances running across the network on any supported platform

It is going to be a long journey, so we have broken it into smaller steps. Each step will result in a distinct deliverable making major new functionality available to the Fiddler community and putting it to a real life test before we build the next step on top of it.

FiddlerCore for .NET Standard

This is the first step on the road to Fiddler Orchestra. FiddlerCore is in essence the Fiddler engine. We currently offer it as a separate product packaged in a .NET assembly for customers that would like to have the power of Fiddler in their apps.

Going multi-platform means our engine must become multi-platform-first. We have experimented with the various flavors of .NET that offer multi-platform support and .NET Standard came to be best suited for our needs. Today’s beta release comes to prove that we are on the right track. All the FiddlerCore functionality has been implemented for .NET Standard 2.0. Some glitches are to be expected of course since .NET Core 2.0 is pretty new, but our internal testing shows the FiddlerCore beta is really stable (of all platforms that support .NET Standard 2.0, we have done most of that testing under .NET Core). So we are well into the first step already.

The Birth of Fiddler Orchestra—.NET Core/Xamarin + FiddlerCore + Fiddler for Windows

Taking things one step further, we are going to convert FiddlerCore for .NET Standard into an executable server running under .NET Core and Xamarin. Having in mind that FiddlerCore is the Fiddler engine, our server is going to have the very same functionality Fiddler has, but it will not have the fully fledged web debugging UI. Instead it will be capable of sending web debugging data to and receiving commands from any instance of the good, old Windows Fiddler.

This is going to be the birth of Fiddler Orchestra. At this point Fiddler will start providing remote web debugging capabilities. I.e., one will be able to monitor what gets sent and what gets received at every node of a complex traffic scenario. And all that is going to happen inside the familiar and convenient Fiddler for Windows UI.

Fiddler Orchestra Possible Continuation—Web UI + .NET Core FiddlerCore

Adding fully fledged web UI to the FiddlerCore servers described above could be a logical next step we might consider in the future. If this effort comes to fruition, it will be initially aimed at the .NET Core framework. It will effectively allow a FiddlerCore server running on any platform supported by .NET Core to provide the same web traffic debugging functionality for that platform as the current WinForms-based version of Fiddler for Windows. This in turn could add tremendous power to the Fiddler Orchestra, since any instance of Fiddler—be it legacy WinForms-based or on .NET Core—could display information from and control several other instances. At this point Fiddler standalone could become available for all platforms supported by .NET Core, and any standalone instance of Fiddler could be part of an Orchestra.

Web UI seems to be a natural choice of technology to accomplish what is described above. Besides offering the same UI experience across all supported platforms, it brings Fiddler in the browser which could be really convenient in a large number of usage scenarios.

In Conclusion

Thanks for bearing with me through the entire first public appearance of Fiddler Orchestra. You, the Fiddler user community, really shaped Fiddler into what it is today. So check it out, and all your thoughts and comments on our plans for its future are most welcome. 

Toolkits, Toolkits, Toolkits!

$
0
0

Learn about two powerful open source tools you can use to build your UWP apps—UWP Community Toolkit and Telerik UI for UWP.

As a UWP developer, you have many options to help build your application quickly and reliably. In fact, there are so many options that you may feel like you can choose only one. Luckily, that’s not the case, and many toolkits complement each other in various ways.

Today, we’ll talk about two open source toolkits:

Both are open source, but each has different strengths. These two particular toolkits can bring tools and controls for a variety of application scenarios. Let’s start by introducing the toolkits and how they can help.

UWP Community Toolkit

The UWP Community Toolkit is the ultimate collaboration between Microsoft and the UWP developer community. With dozens of features such as helper functions, custom UI components, animations and app services, the UWP Community toolkit is a great time saver and can bring your application to the next level.

UWP Community Toolkit

The toolkit has had 12 releases so far and is currently on v 1.4 (released on April 3, 2017). It has more than 80 contributors, with thousands of commits, and the community is constantly working on improvements. Conveniently, it’s broken up into several nuget packages so you can pick and choose exactly what you need.

Examples of this toolkit’s power can be found in the Services namespace, where you can easily interact with social media services with as little as two lines of code.

UWP Community Toolkit 2

Here’s an example of getting a Twitter user’s timeline:

TwitterService.Instance.Initialize("consumer-key", "consumer-secret", "callback-uri");
ListView.ItemsSource = await TwitterService.Instance.GetUserTimeLineAsync("user-screenname", 50);

You can find a full demo application here in the source code or here in the Windows Store. Go here to see a full list of the available features (controls, helpers, etc.) and go here to find the documentation.

Telerik UI for UWP

Telerik UI for UWP, from Progress Software, is a recently open sourced toolkit that contains an amazing set of Line of Business (LOB) controls with which you can create native, business-focused, UWP applications. With controls such as DataGrid and RadListView, the Telerik UI provides the powerful sorting, grouping and editing experiences you might expect from a desktop application, as well as rich data visualization experiences with controls such as Charts, Gauges and BulletGraphs.

Telerik UI for UWP

We recommend you check out the Customer Database Example application here on GitHub to see the DataGrid in action, as well as the SDK Examples app here. You can see a full list of available controls here and find the documentation here (if you’re looking for a little extra help, Progress Software also offers professional support in the premium package).

An example of this toolkit’s power is the RadDataGrid. With one line of code you get a bunch of out-of-the-box features like grouping, sorting and filtering.

Telerik UI for UWP - RadDataGrid

You can install UI for UWP in your application using the nuget package or build from the source directly. If you would like to read more about why Progress Software open sourced Telerik UI for UWP, we recommend you check out this great article.

Contributing

If you’re a developer who likes contributing to GitHub repos and giving back to the community, or if you have ideas to make things better for other developers, both toolkits accept pull requests and each has its own contribution guidelines (here for UWP community toolkit and here for Telerik UI for UWP).

Wrapping up

Both toolkits complement each other. You can use them side by side in your application to bring the user a delightful, yet powerful, experience in your UWP application. With dozens of UI controls, helpers, services and more, you can get your UWP app to market faster and with more confidence than ever. We look forward to seeing your UWP Community Toolkit and UI for UWP powered applications in the Windows Store!

Resources

Note: This article was originally published on the Windows Developer Blog and is republished with permission.

Telerik UI for UWP—Free and Updated XAML Controls

$
0
0

In this guest post from the Windows Developers Blog, learn what's new in UI for UWP and check out some powerful ways to put the controls to work for you.

In case you missed it, Progress Telerik UI for Universal Windows Platform by Progress was released as free and open-source earlier this year. With more than 22 XAML controls, this news has made it easier than ever before to start building UWP apps. Rather than needing to rewrite many complex XAML controls spanning user scenarios across data management, data visualization, navigation and more, you can use Telerik’s controls for free. To get right to it, check out the Downloading and Using the Controls section in this blog post . Not only that, if you need to make modifications to the code, you can simply fork their GitHub repository and work independently.

Telerik has recently demonstrated their continued investment in providing the best possible UWP developer experience by updating their controls packages to opt into the new Visual Studio 2017 design-time experiences for XAML controls from NuGet packages. Read below to see what’s new and to learn how to try out the controls.

Design Time Tooling for XAML Controls in NuGet Packages

In the past, developers who consumed XAML controls from NuGet packages had limited design time tooling. To successfully use and discover the controls required hand editing the XAML file. With the latest version of Visual Studio 2017, we have introduced new features that controls authors can leverage to improve the design time experience for developers using their controls. Progress has partnered with us to update their Telerik UI for UWP controls packages to add Toolbox support to easily view and categorize their controls.

Updated UWP controls added to the Toolbox

As soon as you reference the NuGet package in your UWP application, these new controls will appear in the Toolbox for you to use in your application. You can use these controls just like any other Toolbox control, with drag and drop support on the design surface.

Controls in Action

If you want to learn how to use Telerik UI for UWP controls in your application, download and try out their sample application. Not only is this a good way to see what the controls are capable of, but it acts as a learning tool with the code snippets available in the app itself.

Sample application to learn how to use Teleriks controls in your application

Downloading and Using the Controls

If you want to use Progress’ Telerik UI for UWP controls in your next UWP application, you can do the following to get the controls in your app.

  1. Make sure you are on the latest version of Visual Studio 2017 for optimal design-time experiences: https://www.visualstudio.com/
  2. In your UWP app, right click on the project’s “References” node in the Solution Explorer and select “Manage NuGet Packages…”
  3. Search for “Telerik.UI.for.UniversalWindowsPlatform”
  4. Install the latest version of the package to get Toolbox support, and future updates
  5. Open a .xaml file and observe all the controls available in your Toolbox

Feedback!

We’re constantly trying to improve the developer experience for UWP developers. If you have any feedback for us as you build UWP applications in Visual Studio, please let us know by using the Visual Studio Report a Problem feature found in the top right corner of the Visual Studio Installer, or Visual Studio itself. You can track your feedback on the developer community portal. If you’d like to provide a feature suggestion to the Visual Studio team, you can use the Visual Studio User Voice.

If you have any feedback specific to the Telerik controls, you can file an issue on their GitHub repository.

Note: This article was originally published on the Windows Developer Blog and is republished with permission.

UI Controls for UWP: Building Windows Apps with Adaptive UI

$
0
0

In this episode of DevRadio, learn how to use the open source Telerik UI for the Universal Windows Platform (UWP) to build highly-performant applications for all Windows 10, as well as IoT, Xbox and VR devices.

Earlier this year, we announced that we were open-sourcing the Telerik UI for UWP suite to the wide developer community and especially for those interested in building Windows 10 apps. The project also recently joined the .NET Foundation and we couldn’t be happier. We’ve received amazing feedback from all of you in both of these initiatives and hope that this is yet another step in helping developers be more productive and feel like true .NET Ninjas J.

In this latest episode of Channel 9’s DevRadio, Jerry Nixon welcomes John Bristowe and Sam Basu to share what the Telerik UI for UWP suite offers. They explore how the toolkit can aid developers in building highly-performant applications for Windows 10 based desktop, tablet and phone devices, as well as its implications for markets such as IoT, Xbox and VR. Some of the main topics they cover are:

  1. What is Telerik UI for UWP?
  2. An overview of the Grid, Chart and DataForm controls
  3. Why is the suite “special”?
  4. How can you start off with Telerik UI for UWP?

The guys also discuss the best practices in UI, building controls in-house, the state of UWP today, the UWP ecosystem and the Community Toolkit and what the XAML Standard means for UWP.

Check out the full video here on DevRadio, or just watch below.

Related Resources

Other important links

I want to introduce this video with a quote John gives on the show:

"We are really good at drawing pixels to the screen and grids - that’s our forte. We put all that stuff that we really know and love into these controls and made them available to the UWP audience..."

That's UI for UWP in a nutshell. Enjoy!


Channel 9 Demo: Polished Telerik UI for Xamarin Apps

$
0
0

Sam Basu is on Microsoft's Channel 9 to talk Xamarin UI and development. Check it out and learn how UI for Xamarin can help you achieve a striking UI.

If you’re a .NET developer looking to write mobile apps with your existing skills, you’re likely to use Xamarin. It allows you to write truly native cross platform apps from a single codebase of C# (and XAML if using Xamarin.Forms). Our love for Xamarin at Progress is only eclipsed by our love for helping developers create highly-performant apps with a striking UI. So it’s only natural that our Telerik UI for Xamarin toolset, comprised of more than 70 controls, enables just that.

Recently, our very own Sam Basu sat down with Seth Juarez in Channel 9’s Studio B on the Microsoft campus to talk about Xamarin development and how to achieve a polished and performant UI with the help of Telerik UI for Xamarin.

Check out the video below to learn how to get started, how to integrate with existing projects and some sample scenarios. You can also watch it over on Channel 9's site.

RowDetails Support in the UI for UWP R3 2017 Release

$
0
0

Our latest official release features RowDetails support for RadDataGrid, major bug fixes and more.

In our official R2 SP1 release, we introduced some performance improvements for our Chart and ListView controls. With the R3 release we focused on another major control in the UI for UWP suite – the DataGrid control. 

Let me provide you with some more information about the new RowDetails feature we introduced for the DataGrid control and the Toolbox improvements we have made for our open-source repository NuGet package. 

RadDataGrid RowDetails

We are extending the DataGrid functionalities with the RowDetails feature, which will allow the application’s users to view the record-related data inline, without the need to switch context. Being able to show details for the DataGrid row is extremely useful, and with our latest improvements it's both easy and highly customizable.
DataGrid-RowDetails

Nuget Toolbox Support

With Visual Studio 2017 Toolbox support has been added for the NuGet packages to easily view and categorize the controls. We have taken advantage of this feature and updated our NuGet package to support it. As soon as the NuGet package is referenced, the controls it contains will appear in the Toolbox for you to use in your application. These controls can be used just like any other Toolbox control, with drag and drop support on the design surface.

NuGet_Toolbox

Chart Improvements

There are a bunch of improvements coming to the Chart control, starting with utilizing the composition API that the framework offers to boost the rendering performance of the Chart control.

Old Rendering Performance

oldchart

New Rendering Perfromance

newchart

Share Your Feedback

Take a look at the open source UI for UWP project when you have a chance. There you can share your feedback or add your own contributions. We highly appreciate any contributions that are helpful for improving the controls.

For a full list of what is new and what is improved in the Telerik products, make sure to subscribe for the R3 2017 release webinar

Introducing New Support Options & Product Bundles

$
0
0

Whether you use Kendo UI, a DevCraft bundle or other Telerik products, and no matter the support you need, we have great new options for you.

Some months ago, we set out on a journey to review our bundles and the way in which our products are offered. Through this process, we have spoken with and read feedback from so many of our customers. The applications you are building with our products spread the gamut from custom and niche to mission-critical enterprise; from line-of-business to consumer facing. Our developer community is helping to make the world better through technology and innovation – and we are inspired.

Through these conversations, we developed a rich understanding of the frameworks you are using today, and the technologies you may use in the future. Beyond products and technology, we discussed what you expect from our technical support – and of course we discussed the overall value you place on out products and service.

Thank you for the overwhelming response we received to our reach-out – the changes described below are a direct result of the process so many of you were involved in.

Changes to Technical Support

Most of our individual products can now be configured with one of three options for technical support – this gives you the ability to choose the appropriate level of support for you and your team. If you ever need a higher level of support, your subscription can always be upgraded.

  • Lite - 72-hour response time (10 ticket limit) – This option allows you to purchase our products at an incredible value and provides just enough support for small projects that are not on tight timelines.
  • Priority - 24-hour response time (unlimited tickets) – Perfect for professional developers with typical deadlines.
  • Ultimate – Ideal for professional developers with tight deadlines. Phone support can provide immediate or same-day solutions to commonly encountered issues, remote web assistance can be used to observe issues in your own environment, and issue escalation allows the most critical issues to be escalated directly to product developers.

For more information and a complete side-by-side comparison of the support plans, click here.

DevCraft Bundles

Our DevCraft bundles offer .NET developers the most cost effective way to futureproof their toolbox, and streamline beautiful UI across a variety of technologies and frameworks. Effective today, we are introducing a new ‘DevCraft UI’ bundle that includes all the Telerik UI products that a .NET developer could ever need at an incredible price of $1299. DevCraft UI joins DevCraft Complete and DevCraft Ultimate, which have also been updated. To learn more about our new line-up of DevCraft bundles, click here.

Changes to Kendo UI

We believe that the biggest changes for our Kendo UI product is the introduction of React and Vue support. React and Vue support join existing support for jQuery and Angular, creating the industry’s most complete UI toolbox for JavaScript developers. You may also notice that we have simplified the product names into a single offer called Kendo UI that comes complete with jQuery, AngularJS, Angular, React, and Vue support. Additional server-side wrappers for ASP.NET MVC, ASP.NET Core, PHP, and JSP can be added as needed, and like our other UI products, Kendo UI can be configured with Lite, Priority, or Ultimate support. To learn more about pricing and what is included in Kendo UI, click here.

I own a license of Telerik, DevCraft, or Kendo UI – what does this mean for me?

While full details can be found here , we are pleased to inform you that you will have access to all the great products and support you initially purchased – and in some cases even more. Additionally, you will maintain the same level of support and the same renewal prices.

Thanks again to our amazing community of developers – we love you and hope you love the new R3 bits and bundles.

Viewing all 1954 articles
Browse latest View live


Latest Images