Quantcast
Channel: Telerik Blogs | .NET
Viewing all 1954 articles
Browse latest View live

How To: Capture iOS Traffic with Fiddler

$
0
0

In this step by step tutorial, learn how to setup your iOS device to use Fiddler as a proxy and capture web traffic from your phone.

Last week we learned how to capture the traffic from you Android device with Fiddler. Now, let’s see how it’s done on iOS.

Prerequisites

First you have to have Fiddler installed on your desktop machine. The PC and the iOS device should be discoverable on the same network. This was the tricky part for me, as even when I have them on the same network, they couldn’t communicate with each other. I had to use the mobile hotspot on my machine to make them discoverable.

Just ping the device IP from your machine to be sure they can communicate.

Setting up Fiddler

First, you should enable the Allow remote computers to connect setting in Fiddler

  1. Open Fiddler and select Tools -> Options
  2. Choose the Connections tab
  3. Select the Allow remote computers to connect checkbox to enable the setting.
  4. Restart Fiddler in order the changes to take effect.

Fiddler is now listening on port 8888 (this is the default port, you can change it from the setting above).

Allow remote computers to connect

Setting up the iOS Device

Once Fiddler is listening, we should use it as a proxy in iOS.

  1. Open Settings -> WiFi
  2. Find your current network and click the i icon
  3. Scroll to bottom and choose Manual on the HTTP Proxy choice
  4. Type your IP address in the Server field
  5. Type the Fiddler listening port (8888 by default) in the Port field

Configure proxy

Your device’s traffic should be visible in Fiddler.

Capture HTTPS Traffic

With the current setup you should be able to capture HTTP traffic. However, if you try to open any HTTPS website, you’ll get the This site’s security certificate is not trusted! error. To fix this, you should trust the Fiddler root certificate.

  1. In your browser, navigate to http://ipv4.fiddler:8888
  2. Click on the Fiddler root certificate link to download it
  3. Install the certificate on your device.

Now you should be able to capture HTTPS traffic too.

Cleaning Up

Once you’re done debugging, don’t forget to remove the WiFi proxy from your device.

This is all you need to know about capturing web traffic from iOS devices. If you have any questions or problems, just leave a comment below.

We always love hearing feedback, so feel free to share your thoughts on what you'd like to see with us over on our Feedback Portal. And if you're new to Fiddler, you can get started today - download Fiddler for free right here


Xamarin.Forms 3 For You and Me

$
0
0

This article dives into some exciting new features in the Xamarin.Forms 3.0 release and how developers can leverage them in Xamarin apps.

Most developers are genuinely excited by software. Modern software runs the world and developers get to shape the future. Developers often cannot wait for the next hotness to drop - for their chosen platforms and tools. Developers are known to stay on cutting edge and are eager to try out latest bits. This comes with the obvious risk of bricking computers or wasting hours getting things to work - but hey, new software is just cool. 

However, the realities of being a Professional Software Developer™️ often bring in cautiousness. Developers get wary of hot untested bits because of how easily development environments/tools can get messed up. Amidst this dilemma, comes the new Xamarin.Forms 3.0 release.

While still fairly new, Xamarin.Forms 3.0 has shown surprising maturity - existing features work while long awaited new functionality brings joy to developers. All the while Xamarin.Forms 3 release demonstrates stability, thus lowering barriers for developer adoption.

But what can Xamarin.Forms 3.x do for developers? This article takes a lap around some new features that developers should find rather useful to integrate into their Xamarin apps. You get to play around with the latest and greatest, while enjoying platform stability - what's there to lose?

Cascading Style Sheets

No way. Say it ain't so. The dark magic of CSS has found it's way into our beloved Xamarin.Forms?

Shut the front door!

Yeah, that was the initial reaction from many .NET developers. But the point is CSS styling of XAML is optional and actually works beautifully. Developers used to building for web do not need to learn anything new, as CSS in Xamarin.Forms obeys the same rules. CSS parsing is maturing and pre-processors like LESS/SASS may also be used. 

To use CSS in Xamarin.Forms, developers can simply create a file with a *.css extension and start writing normal CSS.

.importantStuff {
    font-size: 24;
    font-style: bold;
    color: #FF0000;
}

#individId {
    margin: 10 0 0 10;
}

label, button {
    background-color: #c0d6f9
}

Check that out. That CSS is specifying classes, individual element IDs, and entire types of elements. And setting property values is done the same way as in regular old CSS.

Sold on CSS and can't wait to use it? Good - this is how you'd use an individual CSS file within a XAML file in Xamarin.Forms.

<ContentPage.Resources>
    <StyleSheet Source="PATH TO CSS RELATIVE TO XAML PAGE">
</ContentPage.Resources>

<ContentPage.Content>
    <Label Text="This is important" StyleClass="importantStuff">
</ContentPage.Content>
CSSStyles
 

That example shows loading up the CSS, and then applying a class to a Label control. CSS in Xamarin.Forms is here to stay and if building for web and mobile, you can now start sharing styles. Find out more on CSS in Xamarin.Forms with the docs!

Flex Layout

This may sound suspicously like FlexBox from the web - and for good reason! Xamarin.Forms's newest layout rendering FlexLayout was actually inspired from the FlexBox Layout in CSS. So the idea behind FlexLayouts is to give the container (or the layout) many different (flexible) options to layout its children to best fill available space.

You may be thinking - awesome, show me more!

Here's the best thing about the FlexLayout - making use of all of its sweet layout options is as simple as adding controls to it and then tweaking some properties on the Layout and some attached properties (akin to how you set a control's position in a grid Grid.Row="3") on controls.

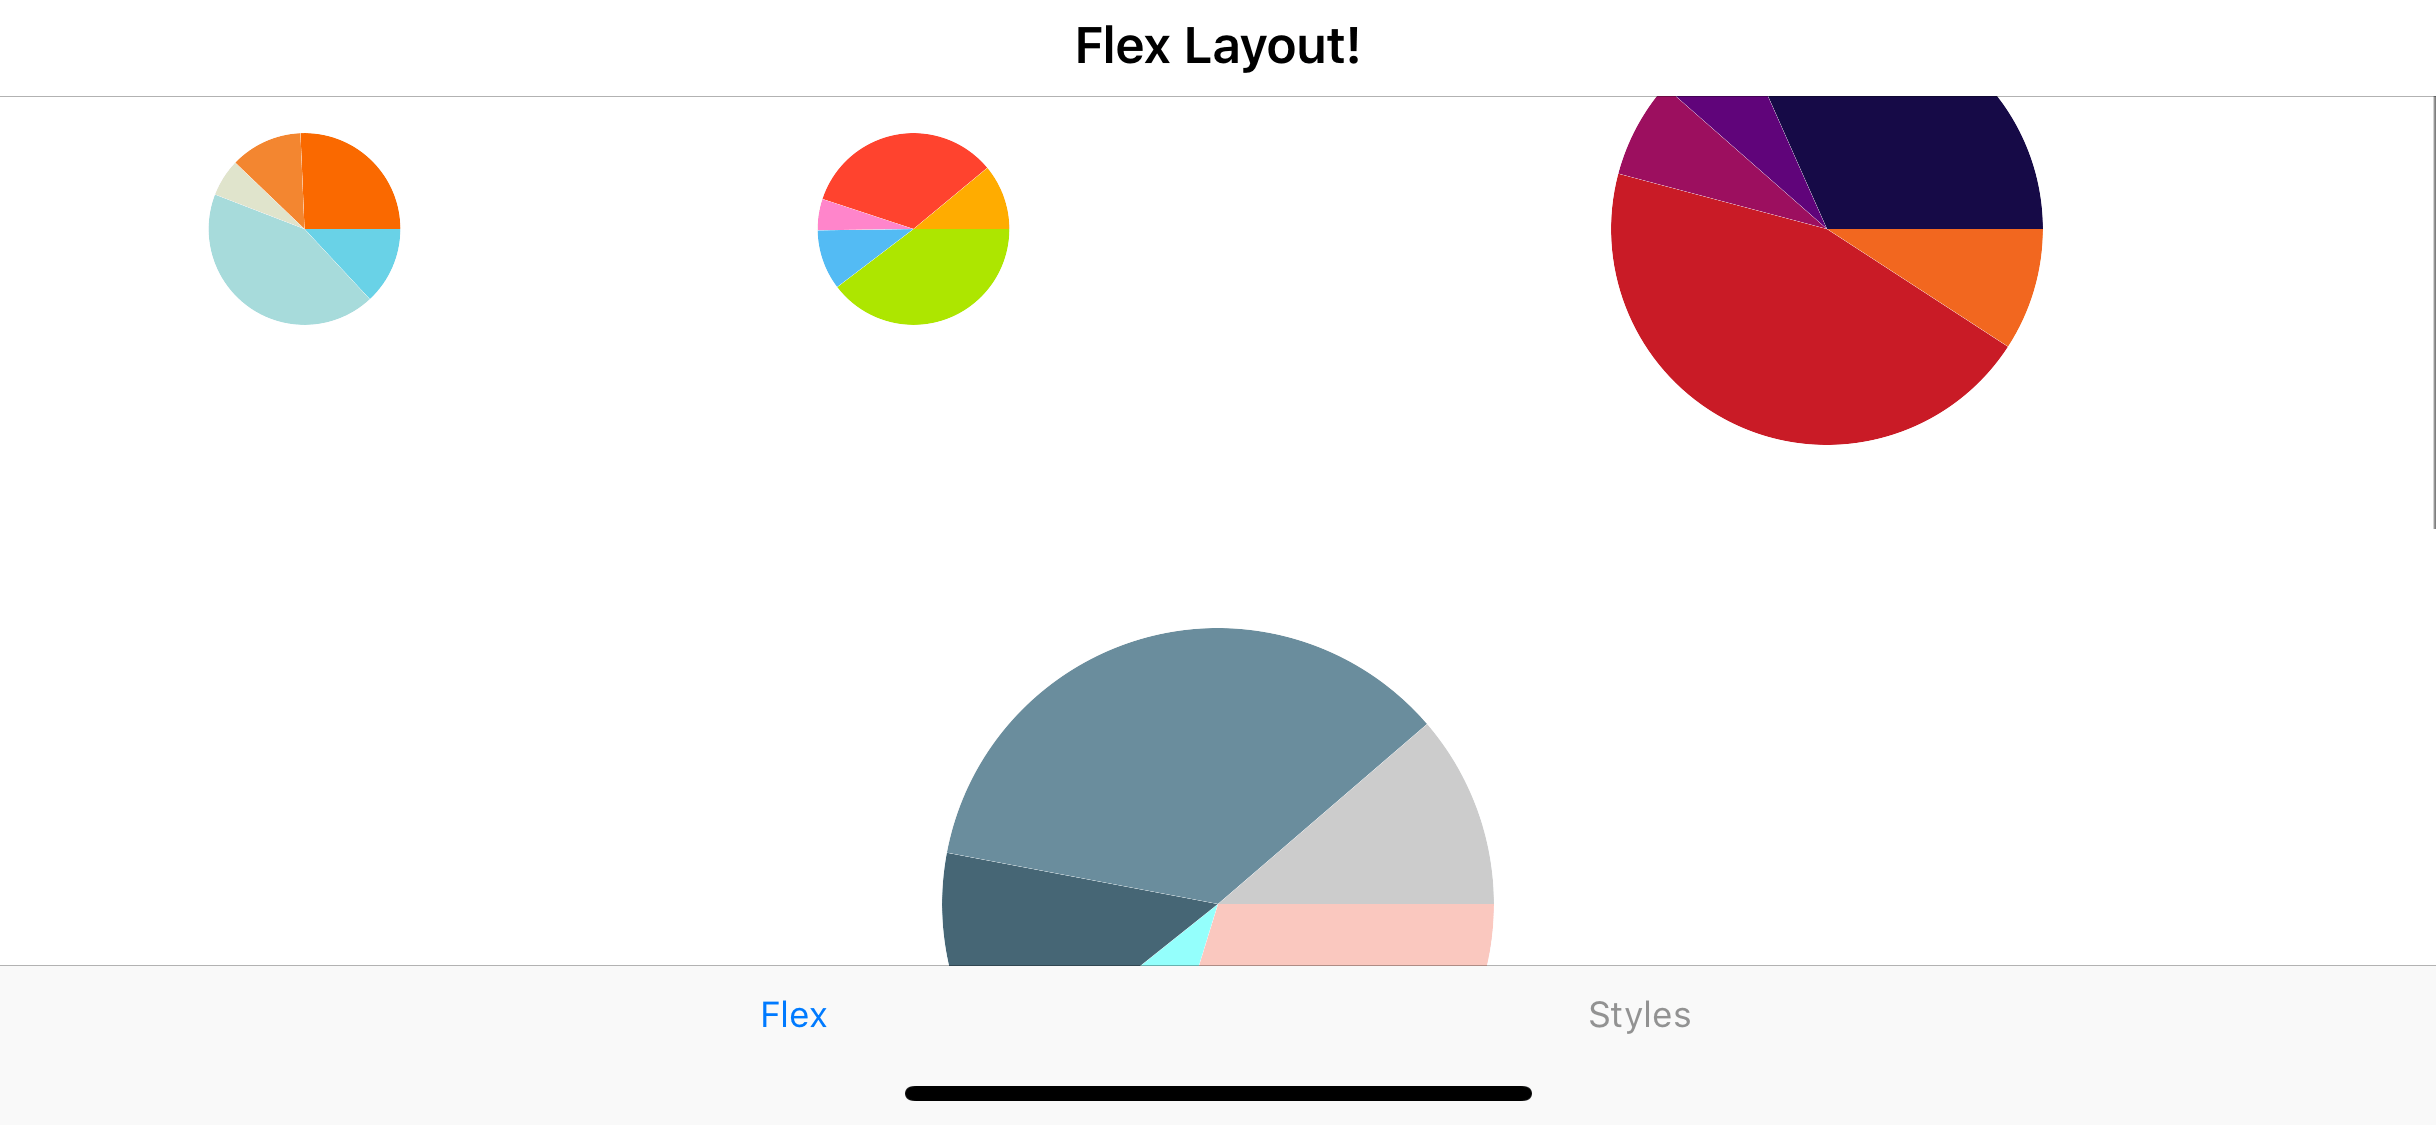
Let's take a peek at an example that combines some CSS with some FlexLayout goodness. And let's see this in action using some beautiful Pie Charts that come built-in with Telerik UI for Xamarin. Pro tip developers - you don't need to reinvent the wheel on complex UI. Telerik UI really shows off the engineering behind each control through performance and flexible APIs.

The CSS:
.chart {
    flex-basis: 25%;
    height: 100;
}

.third {
    flex-basis: 33.33%;
    height: 150;
}

.half {
    flex-basis: 50%;
    height: 200;
}

.full {
    flex-basis: 100%;
    height: 250;
}
The XAML:
<FlexLayout Direction="Row" Wrap="Wrap" AlignItems="Center" AlignContent="Start" >

    <telerikChart:RadPieChart StyleClass="chart">
        <telerikChart:RadPieChart.Palette>
            <local:OrangePalette />
        </telerikChart:RadPieChart.Palette>
        <telerikChart:RadPieChart.BindingContext>
            <local:ChartViewModel />
        </telerikChart:RadPieChart.BindingContext>
        <telerikChart:RadPieChart.Series>
            <telerikChart:PieSeries RadiusFactor="0.8"
                                    ValueBinding="Value"
                                    ItemsSource="{Binding Data}" />
        </telerikChart:RadPieChart.Series>
    </telerikChart:RadPieChart>

    <telerikChart:RadPieChart StyleClass="chart">
        <telerikChart:RadPieChart.Palette>
            <local:BrightPalette />
        </telerikChart:RadPieChart.Palette>
        <telerikChart:RadPieChart.BindingContext>
            <local:ChartViewModel />
        </telerikChart:RadPieChart.BindingContext>
        <telerikChart:RadPieChart.Series>
            <telerikChart:PieSeries RadiusFactor="0.8"
                                    ValueBinding="Value"
                                    ItemsSource="{Binding Data}" />
        </telerikChart:RadPieChart.Series>
    </telerikChart:RadPieChart>

    <telerikChart:RadPieChart StyleClass="chart, half">
        <telerikChart:RadPieChart.Palette>
            <local:DarkPalette />
        </telerikChart:RadPieChart.Palette>
        <telerikChart:RadPieChart.BindingContext>
            <local:ChartViewModel />
        </telerikChart:RadPieChart.BindingContext>
        <telerikChart:RadPieChart.Series>
            <telerikChart:PieSeries RadiusFactor="0.8"
                                    ValueBinding="Value"
                                    ItemsSource="{Binding Data}" />
        </telerikChart:RadPieChart.Series>
    </telerikChart:RadPieChart>

   ...
   ...

The XAML markup and CSS combined produce a layout like this in portrait orientation:

FlexPortrait
 

And like so in landscape orientation:

FlexLandscape
 

The FlexLayout is doing all the work of resizing and making sure everything has enough room to be displayed no matter the orientation for us - how nifty. This works on any container control no matter what be the containing children in the visual tree. And there's a whole lot more to FlexLayout too - Check out the docs for the full story.

Android Bottom Tabs

This next Xamarin.Forms 3.0 feature should be labeled - it's about time!. On Android, navigational tabs generally are on the top. But let's face it, iOS has taught us that the rightful place for tabs are at the bottom of the screen.

DroidTopNav
 

So, in Xamarin.Forms 3, we now have a way to move the tabs to the bottom of the screen, just as Steve Jobs would have wanted had he designed Android himself.

DroidBottomNav
 

Getting the tabs to be rendered at the bottom of the screen is way easier than anything else you ever had to do in Android.

var tabsPage = new Xamarin.Forms.TabbedPage();
tabsPage.On<Xamarin.Forms.PlatformConfiguration.Android>().SetToolbarPlacement(ToolbarPlacement.Bottom);

Yeah - that's it. Xamarin.Forms - making Android development tolerable since 2014 something.

Summing It All Up

So there you have it - a quick lap around some of the new and best features of Xamarin.Forms 3.

Styling XAML controls and pages using CSS is here to stay. Sure it seems a bit weird. But considering that you can use all of your hard won CSS knowledge from the web world, like selectors and cascading rules and apply it to Xamarin.Forms - it's pretty much a no-brainer to start using it. Again, it's an optional feature and developers can choose between XAML Styles or CSS.

The FlexLayoutis another nifty little rendering feature. Here is the second worthy bit of inspiration from the web world happily brought over to Xamarin.Forms. This time, add some controls to a FlexLayout layout - and let the layout do the calculations of where everything should appear on screen for you. Developers can read up on how flexible its layout options are.

Then Android bottom tabs - the mobile world as it should be.

In all, developers should definitely give Xamarin.Forms 3 a spin - it's stable and provides some exciting new features. Staying on the cutting edge has some awesome benefits - and may be you'll be so inclined to look forward to Xamarin.Forms 4.0. Onwards and to the future!

ASP.NET Core 2.2 Goes Bootstrap 4

$
0
0

ASP.NET Core 2.2 brings a migration from Bootstrap 3 to Bootstrap 4, major changes to project templates and the user interface, and more. We break down what's new.

ASP.NET Core 2.2 hit global availability on December 4, 2018. With the release of ASP.NET Core 2.2, project templates were overhauled. The change focused on migrating from Bootstrap 3 to Bootstrap 4, while at the same time modernizing and simplifying the user interface (UI). This overhaul included the default Identity UI boilerplate and scaffolding generated content. These changes are welcome as Bootstrap 4 gains traction as the new community default for HTML/CSS UI frameworks.

Bootstrap 3 vs. 4

The main goal of Bootstrap remains the same—to provide simple components for building responsive, mobile-first sites. However, the Bootstrap framework itself has changed pretty significantly from version 3 to 4. Bootstrap 4 now uses Sass (.scss) by default in its source code, unlike the previous version which was built on Less. The underlying grid has been expanded to use Flexbox, which provides simpler and more flexible layout options. Panels, wells, and thumbnails are now replaced with the concept of cards. Other notable features include white spacing utilities, a new look & feel, and an extra break point for extra large (XL) screen sizes.

Get Sass'y

Bootstrap 4 is built with the Sass CSS extension language (or pre-processor). Sass allows developers to use powerful features not typically available with CSS. Advanced features include nesting, variables, functions, and operators that can be used to produce flexible and reusable CSS libraries. With Sass, complex tasks like changing the theme of an app are reduced to a simple value change in a settings file.

In the following example, a map of colors comprise a theme for a Bootstrap app:

$theme-colors: (
  "primary": #84329b,
  "secondary": #02bceb
);

Changing settings scratches the surface of what's possible. Almost every aspect of Bootstrap can be customized, and it's fully documented.

While the source .scss files aren't included with the ASP.NET Core 2.2 project templates, they're easy to add to and compile with .NET tooling. If you're interested, continue reading through the Dependency Management section below.

Flexbox

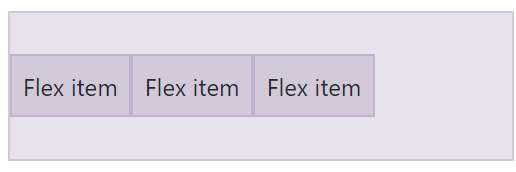
Bootstrap's grid system is now built with Flexbox—a module of CSS that defines a CSS box model optimized for UI design and the layout of items. With Flexbox, the grid system has been simplified and made more versatile.

Columns can be created without explicitly setting a numeric width. Instead of writing the class .col-{breakpoint}-{#}, it can be simplified as col. This improvement makes dealing with dynamic content much easier as the grid defaults to an equal width for each .col element.

<div class="col">
  First Column
</div>
<div class="col">
  Second Column
</div>

<!-- Dynamic items -->
<div class="row">
  @foreach (var item in data)
  {
    <div class="col">
      @item
    </div>
  }
</div>

Bootstrap also ships with a full set of Flexbox utilities used to manage layout and alignment of grid elements. The flex utilities simplify previously difficult tasks like stretching all elements to an equal height or vertically aligning an element within a parent.

<div class="d-flex align-items-center">...</div>

vertical-align

<div class="d-flex align-items-stretch">...</div>

stretch-align

Cards

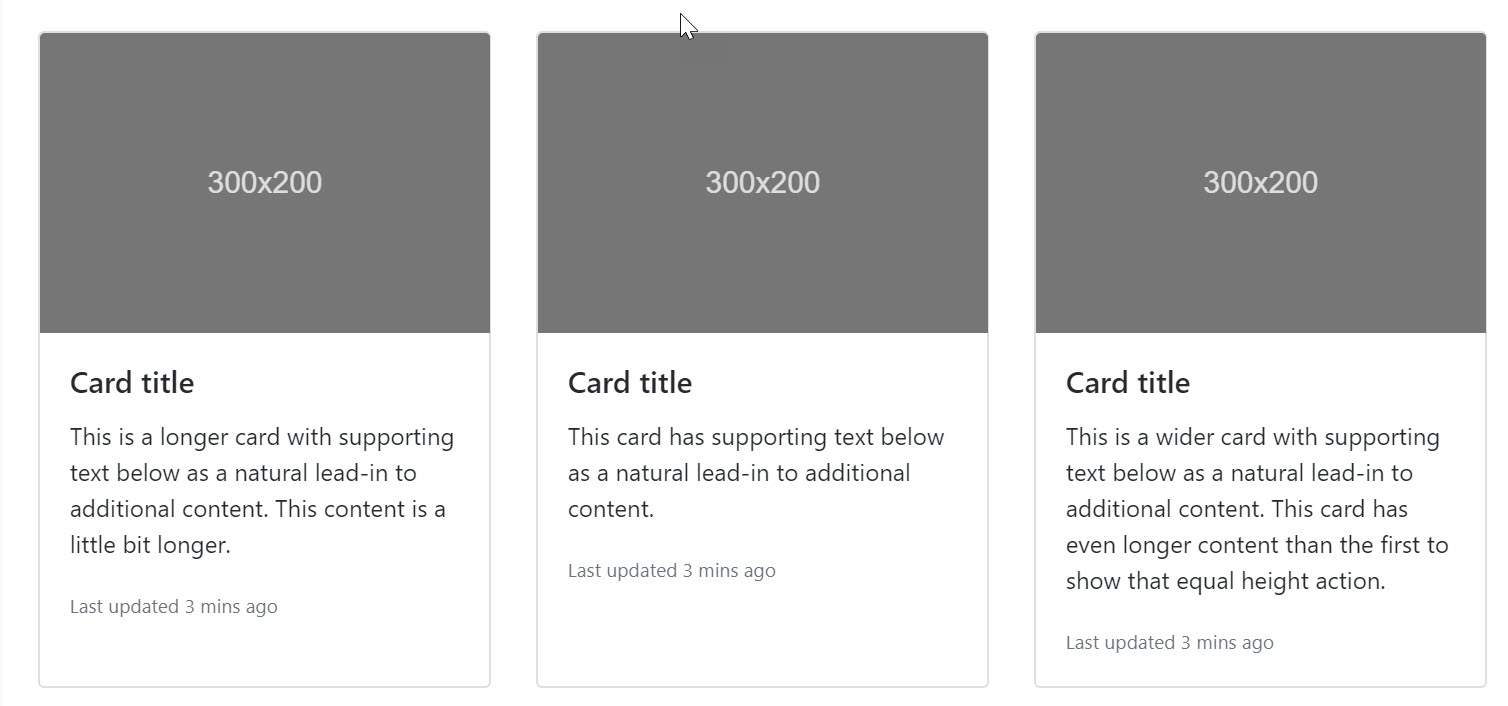
Cards are another area in which Bootstrap has changed in a big way. Cards are a replacement for wells and panels in prior versions of Bootstrap. Cards are more representative of a modern approach to UI design. Cards can include titles, images, and actionable items. They're perfect for focusing a user's attention.

<!-- A single card -->
<div class="card">
  <img class="card-img-top" src=".../100px200/" alt="Card image cap">
  <div class="card-body">
    <h5 class="card-title">Card title</h5>
    <p class="card-text">This is a longer card with supporting text below as a natural lead-in to additional content. This content is a little bit longer.</p>
    <p class="card-text"><small class="text-muted">Last updated 3 mins ago</small></p>
  </div>
</div>

Combined with the new card-deck container, cards can be used to compose a rich UI with groups that automatically line up.

<!-- A deck of cards -->
<div class="card-deck">
  <div class="card">...</div>
  <div class="card">...</div>
  <div class="card">...</div>
</div>

cards

These are just a few of the improvements that can be expected from Bootstrap itself. Next, we'll discuss the improvements made to the ASP.NET Core project templates and Identity features.

File New Project

File > New > Project experience

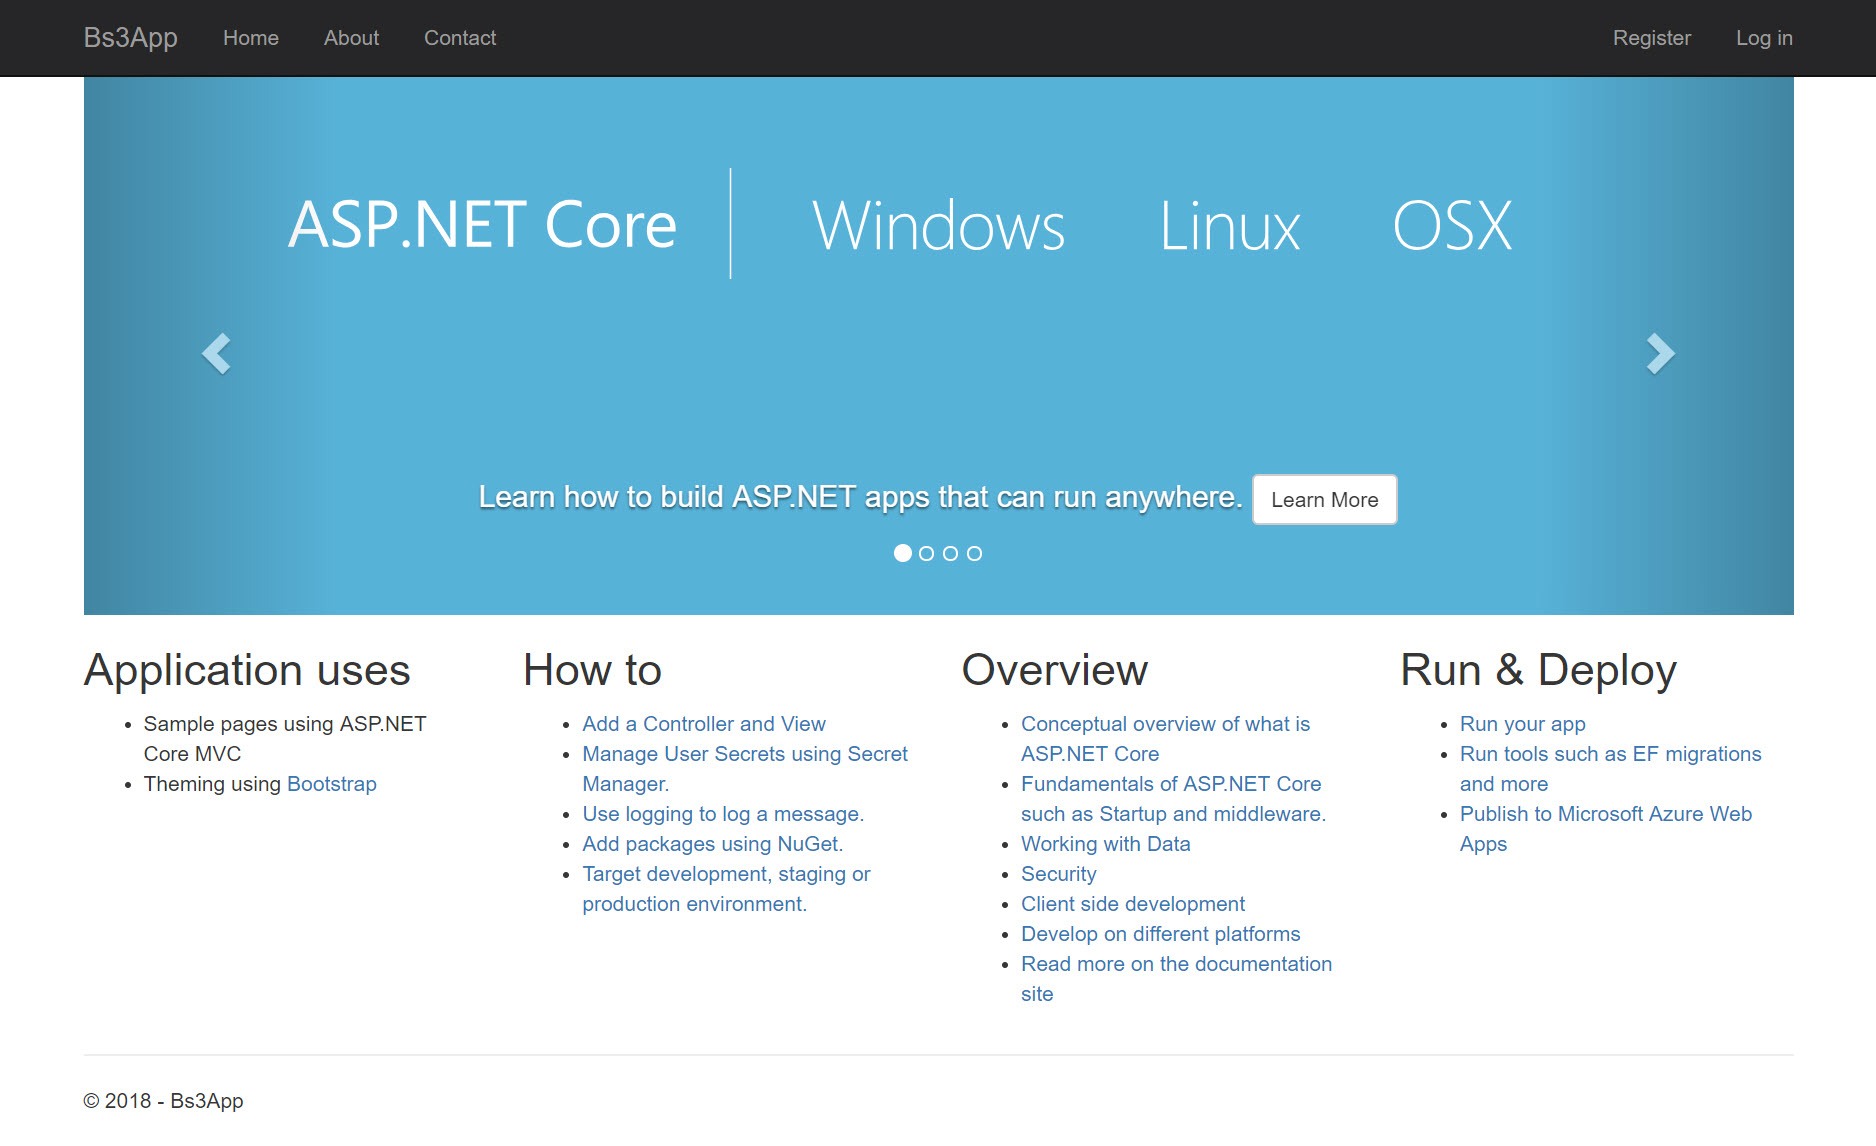
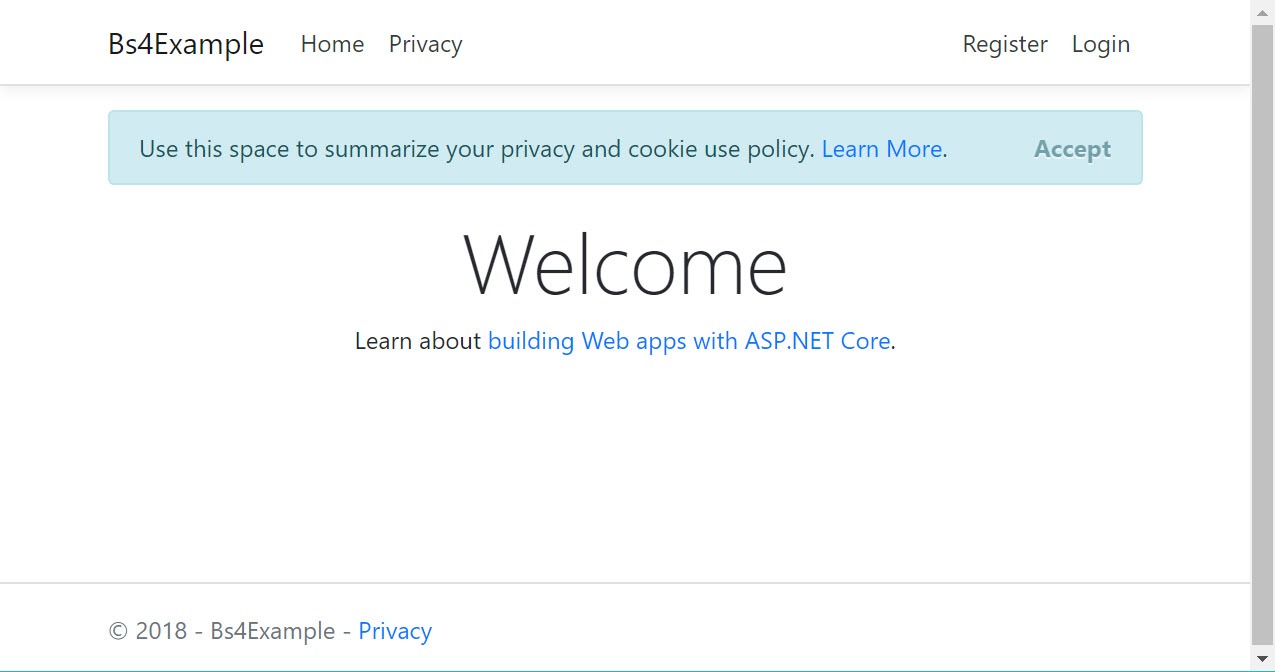
The ASP.NET Core new project web app template has been updated in this release with a simplified default index page. In previous versions, the index page included a sample carousel and additional elements. Carousels were once a popular UI feature but have decreased in popularity over the years. The removal of these items is a welcome change. There's less boilerplate code to remove when starting a new app.

aspnet21-index 

The new experience is cleaner with only a few example UI elements remaining. Examples include the top menu bar and alert box. A welcome message directing users to documentation replaces columns of reference links.

aspnet22-index

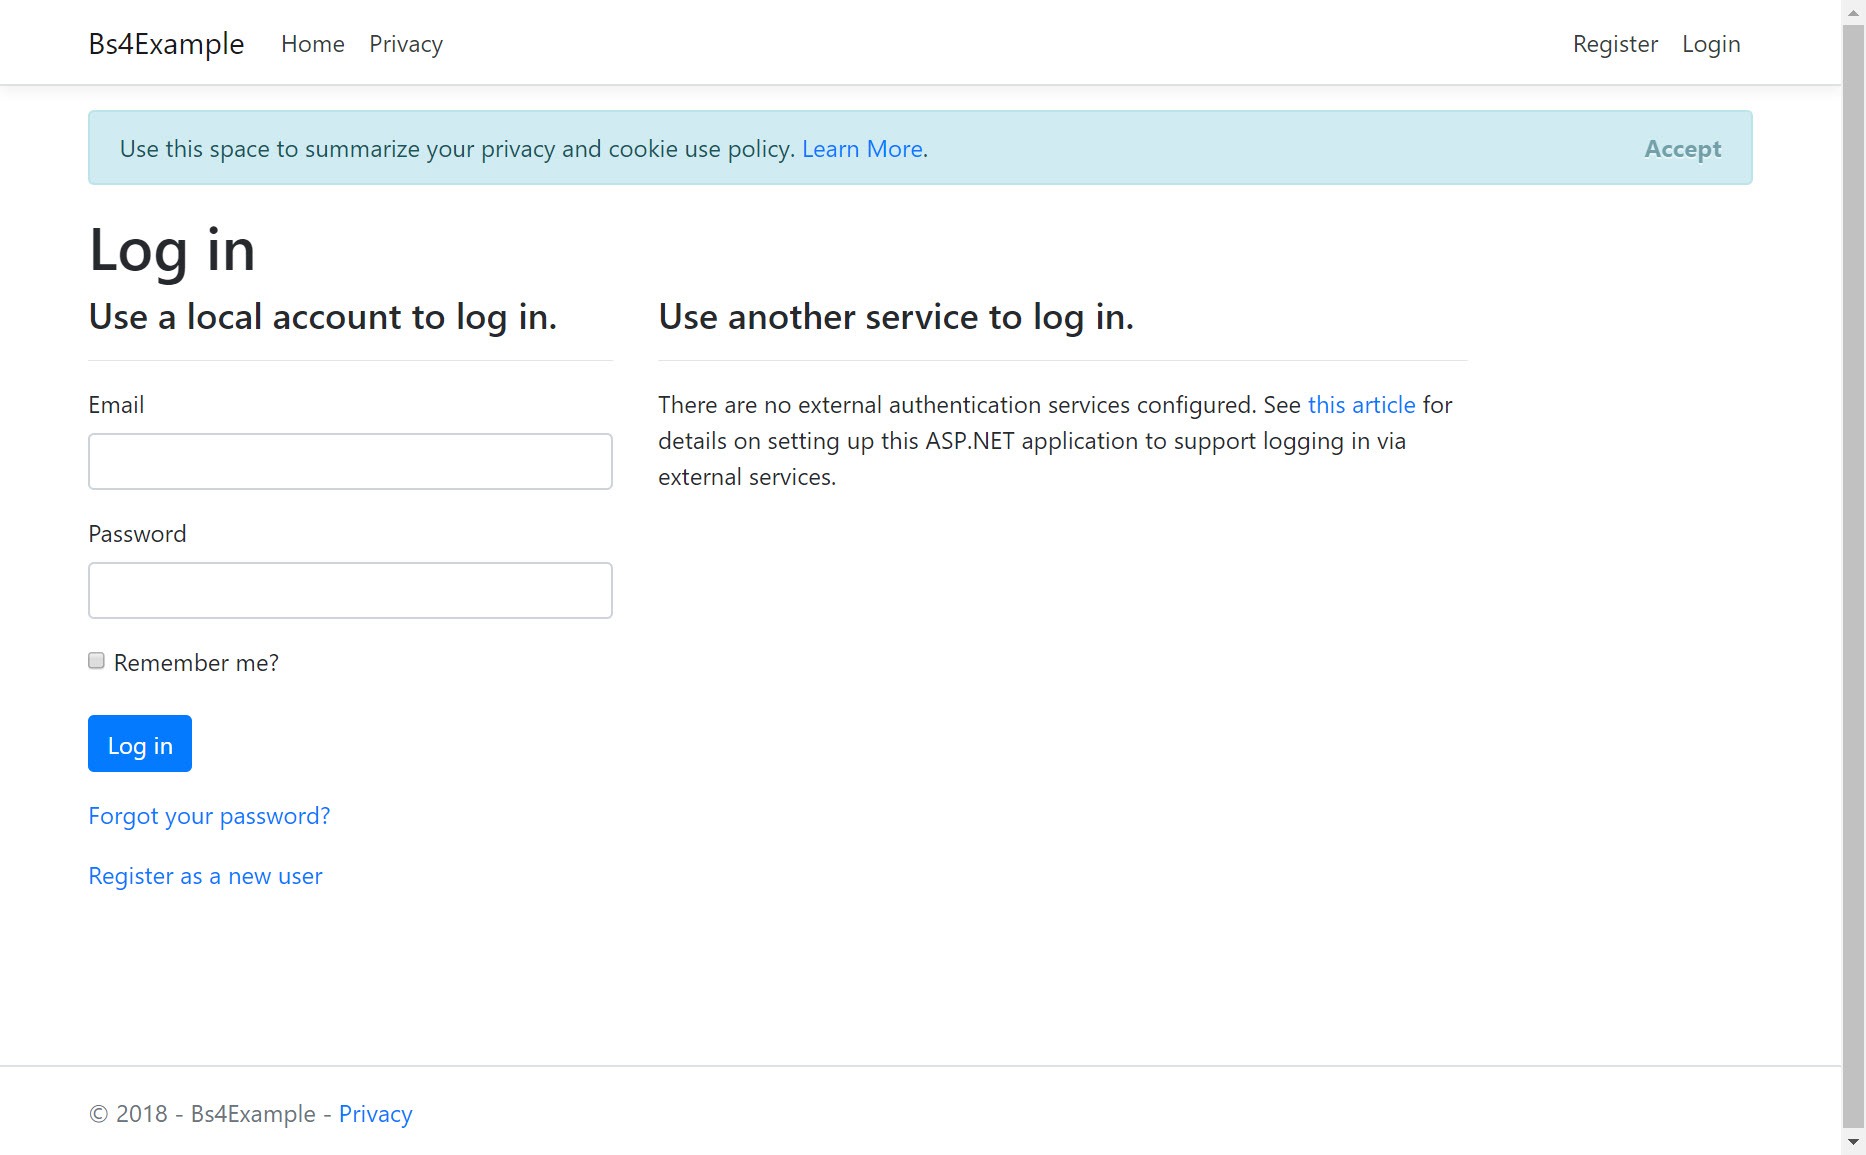
The Identity pages, which include login and registration screens, were also updated with the new Bootstrap style. The changes to specific Identity pages are less visually drastic than the index page.

Identity

In ASP.NET Core 2.1, Identity evolved to utilize a Razor Class Library (RCL). The RCL adds Identity to the project as a self-contained package represented as a single .dll library. Along with the Identity library, a scaffolding tool was added to override pages "hidden" within the Identity library itself. Because the Identity library includes many views that incorporate Bootstrap classes, it's important that the Identity library update along with the project template while retaining backwards compatibility.

aspnet22-login

An effort was made to ensure that the Identity library is flexible enough to serve both ASP.NET Core 2.1 and 2.2 users. Depending on which version of ASP.NET Core is used, the Identity library emits the correct markup for either Bootstrap 3 or 4. To support this requirement, an option can be set to specify the default UI framework for Identity.

The default UI framework is now set using the AddDefaultUI method and passing in the desired framework version as a parameter. For example, (UIFramework.Bootstrap4):

services.AddDefaultIdentity<IdentityUser>()
  .AddDefaultUI(UIFramework.Bootstrap4)
  .AddEntityFrameworkStores<ApplicationDbContext>();

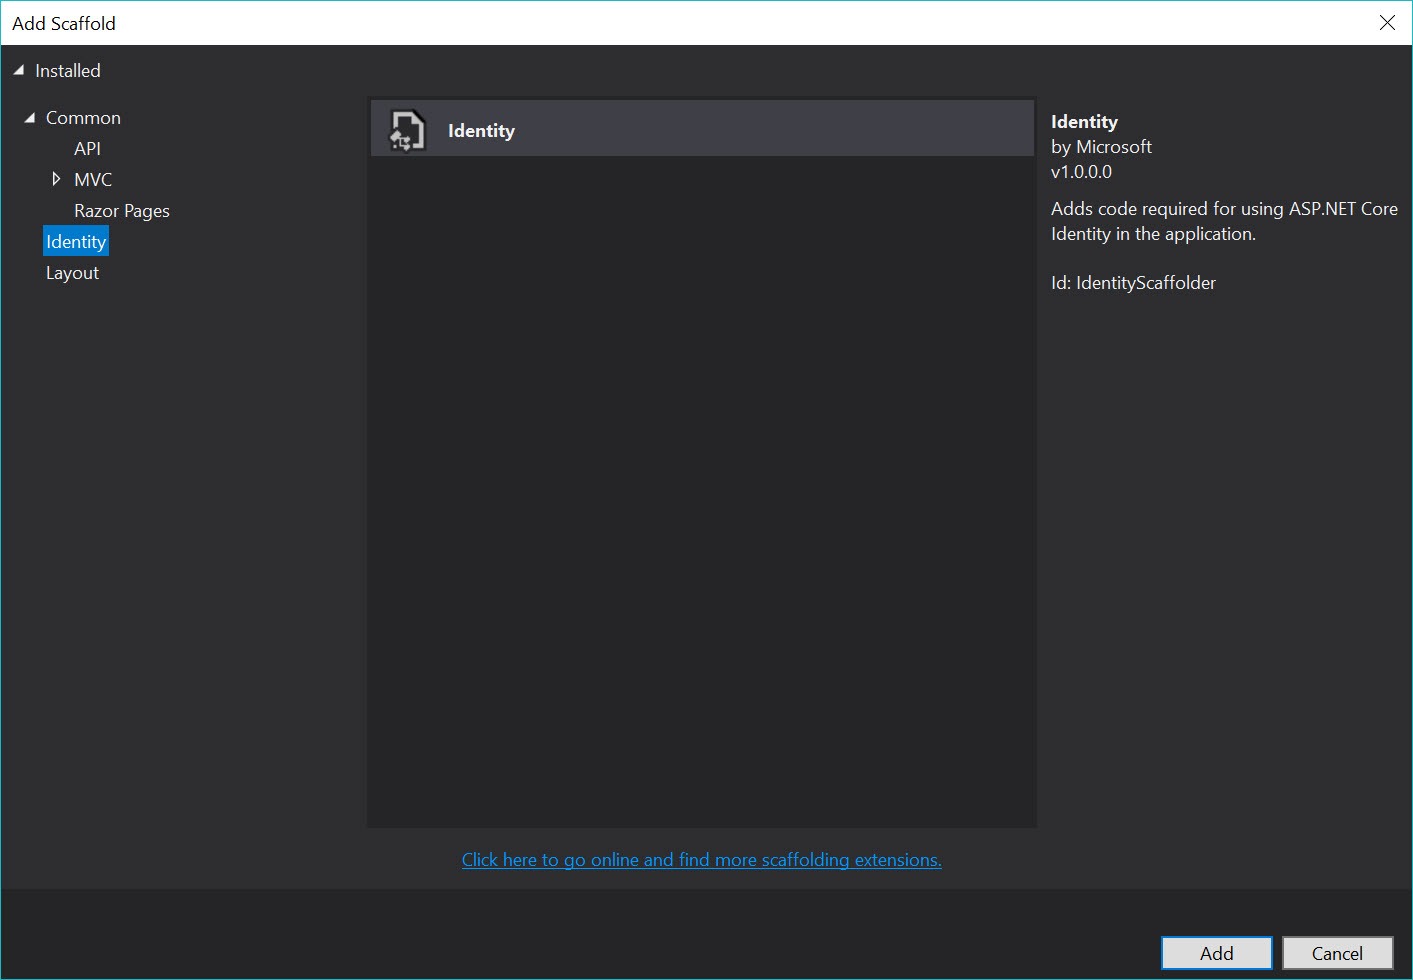
In addition to the ability to choose between versions, the scaffolding system generates the correct Bootstrap markup, thus ensuring its compatibility. The Identity scaffolding tool generates pages used to override the pre-packaged Identity pages. The scaffolding tool can be accessed by right-clicking the project in the Visual Studio's Solution Explorer window and choosing Add Scaffolded Item> Identity.

scaffold-items

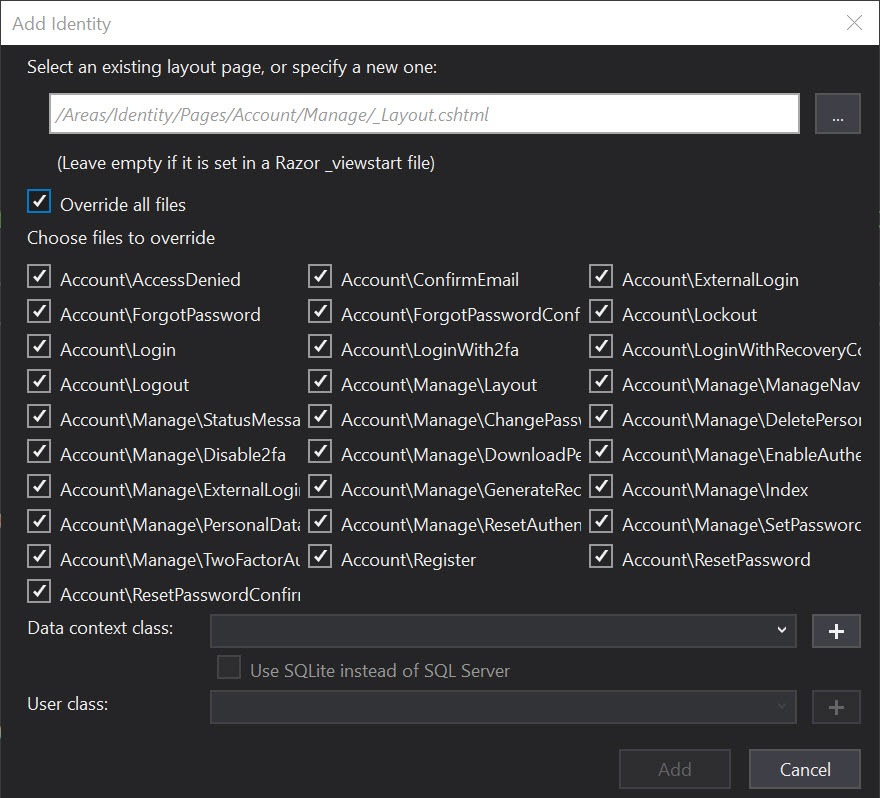
From the Add Scaffold dialog, individual pages from the Identity library can be generated. Alternatively, all pages can be generated at once.

scaffold-dialog

The pages generated by the tool are written to the Identity area of the app. These pages use Bootstrap 4 styles and serve as a good starting point for customization.

Dependency Management

Throughout the history of ASP.NET Core, there have been default options included for client-side dependency management such as NuGet and Bower. Because client-side development evolves so rapidly, a default is no longer included and developers can choose to handle dependency management however they see fit. Client-side packages can be managed from a variety of tools, such as npm, Yarn, and Bower. There are various command line (CLI) tools and Visual Studio extensions available to simplify the process; however, most of these tools were "born" outside of the .NET ecosystem and require additional setup and installation. These tools often introduce unnecessary files to the project as well. For example, the node_modules folder is notorious for being massive.

Libman is a simplified client-side dependency tool. It's included with Visual Studio 2017 and is an alternative for ASP.NET Core development. Libman can resolve client-side dependencies from a Content Delivery Network (CDN) or a file system while only targeting the files needed by the project. Developers can choose to retrieve single minified JavaScript and CSS files, or entire folders, which is useful for .scss development.

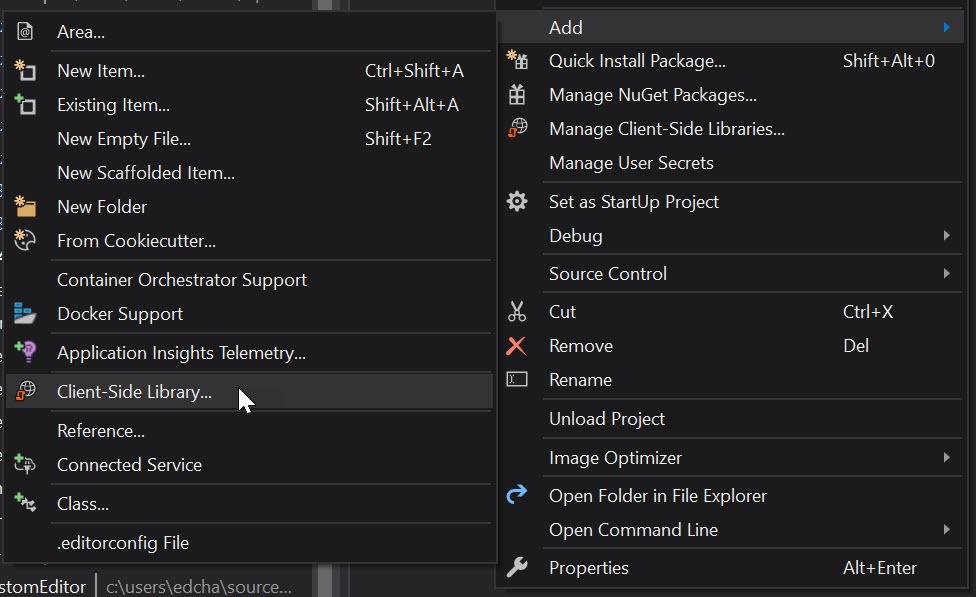
Let's use Libman to add the Bootstrap 4 .scss source code to a project. Right-click the project, and choose Add> Client-Side Library to display the Libman dialog used for fetching packages.

add-client-side-library

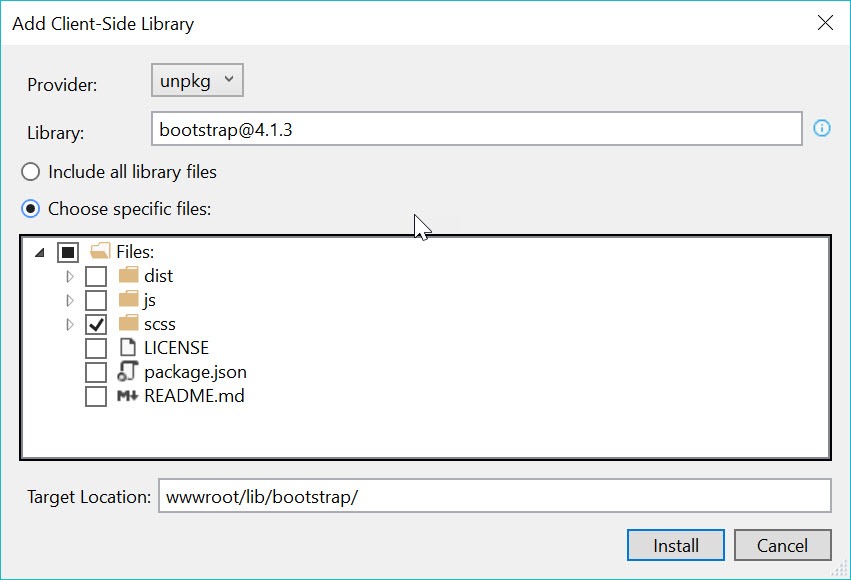
Next, choose a package provider. This can be the CDN cdnjs, the file system, or a package provider called unpkg. We'll use unpkg to retrieve the files, since unpkg allows us to quickly and easily load any file from any npm package without needing npm itself. Supply the package name and version number, then select the files to include in the project.

using-unpkg

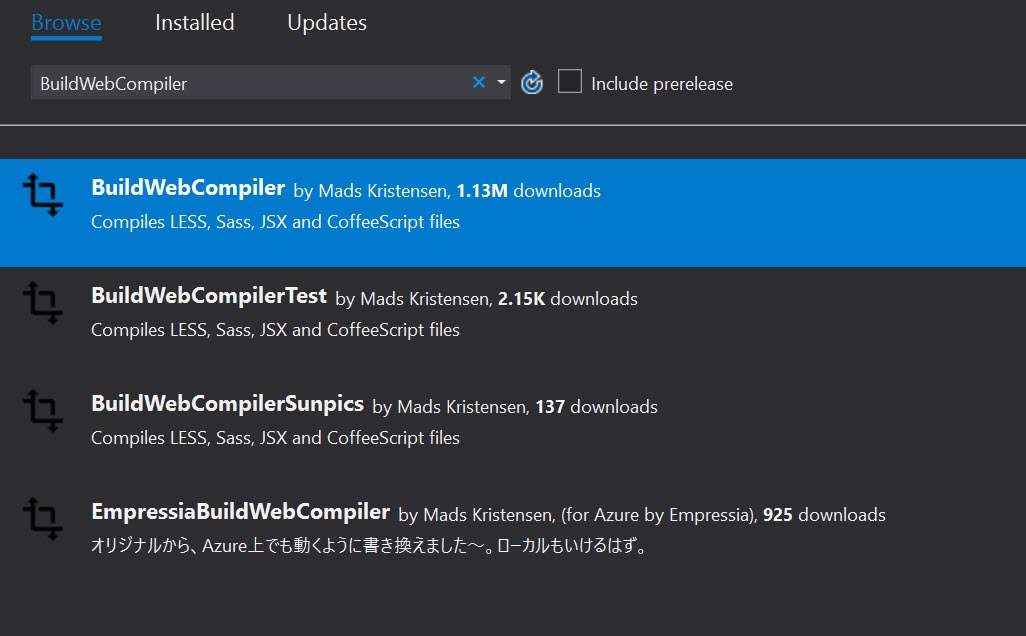
When clicking Install, Libman fetches the files and loads them into the target location. You can then work with the files in our project as needed. In this example, we're using .scss files, which need to be compiled into .css files the browser understands. To compile the files, install the BuildWebCompiler NuGet package—a .NET-based tool that can compile client-side assets. The NuGet package is added through Visual Studio's NuGet Package Manager window or via command line with Install-Package BuildWebCompiler.

BuildWebCompiler

With BuildWebCompiler installed, instruct the compiler to build the Bootstrap source code. A compilerconfig.json configuration file that uses simple input/output properties is needed to complete the task:

[
  {
    "outputFile": "wwwroot/css/bootstrap.css",
    "inputFile": "wwwroot/lib/bootstrap/scss/bootstrap.scss"
  }
]

If using a custom build of Bootstrap, you'll likely need to modify the <link /> tags within your app's _Layout.cshtml file:

<environment include="Development">
    <link href="~<myCustomPath>/css/bootstrap.css" rel="stylesheet" />
</environment>
<environment exclude="Development">
    <link href="~<myCustomPath>/css/bootstrap.min.css" rel="stylesheet" />
</environment>

Telerik UI for ASP.NET Core Bootstrap 4 theme

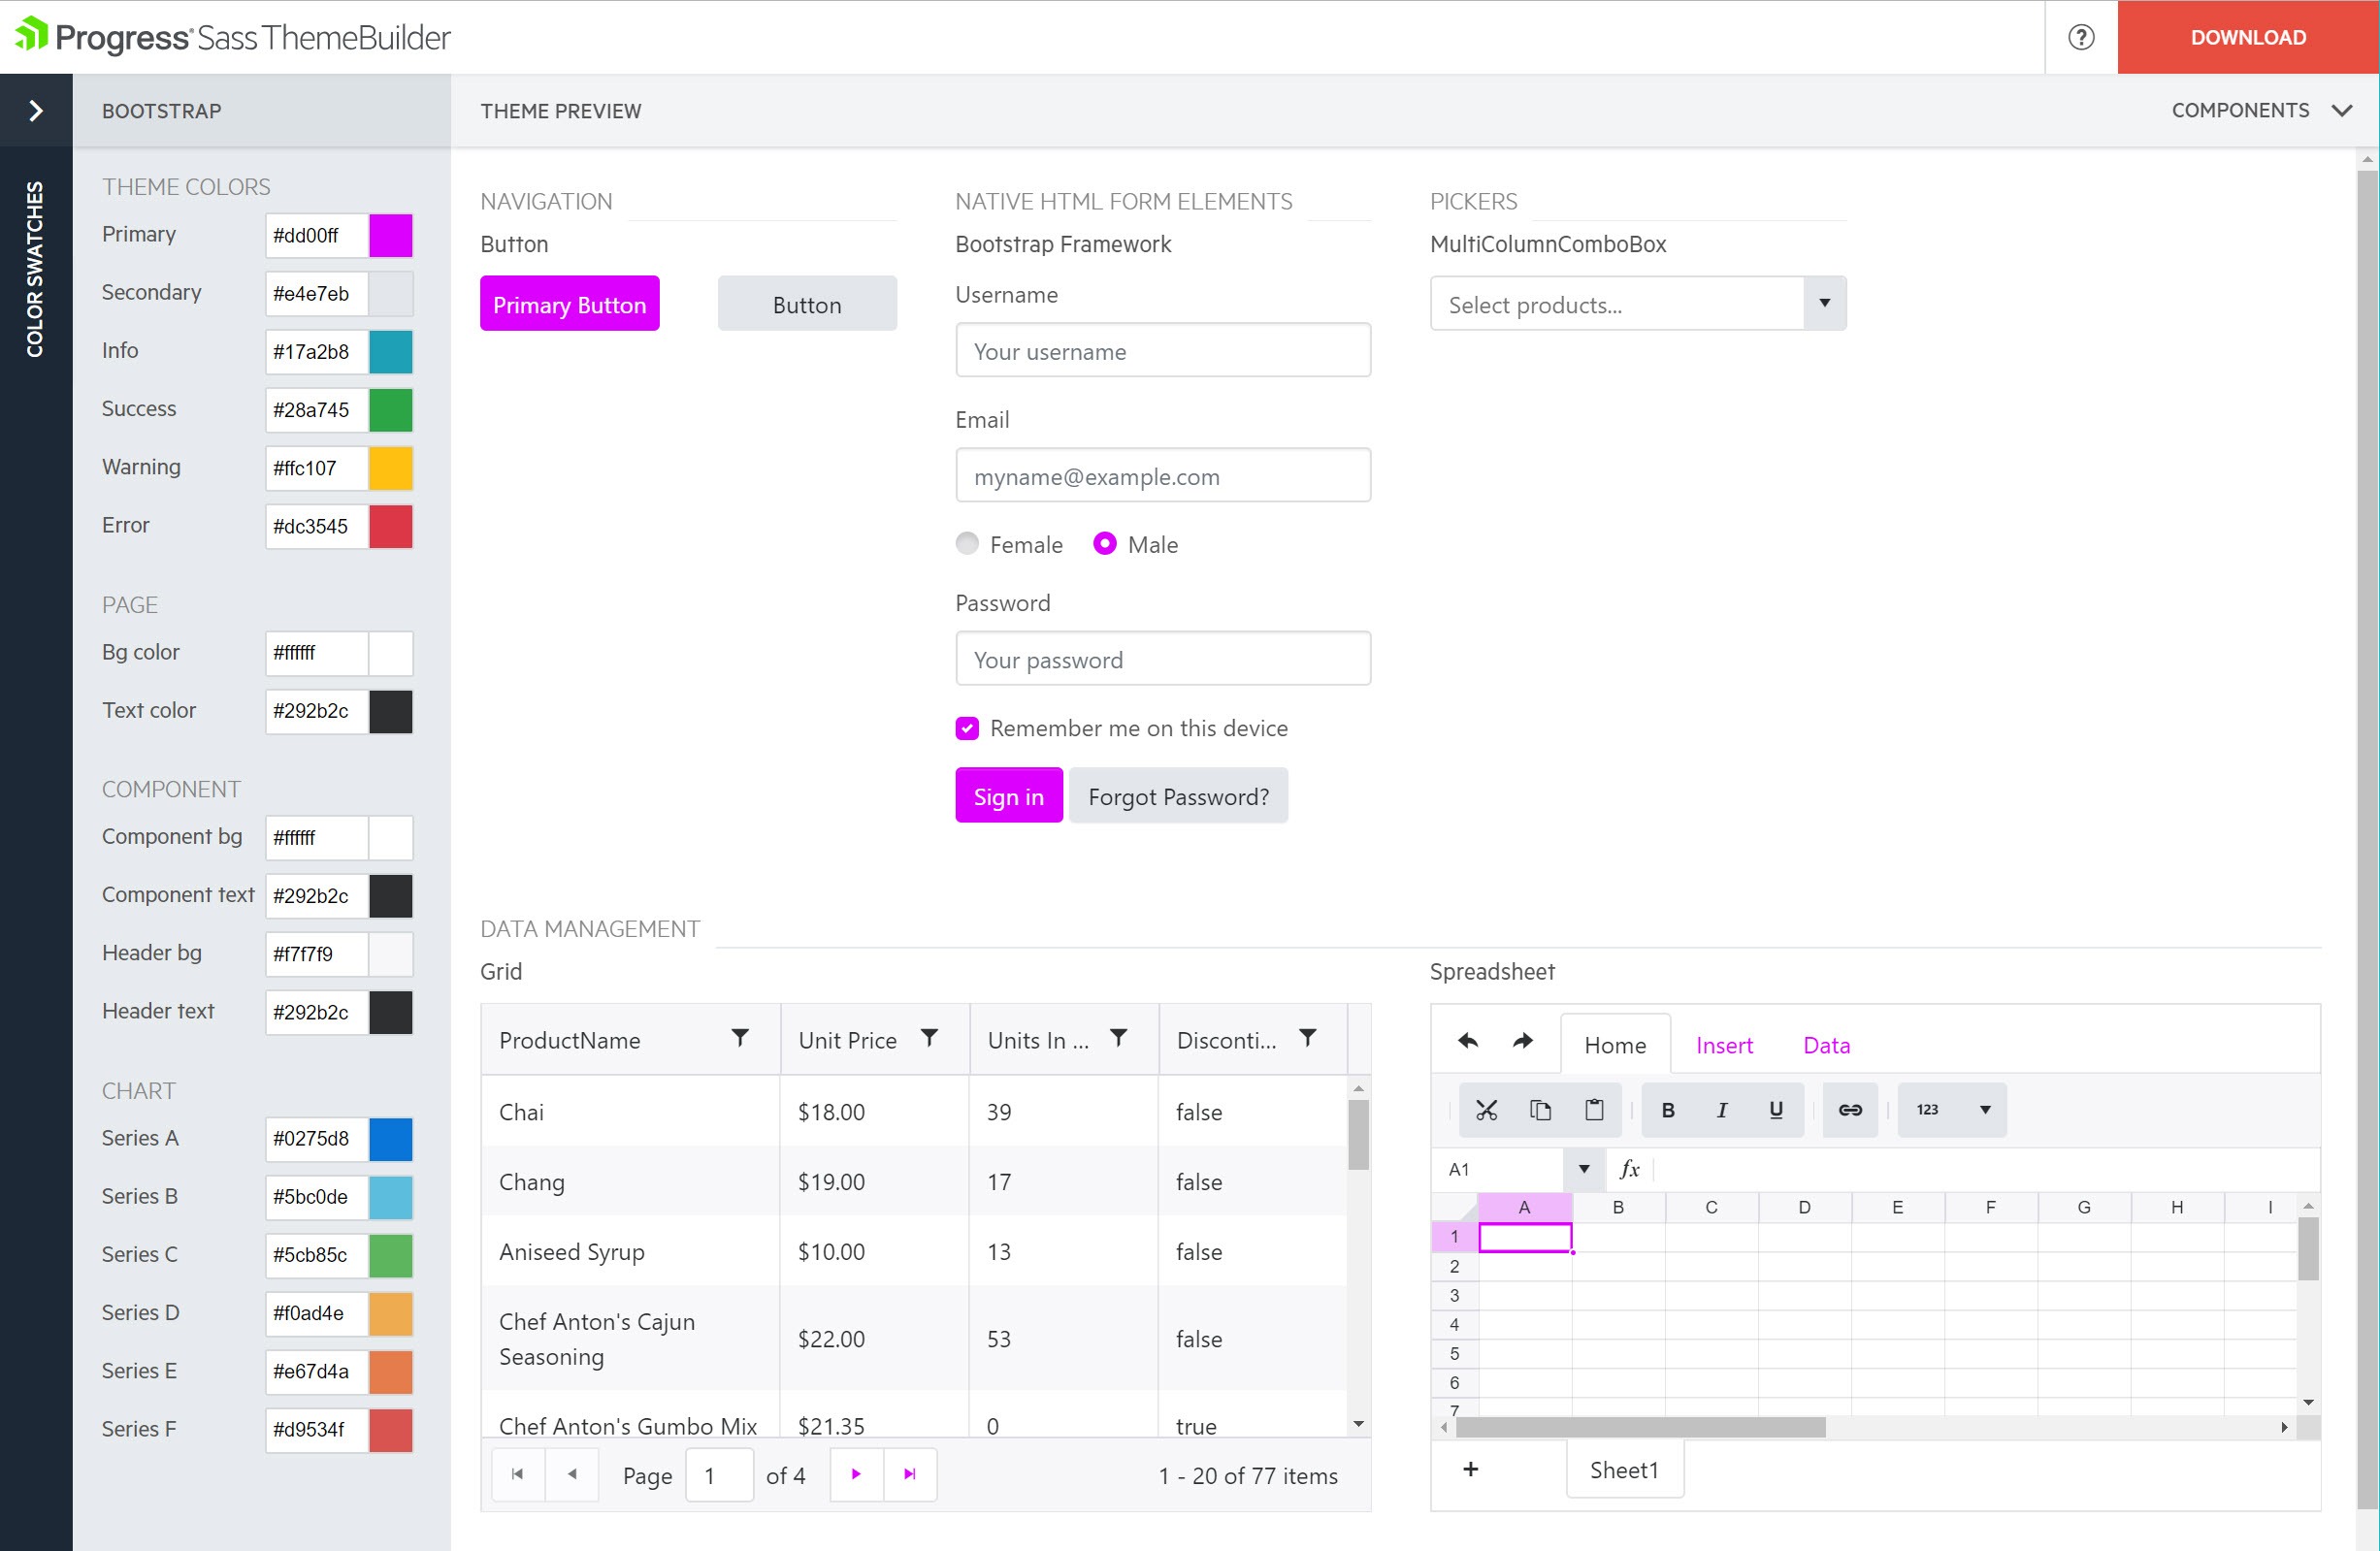
For the ultimate Bootstrap 4 experience, use the Bootstrap 4 theme in Telerik UI for ASP.NET Core. Since UI for ASP.NET Core supports Bootstrap 4, there are over 60 UI components that seamlessly integrate with ASP.NET Core 2.2 apps. In addition, developers can leverage the Kendo UI and Telerik Web UI Theme Builder. The Theme Builder not only customizes the Telerik UI components, but native Bootstrap 4 components as well. The Theme Builder also supports .scss files for developers who want to integrate with their custom Bootstrap builds.

theme-builder

If you're interested in seeing how UI for ASP.NET Core performs with your project, test drive it by downloading a 30 day free trial.

Wrap Up

ASP.NET Core 2.2 project templates have seen quite the improvement. The template improvements span across project basics, Identity & tooling, and dependency management. Bootstrap itself has changed significantly from version 3 to 4 with Sass source code, new grid layouts, cards, and much more. By updating the project templates, the ASP.NET team has set the stage for the next generation of ASP.NET Core apps.

Getting Started with Expander and Accordion for Xamarin.Forms

$
0
0

Have you ever been in a situation where you wanted to show more data inside your mobile app? Perhaps the issue was insufficient screen size on your mobile device, which makes it difficult to fit all the information you want to share. This is not an issue anymore! Telerik UI for Xamarin solves that for you. 

There are two new controls that you can find with the UI toolkit, which first shipped in the R3 2018 release. These controls solve the limited real estate problem on a mobile device while delivering a very elegant UI. Let me introduce you the Expander and Accordion controls of Telerik UI for Xamarin.

This blog post will get you familiar with these two controls and all the features and customization capabilities they provide. Both controls can expand or collapse their content and hold various components in their content panel. 

Expander control

Accordion control

As you can see both controls have a similar UI, but at the same time they serve different purposes. You can use the Expander to display the content of a single item, but if you want to have multiple items and only one of them to have the ability to expand at a time, you should go for the Accordion control.

Expander

RadExpander control has two main parts:

  • ExpanderHeader
  • Content

The snippet below shows how to define RadExpander in XAML:

<telerikPrimitives:RadExpander x:Name="expander" HeaderText="More Options">
   <telerikPrimitives:RadExpander.Content>
      <StackLayout Margin="10, 20, 10, 20">
         <StackLayout Orientation="Horizontal" Spacing="10">
            <telerikPrimitives:RadCheckBox/>
            <Label Text="Make my profile private"/>
         </StackLayout>
         <StackLayout Orientation="Horizontal" Spacing="10">
            <telerikPrimitives:RadCheckBox  />
            <Label Text="Only show my posts to people who follow me" />
         </StackLayout>
      </StackLayout>
   </telerikPrimitives:RadExpander.Content>
</telerikPrimitives:RadExpander>

Features

Here are some of the features the Expander control ships with:

  • Collapsed and Expanded States
  • Animation
  • Customization Options
  • Theming support

Collapsed and Expanded States

The control hosts the content in an expandable container that can be easily expanded/collapsed by tapping on its header. The current state of the control can be switched by the IsExpanded property.

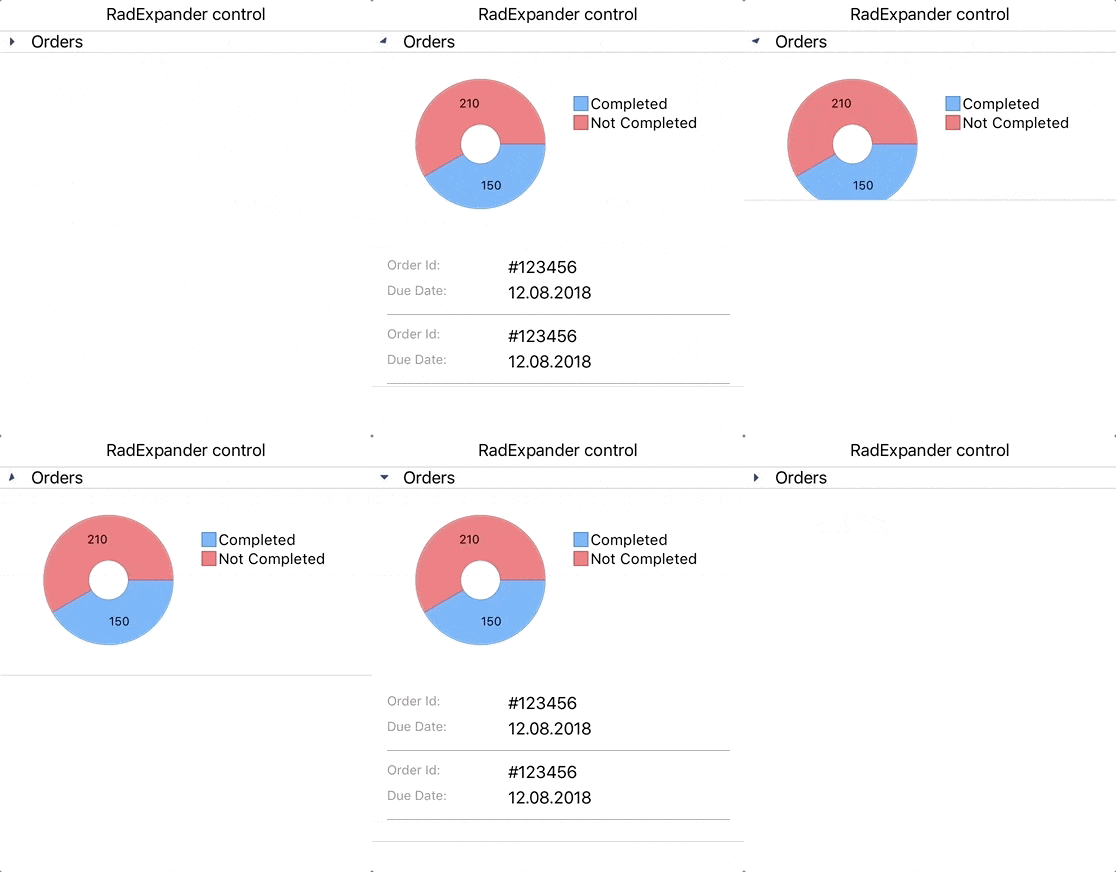
The image below shows what the control looks like in its expanded/collapsed states:

Expander First Look

Animation

The RadExpander control provides a property which allows you to enable or disable the animation when the content is collapsed / expanded. If you want to enable/disable the animation you need to use the IsAnimationEnabled property. By default, the Animation is enabled.

Customization Options

The visual appearance of the control can be customized in a variety of ways, like:

  • Animation duration and easing can be set through the AnimationDuration and AnimationEasing properties.
  • Border Styling. You can change the color and thickness of the border surrounding the component.
  • Header location.The Expander Header can be placed at the top or at the bottom of the expandable container.
  • Header Customization.If the default Expander Header control doesn't suit your needs, you can use ExpanderHeader content control. This content control provides various of properties to customize the indicator’s text, location, color, rotation animation, font family and size. If you want to customize the ExpanderHeader, check our help article.

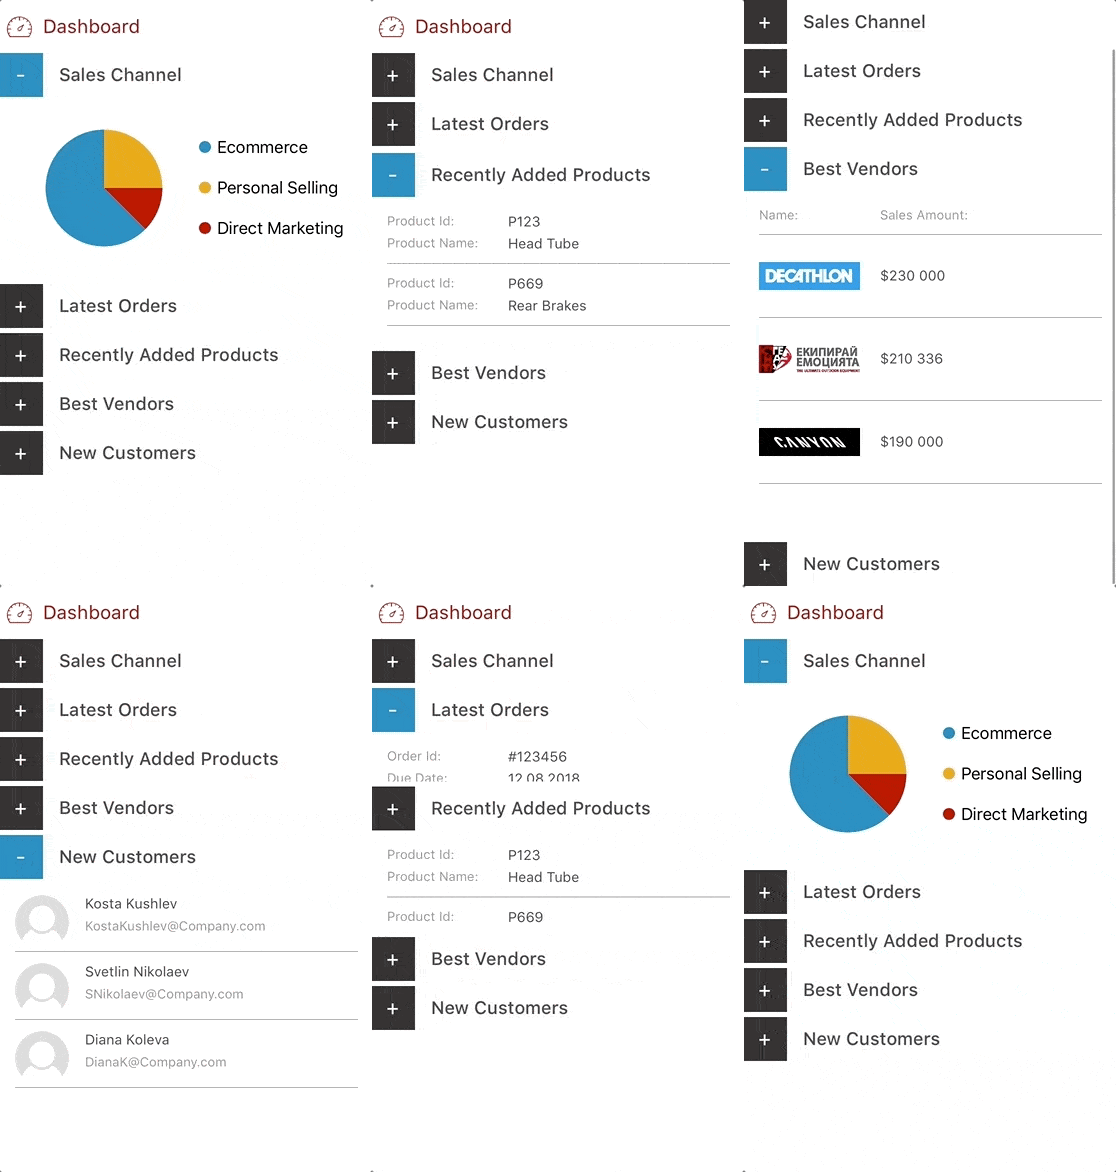
The image below shows what the RadExpander control looks like after customization:

Expander customization

Accordion

The RadAccordion control contains a set of collapsible content panels. Each panel (AccordionItem) consists of a Header (AccordionItemHeader) and Content. The Accordion control expands only one of its items at a time within the available space.

The snippet below shows how the RadAccordion can be defined in XAML:

<telerikPrimitives:RadAccordion x:Name="accordion">
   <telerikPrimitives:AccordionItem HeaderText="Attachments"IsExpanded="True">
      <telerikPrimitives:AccordionItem.Content>
         <telerikInput:RadButton Text="Attach files"
                         Margin="70, 20, 70, 20"
                         BorderColor="Blue"
                         BorderThickness="2"/>
      </telerikPrimitives:AccordionItem.Content>
   </telerikPrimitives:AccordionItem>
   <telerikPrimitives:AccordionItem HeaderText="Settings">
      <telerikPrimitives:AccordionItem.Content>
         <StackLayout Margin="10, 20, 10, 20">
            <StackLayout Orientation="Horizontal" Spacing="10">
               <telerikPrimitives:RadCheckBox  />
               <Label Text="Make my profile private" />
            </StackLayout>
            <StackLayout Orientation="Horizontal" Spacing="10">
               <telerikPrimitives:RadCheckBox  />
               <Label Text="Only show my posts to people who follow me" />
            </StackLayout>
         </StackLayout>
      </telerikPrimitives:AccordionItem.Content>
   </telerikPrimitives:AccordionItem>
   <telerikPrimitives:AccordionItem HeaderText="Rating">
      <telerikPrimitives:AccordionItem.Content>
         <telerikInput:RadShapeRating x:Name="rating" Margin="20"/>
       </telerikPrimitives:AccordionItem.Content>
   </telerikPrimitives:AccordionItem>
</telerikPrimitives:RadAccordion>

Features

Here are some of the features the Accordion control ships with:

  • Collapsed and Expanded States
  • Animation
  • Customization Options
  • Theming support

Collapsed and Expanded States

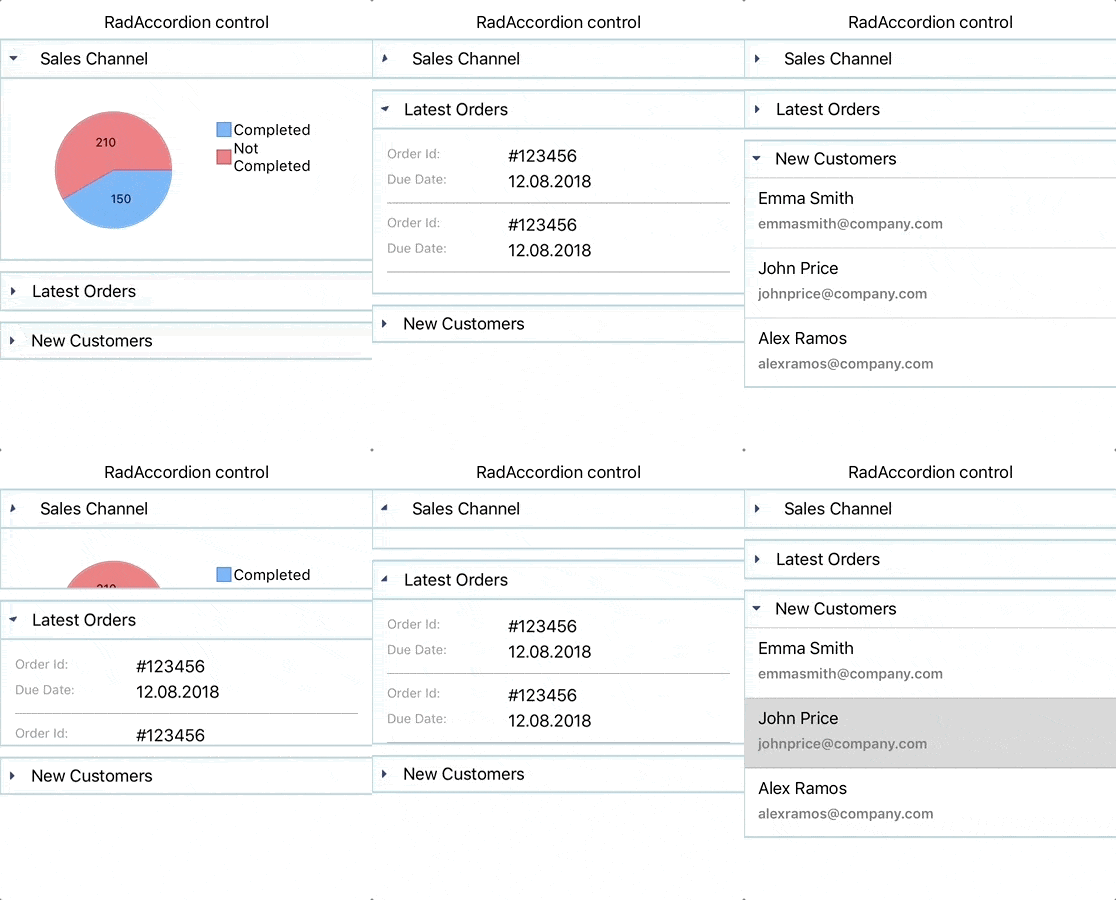
The RadAccordion control is designed in such a way that opening one AccordionItem automatically closes the previous displayed content.

The image below shows this functionality:

Accordion First Look

Animation While Expanding/Collapsing

The Animation that RadAccordion control provides while expanding/collapsing its content can be enabled/disabled through the IsAnimationEnabled property.

Customization Options

The Accordion control's header provides the following options for customization: 

  • Animation duration and easing can be set through the AnimationDuration and AnimationEasing properties.
  • Border Styling. You can change the way the Border around the control looks with the BorderColor and BorderThickness properties of the AccordionItem.
  • Header Customization.If the default AccordionItemHeader does not suit your needs, you can use AccordionItemHeader content control. This content control provides various properties to customize the indicator’s text, location, color, rotation animation, font family and size. If you want to customize the AccordionItemHeader, check our help article.

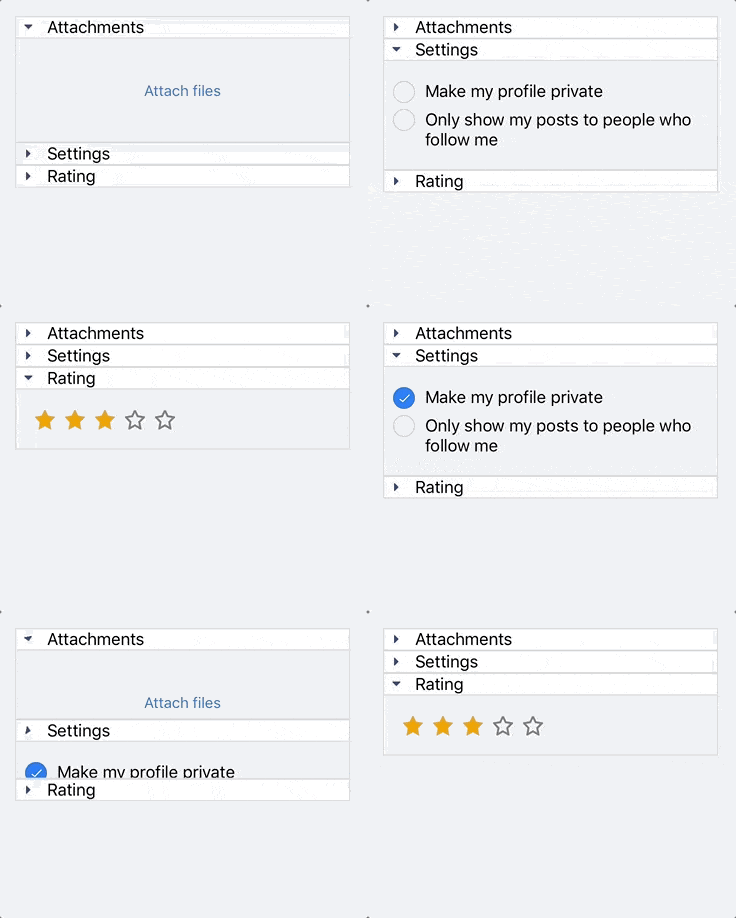
Here's what the RadAccordion control looks like after customization:

Accordion customization

Both RadAccordion and RadExpander come with built-in Theming Support. Using a predefined theme provides your application with a consistent look and feel across all platforms.

We would love to hear what you think about Expander and Accordion controls and how we can continue to improve them. If you have any ideas for features to add, do not hesitate to share this information with us on our Telerik UI for Xamarin Feedback portal.

Don’t forget to check out the various demos of the controls in our SDK Sample Browser and the Telerik UI for Xamarin Demos application.

If you have not yet tried the Telerik UI for Xamarin suite, take it out for a spin with a 30-day free trial, offering all the functionalities and controls at your disposal at zero cost.

Happy coding with our controls!

Creating a Reusable, JavaScript-Free Blazor Modal

$
0
0

In this guide, Chris Sainty helps you learn how to build a reusable modal without using any JavaScript for your Blazor and Razor applications.

Modals are a common feature of today’s web applications. You will find them in most UI frameworks, and they range from simple confirmation boxes to full-blown forms. In this post, I’m going to walk you through building a JavaScript-free, reusable modal for your Blazor/Razor Components applications. To make things even more interesting, we’re going to build the modal in such a way that we can pass it components to display instead of just plain text or markup strings.

For anyone new to Blazor, let me give you a quick overview. Blazor is a SPA-like framework developed by Microsoft. There is a client-side model, which runs via a WebAssembly-based .NET runtime. There’s also a server-side model (Razor Components), which runs on the standard .NET Core runtime. You can find out more at Blazor.net.

Getting Set Up

If you’re new to Blazor development, then you will need to make sure you have the latest version of the .NET Core SDK installed. You will also need to install the Blazor Language services, as well as the Blazor templates via the dotnet CLI.

dotnet new -i Microsoft.AspNetCore.Blazor.Templates

Creating a Blazor Library

We want to be able to use our modal in whatever projects we see fit. The best way to achieve this is by using the Blazor Library project included in the CLI templates we installed above. This project type works in a similar way to a class library and allows us to share components and their assets (images, CSS, etc.) between Blazor applications.

As this project type is currently only available using the dotnet CLI, we can run the following commands to create a new directory as well as the Blazor Library project.

mkdir BlazorModal
cd BlazorModal
dotnet new blazorlib

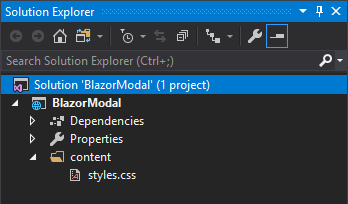
Now we have a new Blazor library project we can open in Visual Studio. Before we do anything else, let’s remove some of the default items that come with the template. The only thing we want to keep is the styles.css, so the project should look like this.

EmptyBlazorLibrary

The first thing we are going to build is the ModalService. This is going to be the glue which will join our modal component with any other components that wish to use it. In the root of the project, add a new class called ModalService.cs with the following code.

using Microsoft.AspNetCore.Blazor;using Microsoft.AspNetCore.Blazor.Components;using System;namespace BlazorModal.Services
{publicclassModalService{publicevent Action<string, RenderFragment> OnShow;publicevent Action OnClose;publicvoidShow(string title, Type contentType){if(contentType.BaseType !=typeof(BlazorComponent)){thrownewArgumentException($"{contentType.FullName} must be a Blazor Component");}var content =newRenderFragment(x =>{ x.OpenComponent(1, contentType); x.CloseComponent();});
OnShow?.Invoke(title, content);}publicvoidClose(){
OnClose?.Invoke();}}}

So what’s going on here?

The class exposes two methods, Show() and Close(), as well as a couple of events. The Show method is the interesting one, though. After checking that the type passed in via the contentType argument is a Blazor component, it creates a new RenderFragment using said type. This is then passed into the OnShow event so it can be used by an event handler. We’ll get to that in a bit.

Now before we go any further, I know what some of you are thinking… What’s a RenderFragment??

In simple terms, a RenderFragment represents a piece of UI. Blazor uses these RenderFragments to output the final HTML in the browser. In the code above, if we passed in a type of Foo, the resulting HTML would look like this.

<Foo></Foo>

There are many interesting uses for RenderFragment especially when dealing with dynamic component generation, but that is a topic for another time. Let’s crack on.

IServiceCollection Extension

When creating a library, I always find it a good idea to provide an extension method which can handle registering services with the DI container. It makes sure that everything gets registered with the correct scope, plus consumers only have to add a single line to their apps. Add a new class to the root of the project called ServiceCollectionExtension.cs with the following code.

using BlazorModal.Services;using Microsoft.Extensions.DependencyInjection;namespace BlazorModal
{publicstaticclassServiceCollectionExtensions{publicstatic IServiceCollection AddBlazorModal(this IServiceCollection services){return services.AddScoped<ModalService>();}}}

Now that the service is in place, we can build the modal component. I always like to separate the logic and the markup of my components. This is achieved by creating a base class with all the logic that the component will inherit, leaving the component with just markup.

First add a new Razor View named Modal.cshtml, then add a new class called Modal.cshtml.cs. The reason for this naming is so that Visual Studio will nest the base class under the Razor View. You don’t have to follow this convention, but it does keep the solution window nice and tidy. Also be sure it’s a Razor View you select and not a Razor Page — Razor Pages won’t work.

Let’s look at the base class logic first.

Oh! One other thing. You will need to change the name of the base class. As you can see in the code below, I’ve stuck Base on the end. Again, you can call it what you want. Model is another popular choice. But this is to stop a name clash with the code generated by Modal.cshtml.

Component Logic

using BlazorModal.Services;using Microsoft.AspNetCore.Blazor;using Microsoft.AspNetCore.Blazor.Components;using System;namespace BlazorModal
{publicclassModalBase: BlazorComponent, IDisposable
{[Inject] ModalService ModalService {get;set;}protectedbool IsVisible {get;set;}protectedstring Title {get;set;}protected RenderFragment Content {get;set;}protectedoverridevoidOnInit(){
ModalService.OnShow += ShowModal;
ModalService.OnClose += CloseModal;}publicvoidShowModal(string title, RenderFragment content){
Title = title;
Content = content;
IsVisible =true;StateHasChanged();}publicvoidCloseModal(){
IsVisible =false;
Title ="";
Content =null;StateHasChanged();}publicvoidDispose(){
ModalService.OnShow -= ShowModal;
ModalService.OnClose -= CloseModal;}}}

Working from the top, we inject an instance of the modal service. Then we’re declaring a few parameters that we’ll be using in the markup side of the component. We’re overriding one of Blazor’s lifecycle methods, OnInit, so we can attach the ShowModal and CloseModal methods to the respective OnShow and OnClose events from the modal service.

The ShowModal and CloseModal methods are pretty self-explanatory. The only part that is probably worth pointing out is the call to StateHasChanged. We need to call StateHasChanged due to the fact that these methods are invoked from outside of the component. And all this method does is tell the component that something has changed so it needs to re-render itself.

Finally, the component implements the IDisposable interface so we can unregister the event handlers when the component is destroyed.

Now let’s look at the markup side.

Component Markup

@inherits ModalBase

<div class="bm-container @(IsVisible ? "bm-active" : string.Empty)">

    <divclass="bm-overlay"onclick="@CloseModal"></div><divclass="blazor-modal"><divclass="bm-header"><h3class="bm-title">@Title</h3><buttontype="button"class="bm-close"onclick="@CloseModal"><span>&times;</span></button></div><divclass="bm-content">
            @Content
        </div></div></div>

The first line is a directive stating the component is inheriting from ModalBase. Next we have a container div with a bit of Razor syntax which uses the IsVisible property to toggle the bm-active class. This is what’s responsible for showing or hiding the component.

The next div is for creating a darkened overlay that the modal will sit on. This also has a onclick handler which closes the modal if a user clicks anywhere on the overlay.

Then we come to the modal itself. It has a header which displays the title along with a button that can be used to close the modal. The @Content marker is where the RenderFragment we talked about earlier will be displayed.

Adding a Bit of Style

No component would be complete without a bit of styling. There is nothing special or clever her — I’m by no means a CSS guru. But the following classes should give everything a nice clean look and feel with the modal being centered both horizontally and vertically on the page. All thanks to the wonders of Flexbox!

.bm-container{display: none;align-items: center;justify-content: center;position: fixed;width:100%;height:100%;z-index:2;}.bm-overlay{display: block;position: fixed;width:100%;height:100%;z-index:3;background-color:rgba(0,0,0,0.5);}.bm-active{display: flex;}.blazor-modal{display: flex;flex-direction: column;width:50rem;background-color:#fff;border-radius:4px;border:1px solid #fff;padding:1.5rem;z-index:4;}.bm-header{display: flex;align-items: flex-start;justify-content: space-between;padding:002rem 0;}.bm-title{margin-bottom:0;}.bm-close{padding:1rem;margin: -1rem -1rem -1rem auto;background-color: transparent;border:0;-webkit-appearance: none;cursor: pointer;}

Testing it Out

We have now built our modal, but it would be good to see it all in action. Let’s add a standalone Blazor app to the solution so we can try it out. This will work just as well with a server-side project if you prefer.

Right-click on the solution and Add > New Project. Then select ASP.NET Core Web Application and give it a name. I’m going to call it BlazorTest. Finally, select Blazor as the project type from the dialogue.

If you prefer, you could use the CLI with the following command.

dotnet new blazor -n BlazorTest

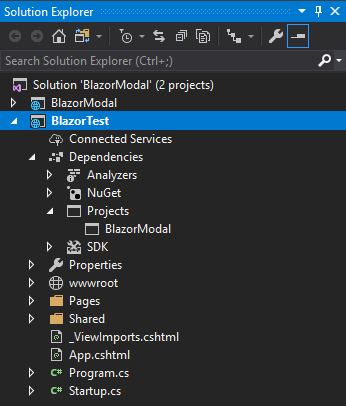
We also need to add a project reference from the BlazorTest (or whatever you’ve called it) to the BlazorModal project. Your solution should now look like this.

SolutionWithTestProject

Setting Up the Test Project

Now that we have a test project, we need to do three things to register our modal for use.

First, we need to add the following lines into the _ViewImports.cshtml.

@using BlazorModal
@using BlazorModal.Services

@addTagHelper *, BlazorModal

The using statements will save us having to use fully qualified names when using the ModalService. The addTagHelper will import all components from the specified namespace.

Second, we need to add our ModalService to the DI container. Due to our earlier work creating the service collection extension method, we just need to add the following to the ConfigureServices method in Startup.cs.

using BlazorModal;// Other code omitted for brevitypublicvoidConfigureServices(IServiceCollection services){
services.AddBlazorModal();}

The third and final task is to add the modal component to the MainLayout.cshtml.

@inherits BlazorLayoutComponent

<Modal/><divclass="sidebar"><NavMenu/></div><!—Remainingcodeomittedforbrevity-->

We have now setup the test project to use our modal component.

Creating a Test Component

In order to test our modal we are going to create a simple form component that we will display in our modal. In the Pages folder, add a new Razor View called SimpleForm.cshtml and add the following code.

@if (ShowForm)
{
<divclass="simple-form"><divclass="form-group"><labelfor="first-name">First Name</label><inputbind="@FirstName"type="text"class="form-control"id="first-name"placeholder="Enter email"/></div><divclass="form-group"><labelfor="last-name">Last Name</label><inputbind="@LastName"type="text"class="form-control"id="last-name"placeholder="Enter email"/></div><buttononclick="@SubmitForm"class="btn btn-primary">Submit</button></div>
}
else
{
<divclass="alert alert-success"role="alert">
Thanks @FirstName @LastName for submitting the form.
</div>
}

@functions {
bool ShowForm { get; set; } = true;
string FirstName { get; set; }
string LastName { get; set; }

void SubmitForm()
{
ShowForm = false;
}
}

The component takes the user’s first and last names and then shows them a personalized message after they click submit.

All that’s left is to call it. Let’s make some additions to the Index component to call our modal with the simple form we’ve just created.

@page "/"
@inject ModalService ModalService

<h1>Hello, world!</h1>
Welcome to your new app.

<SurveyPromptTitle="How is Blazor working for you?"/><hr/><buttononclick="@ShowModal">Show Modal</button>

@functions {
private void ShowModal()
{
ModalService.Show("Simple Form", typeof(SimpleForm));
}
}

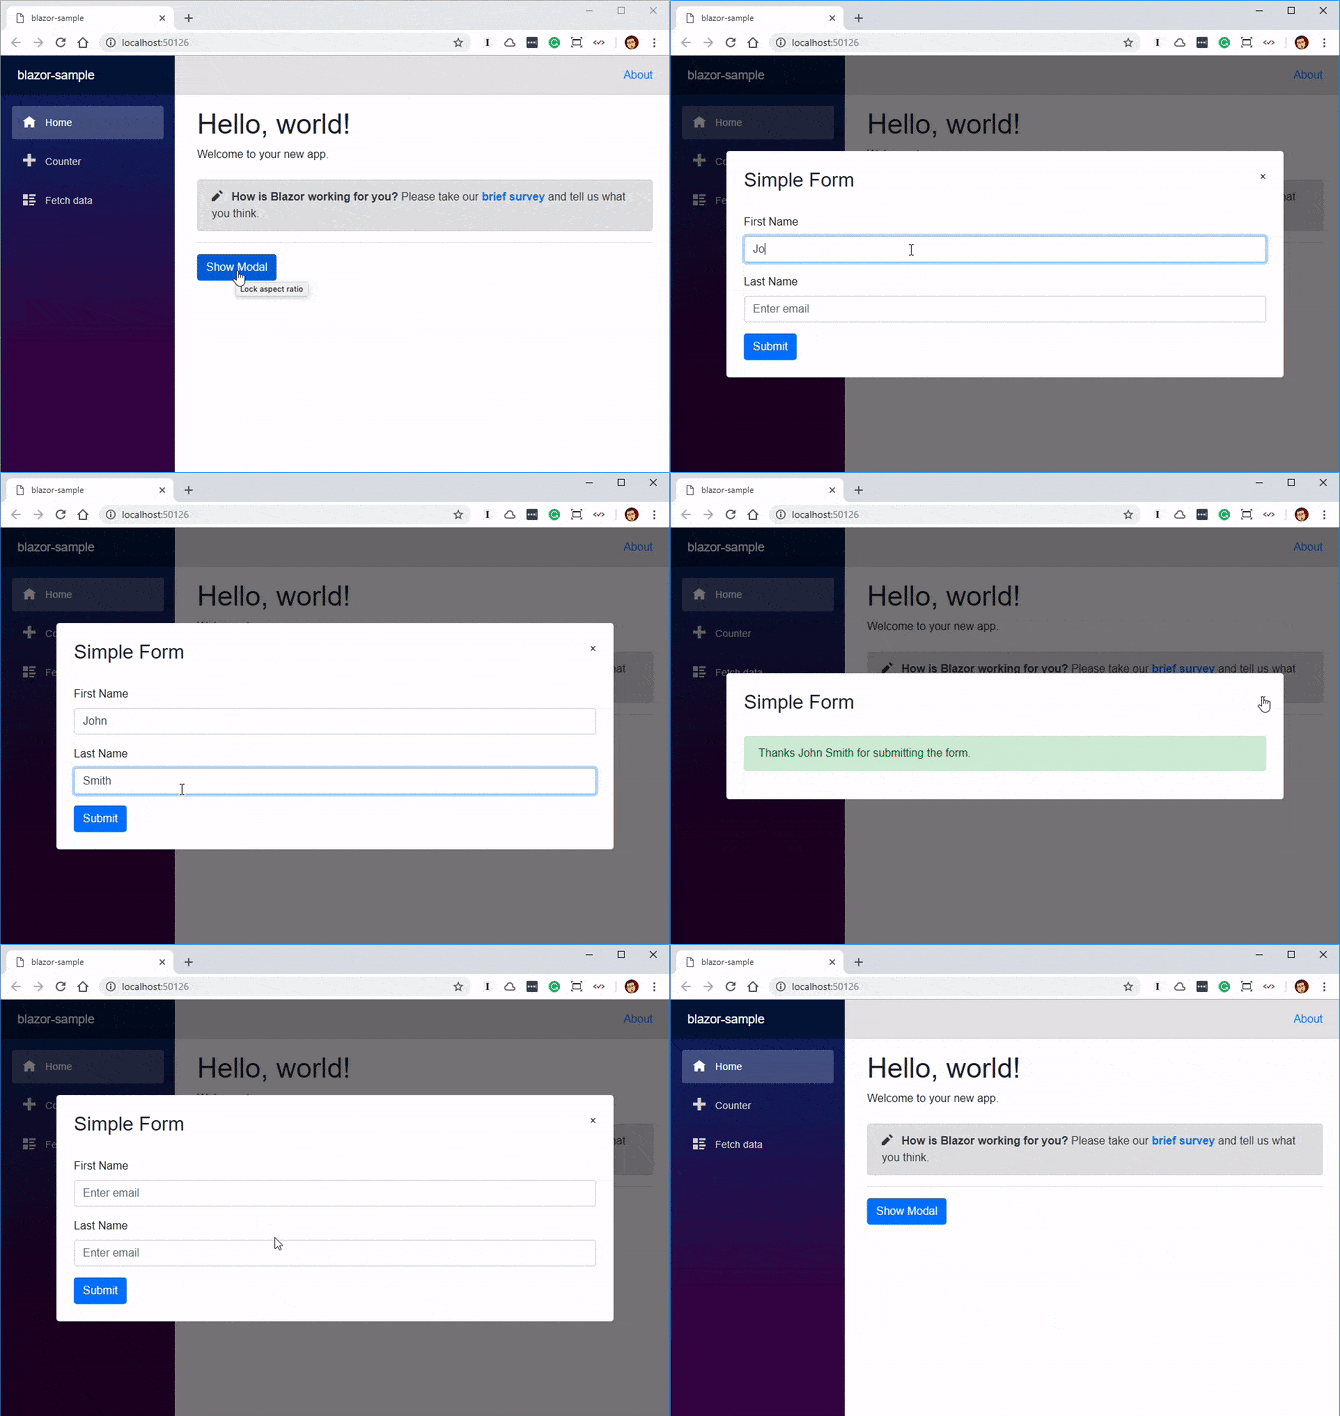
And we’re done! This is what the finished Index component looks like.

Running Our Test App

We can now run our test app and if all has gone to plan it should work something like this.

BlazorModal

Wrapping Up

In this post, we’ve built a reusable modal without using any JavaScript. We’ve also built it in such a way that we can display other components which I think is a really nice feature and fits nicely with Blazor’s component model.

All the code for this post is available on my GitHub.

Related News

Looking for more news and info on Blazor? Check out these recommended resources:

Telerik R1 Release Webinar Recap

$
0
0
R1 2019 was a big Telerik release, with a focus on delivering Modern UI and Developer Productivity. Let's recap the webinar and product features!

It’s the first day at work after the nice and relaxing holidays. You are fresh and pumped to start the new year right by getting stuff done. But by mid-day, you quickly realize you are back exactly where you had left. The same stringent delivery deadlines and projects with UI so antiquated that they give you the chills.

Time to chin up. Your beloved Telerik developer tools just had a big R1 2019 release, that sets the tone for the rest of the year. To deliver your software development projects on time and to the delight of your users, you need awesome tooling. Modern, cutting-edge developer tooling should elevate your development experience and enable you to deliver solutions faster than what you would have envisioned even a few months back. That’s exactly what the latest Telerik DevCraft release promises. No matter what be your app platform – mobile, web or desktop, this R1 release should make developers more productive.

Relive the Content

On Jan 18th 2019, Ed Charbeneau and I (Sam Basu) hosted the Telerik R1 Release Webinar - livestreamed from our global HQ in Boston. It is always a daunting ask for us to do justice to all the product updates in the Telerik family within an hour, but we try. If you missed our webinar, got interrupted or just want to catch up, we have the recording up in full HD.

Something for Everyone

Telerik DevCraft is a diverse product portfolio and R1 2019 was a big release. Across all product updates though, the theme remains the same - Modern UI and Developer Productivity.

Telerik products have always been future-facing - riding the waves of what's latest in the .NET developer ecosystems. We are known to support new tools/technologies in .NET land before they are even released formally. Along those lines, Telerik R1 2019 release comes with support for Preview bits of two big upcoming giants - WPF/WinForms on .NET Core 3 and Visual Studio 2019 for all .NET tooling.

FutureFacing
 

We try pushing the envelope towards the future, while keeping existing products stable with continued enhancements. You can benefit from all of our R1 release goodness - just go get the latest Telerik bits through NuGet, Control Panel or plain downloads. Since we strive to make developers successful, we take pride and pour in efforts behind Documentation and Feedback portals - both redesigned recently.

Here's a quick sampling of major product updates across the Telerik family:

Web

Telerik UI for ASP.NET Core, MVC and AJAX

  • New MultiViewCalendar & DateRangePicker components
  • New grid features for ASP.NET MVC/Core
  • New MultiColumnComboBox for ASP.NET AJAX

Telerik UI for Blazor

  • Early preview bits to support experimental Blazor & server-side Razor components
  • Essential Grid & few more controls

Mobile

Telerik UI for Xamarin

  • New PDFViewer, Popup & DockLayout controls
  • New scheduling features, including add/edit & recurring appointments
  • Header & footer support in ListView
  • Localization & Globalization support

Desktop

Telerik UI for WPF & WinForms

  • New NavigationView (aka Hamburger menu)
  • Diagram Ribbon UI & HyperlinkButton controls for WPF
  • Charts support in RadSpreadsheet & RadSpreadProcessing
  • New TabbedForm, FontDropDownList, ButtonTextBox & TimeSpanPicker controls for WinForms
  • New Grid features, including TimeSpan editor & TimeSpan column for WinForms
  • New MultiColumnComboBox column in WPF Grid
  • Support for high-performance asynchronous exporting for WPF
  • New CrystalDark theme for WinForms

Reporting, Testing, and Productivity Tools

Telerik Reporting & Report Server

  • Improved Web Viewers User Experience for Telerik Reporting
  • Report Definitions Localization for Telerik Reporting & Report Server
  • Scalability of the Report Scheduling Service for Telerik Report Server
  • Improved Report Preview User Experience for Telerik Report Server
  • Deploy report rendering engine along with the reports web service on .NET Core – both on Windows and Linux

Telerik Fiddler & JustMock

  • Fiddler now cross-platform for Mac & Linux
  • Fiddler Decoding of encoded requests/responses
  • JustMock supports .NET Core
  • New JustMock Developer Console
  • JustMock CLI support for CI/CD pipelines

Addressing Feedback

One of the consistent pieces of feedback we get during Telerik Release webinars is the desire to see more of a desired/most used technology. We all have our beloved products and it is only natural to want to see more of it. From our side, it is quite a serious challenge to cover all the product updates across the Telerik family within an hour. Our teams pour in their efforts to make releases shine and each product deserves air time.

So, how do we do justice to all products? We'll try changing up the webinar format a little - starting with our R2 release, you'll see the next Telerik Release Webinar split up in two:

  1. Part 1 | 45 mins - Intro + Web technologies + Report technologies
  2. Part 2 | 45 mins - Mobile technologies + Desktop technologies + Productivity tools

With a single webinar registration, you'll be able to attend either or both sections, with a small break in between. We hope this new format will cater to specific interests and be better suited to showcase the plethora of product updates we cover during the release webinar.

Pertinent Q/A

We answered a lot of questions during the webinar - both on Twitter and on the Q/A panel. A few of the Q/A were important enough to resurface for everyone's visibility:

Q: Will Telerik UI for Blazor just be Kendo UI Core wrappers?
A: Telerik UI for Blazor is not made of Kendo UI wrappers and will have no jQuery dependencies. We are writing native UI Components for Blazor from the ground up.

Q: Is Blazor fully compatible with Internet Explorer and Edge?
A: Blazor running client-side through WebAssembly is meant for modern evergreen browsers, but has fallback support for older browsers through polyfills. Telerik UI for Blazor will have the same browser support as the Blazor framework, both for client-side runtime or Razor Server Components.

Q: With Telerik UI for Blazor, is it safe to assume that Blazor components will support Material Design?
A: Telerik UI for Blazor will support three themes out of the box - Default (a flat theme), Bootstrap 4 and Material Design.

Q: Can we build Mac desktop apps with .NET Core 3?
A: Not yet. While .NET Core runtime is perfectly compatible on Mac/Linux, there is no UI technology yet that can lift & shift Windows desktop apps. Xamarin.Mac or Mac support for Xamarin.Forms are good candidates for reaching the Mac desktop.

Q: Any plans/news to support/embrace UNO UWP Platform and Universal XAML?
A: We are keeping a close eye on Uno and Universal XAML promise in particular.

Until Next Time

That's it then for the Telerik R1 Release. We're known to make Modern UI for .NET technologies and this is one of the most exciting times to be a .NET developer. With R1, we tried pushing the envelope on web/mobile/desktop fronts while enriching utilitarian reporting services and making developers more productive.

Hope you all enjoy the new features across Telerik products. Use them and please give us feedback - If you haven't yet, be sure to download a trial or upgrade to the latest release here. We'll see you all during our next R2 release. Until then, happy coding!

Why You Should Move to Continuous Scrolling Now - and How to Do It

$
0
0

Check out the new continuous scrolling in Telerik Reporting, which delivers more data that is easier to work with in fewer actions: a better experience.

Scroll, scroll, scroll. We all love it. We all do it. Every day, everywhere. Facebook, Twitter or just in your favorite news site. Do not try to fool me that you do not scroll, because after a minute you will scroll. Scroll, scroll, scroll.

I am very happy to let you know that now you can scroll, and scroll, and scroll, in your beloved Telerik Report Viewer too. The new page mode gives you the ability to read the whole report just on a few scrolls. No need to click somewhere to navigate or enter a page number.

scrolling animation

Benefits

There are a lot of reasons why you should move to continuous scrolling. Here's some of them that I found most interesting.

  • Fewer clicks - Scrolling is easier for users than clicking (and then scrolling again) and requires less action.
  • Better content exposure - Continuous scroll lets users find the content they might not otherwise see.
  • Great for mobile - Continuous scrolling is especially beneficial for any mobile or touch users.
  • Increase the number of content pieces (also known as page depth) – the user can see and comprehend more data just in one look.
  • Continuous scroll makes it easier to read the piece you’re on, and then makes it easier to read the next.

How Does it Work?

Telerik Report Viewer page scroll mode has the behavior of a continuous scroll. When the report is ready, N pages are rendered in the viewport to fill in the visible part of your report viewer. A next or previous page is loaded on demand after you do what? That’s right after you scroll.

How to Enable It?

After updating your Telerik Report Viewer to the latest version, the continuous scroll will be the new default page mode for your viewer. If for some reason we cannot imagine yet, you do not like the new page mode, there is an easy way to switch to the old single page mode by setting the following property to your Telerik Report Viewer.

pageMode: telerikReportViewer.PageModes.SINGLE_PAGE,

Expected Behavior

Of course, there is no need to tell you that all already known navigation mechanisms will continue to work for the continuous scroll mode. For example, if you are on page 2 and want to go to page 150, just type the wanted page in the navigation input in the Telerik Report Viewer toolbar. Do you love clicking? The beautiful buttons in the toolbar area will be there for you, to help you navigate to the next or previous page, or just to jump to the end or to the begging of your report.

toolbar_navigation_part

To summarize. More data, easy to work with, fewer actions, better experience. That is the new Telerik Report Viewer page scroll mode. Upgrade and enjoy it.

Try it Out and Share Feedback

We want to know what you think—you can download a free trial of Telerik Reporting or Telerik Report Server today and share your thoughts in our Feedback Portal, or right in the comments below.

Start your trial today: Reporting Trial   Report Server Trial

Tried DevCraft?

You can get Reporting and Report Server with Telerik DevCraft. Make sure you’ve downloaded a trial or learn more about DevCraft bundles. DevCraft gives you access to all our toolsets, allowing you to say “no” to ugly apps for the desktop, web or mobile.

How to: Compose HTTP(S) Requests with Fiddler

$
0
0

Learn everything you need to know about Fiddler’s composer tab and how to use it. Part 1 of a series.

Fiddler is well known for its ability to capture HTTP(S) traffic, which makes it possible to debug any website or application. However, there is another feature that may be just as useful, and that’s creating HTTP(S) requests. This gives you the ability to communicate with the web server with precision, thus calling only the resources you want. Something that is hardly achievable in a real-life application.

Composer Tab

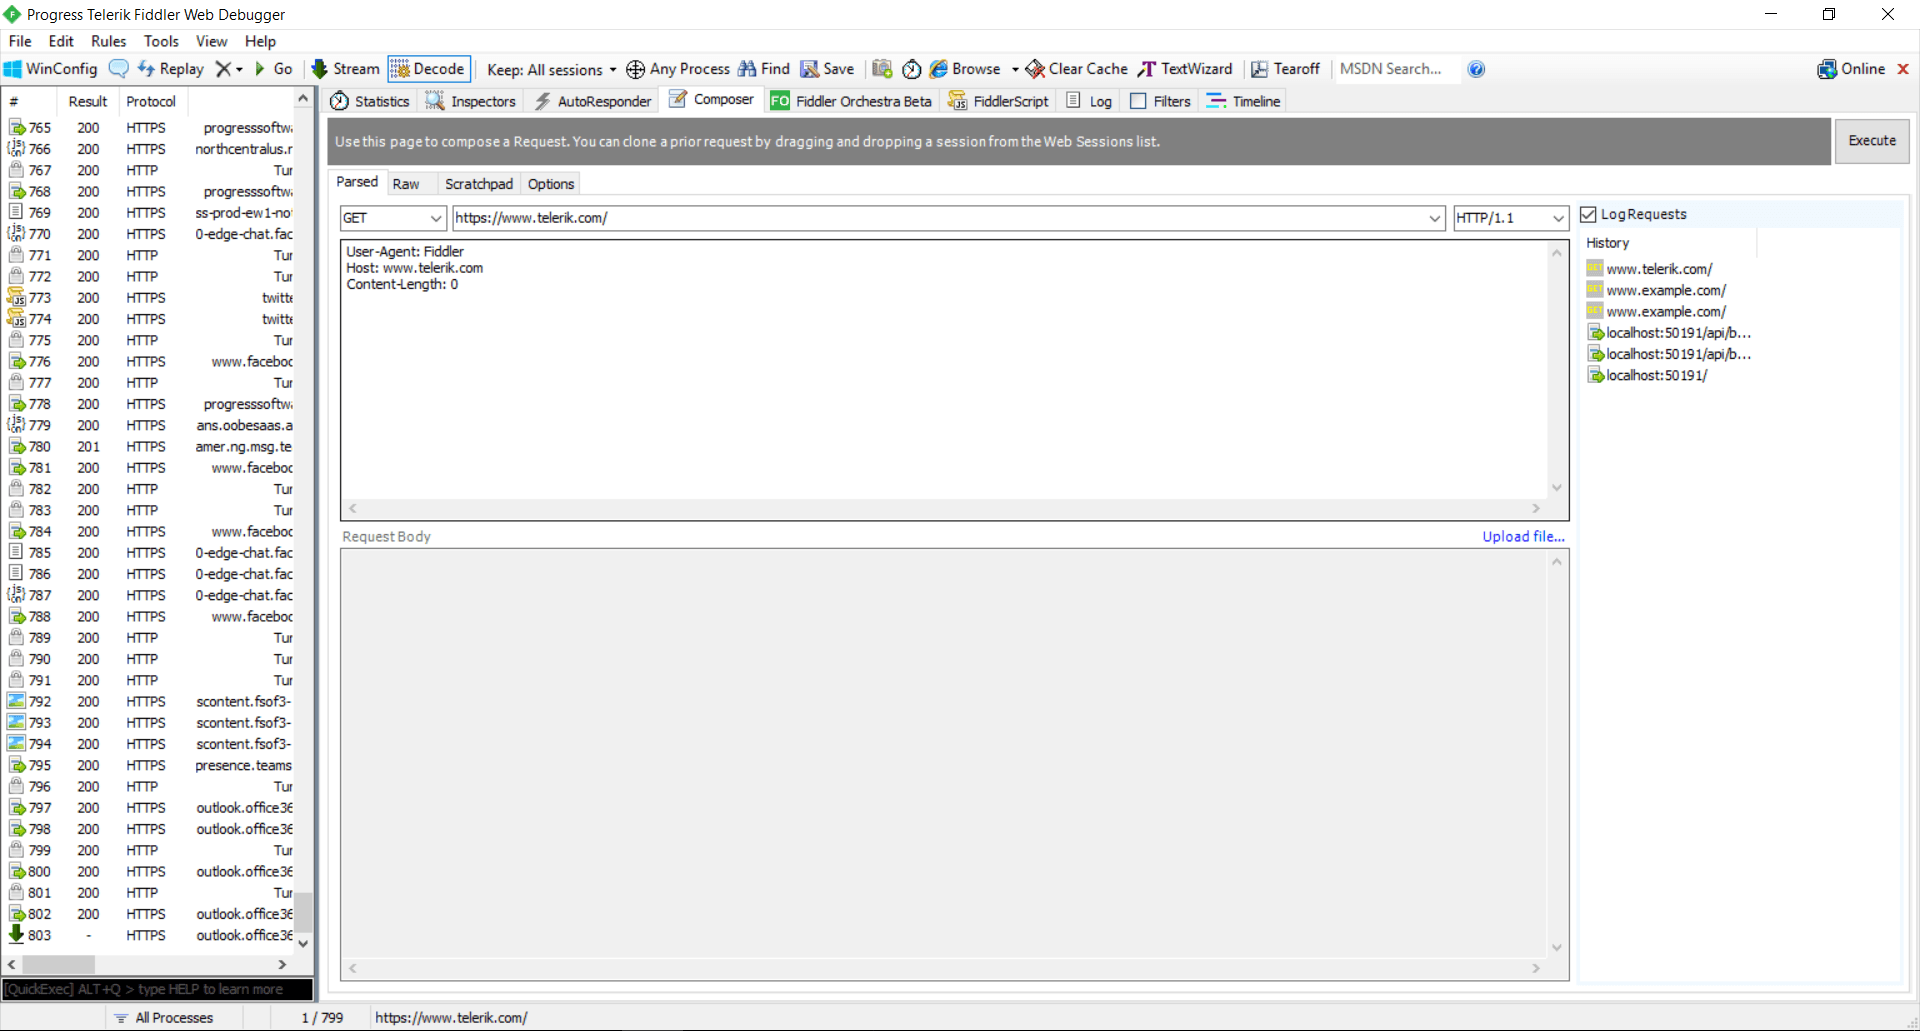
You can access everything you need to create new request from the Composer tab in Fiddler.

composer-1

It supports two different modes, but you’ll probably need the Parsed one. There you can specify the HTTP method, the URL, the HTTP version, the Headers and the Body of the request. On the right you can find the History panel where you can easily load a previously executed request.

Sending GET Request

This is the most used request type. Every time you type an URL inside your browser, you’re sending a get request to the server. To create a GET request inside Fiddler, choose the GET method and type the server URL in the URL box. Then click the Execute button.

NOTE: Once the request is sent to the server, use the Inspectors to inspect the response. There is a different inspector type for almost all response content types like JSON, Web, etc. This way you can verify if the response you’re getting is as expected.

composer-2

Sending POST Request

Unlike the GET request, where you should specify only the URL, in POST requests, there is an additional optional parameter - Request Body. These requests are used when you want to send data back to the server. The most common usage is when you submit a form in a website. To send a new POST request, choose POST for method type, type the URL, enter the body content and click Execute.

composer-3

Other Methods

Fiddler can create any type of request that is supported by the HTTP standard in a similar manner. Just choose the HTTP method and type the parameters of the request.

Working with Headers

HTTP headers are the way the way client gives additional context to the server. Any header consists of a case-sensitive name followed by a “:” then by its value (without line break). You can add a header to your request by appending inside the Header box – every header on new line. A list with all HTTP headers can be found here.

Conclusion

This is all you need to know about Telerik Fiddler’s composer and how it works. It gives you everything you need to create all kind of HTTP request you need. In the next blog post in this series, we will cover different user scenarios where the Composer can be very useful.

If you have any questions or comments, don’t hesitate to drop a line or two below. Any feedback is highly appreciated.


Channel 9: Sam Basu Talks Chatbots with James Montemagno

$
0
0

Interested in integrating chatbots in your mobile app but don't know where to start? Check out Sam Basu's engaging interview with James Montemagno on The Xamarin Show on Channel 9. In the short video, Sam lays the foundation for everything you'd need to build the bot and then walks you through a sample app. 

In a recent episode of James Montemagno’s The Xamarin Show, he caught up with our very own Sam Basu to talk about Conversational UI for Chatbots.

Throughout his lively and entertaining conversation, Sam explains what a bot is, talks about how to create one and he even shows how you can use the Progress Telerik Conversational UI controls.

What is a Bot & How to Build it

He starts by explaining the landscape, or the conversational bot ecosystem. He touches on agents, platforms, what makes a bot smart (rules, NLP, logic, etc) and then talks about the different bot frameworks.

Conversational Bot Ecosystem

Sam then went into a little more detail about the Microsoft Bot Framework, as that is where he will use for the demo he shares later in the interview.

For those of you interested in building a bot, he does a nice job of laying out how to get started and what you would need. You can also learn more about what goes into a bot by reading this blog post.

He nicely and succinctly explains the tools you would need to build your bot, the ways you can connect it, and some of the services you can use.

Bot Framework

As you might expect, Sam also shared more about our Conversational UI components across all products before diving into his demo. If you haven’t already played with them, it is worth a look. They are chatbot framework agnostic and able you – whether you are creating a .NET or JavaScript web, mobile or desktop app – to create modern chatbot experiences. If you have any sort of Telerik or Kendo UI license, you have access to these components. If you don’t have a license, you can download a trial. But I digress…

Conversational UI

Once he’s laid the foundation for what you would need to build a bot – from the backend all the way to the frontend, he walked through how to actually build a chatbot in a Xamarin application. His tutorial walks you through a sample app which is available with your Telerik UI for Xamarin license or trial. Using Visual Studio for Mac, Sam demonstrates how to build a chatbot integrated iOS app.

If you are interested in learning how he did it, tune in here:

And remember, chatbot controls are available with all of our Telerik and Kendo UI toolsets. Happy coding!

Telerik UI for Blazor 0.2.0 is Available

$
0
0

Telerik UI for Blazor 0.2.0 is available for download today. This release makes Telerik UI for Blazor compatible with Visual Studio 2019 preview 2, and ASP.NET Core 3.0 preview 2. 

A few weeks ago we released an early preview of Telerik UI for Blazor. The early preview is intended to give developers a peek into the development process while giving everyone a chance to share their feedback on the product. We are working closely to align our goals with those of Microsoft's ASP.NET Core team, which is why we're happy to announce Telerik UI for Blazor 0.2.0. This new version aligns our UI components with the ASP.NET Core 3.0 preview 2 and Blazor 0.8.0 release.

What's New

In this release you may not see a lot of changes on the surface, but we've diligently kept up with things that are happening beneath the surface of the framework. ASP.NET Core 3.0 preview-2 marks a milestone for Razor Components, the underlying component model for Blazor. In preview 2, Razor Components has been decoupled from Blazor, making the component model much more flexible (for more about this see the preview 2 announcements). The change shifted some dependencies and name spaces used to power Telerik UI for Blazor, prompting us add compatibility with the new release.

Telerik UI for Blazor is now compatible with:

  • Visual Studio 2019 Preview 2
  • ASP.NET Core 3.0 Preview 2
  • and Blazor 0.8.0

Going forward Telerik UI for Blazor 0.1.0 is only compatible with Visual Studio 2017. You will need to migrate your experiments along with your tooling to Visual Studio 2019 to utilize 0.2.0.

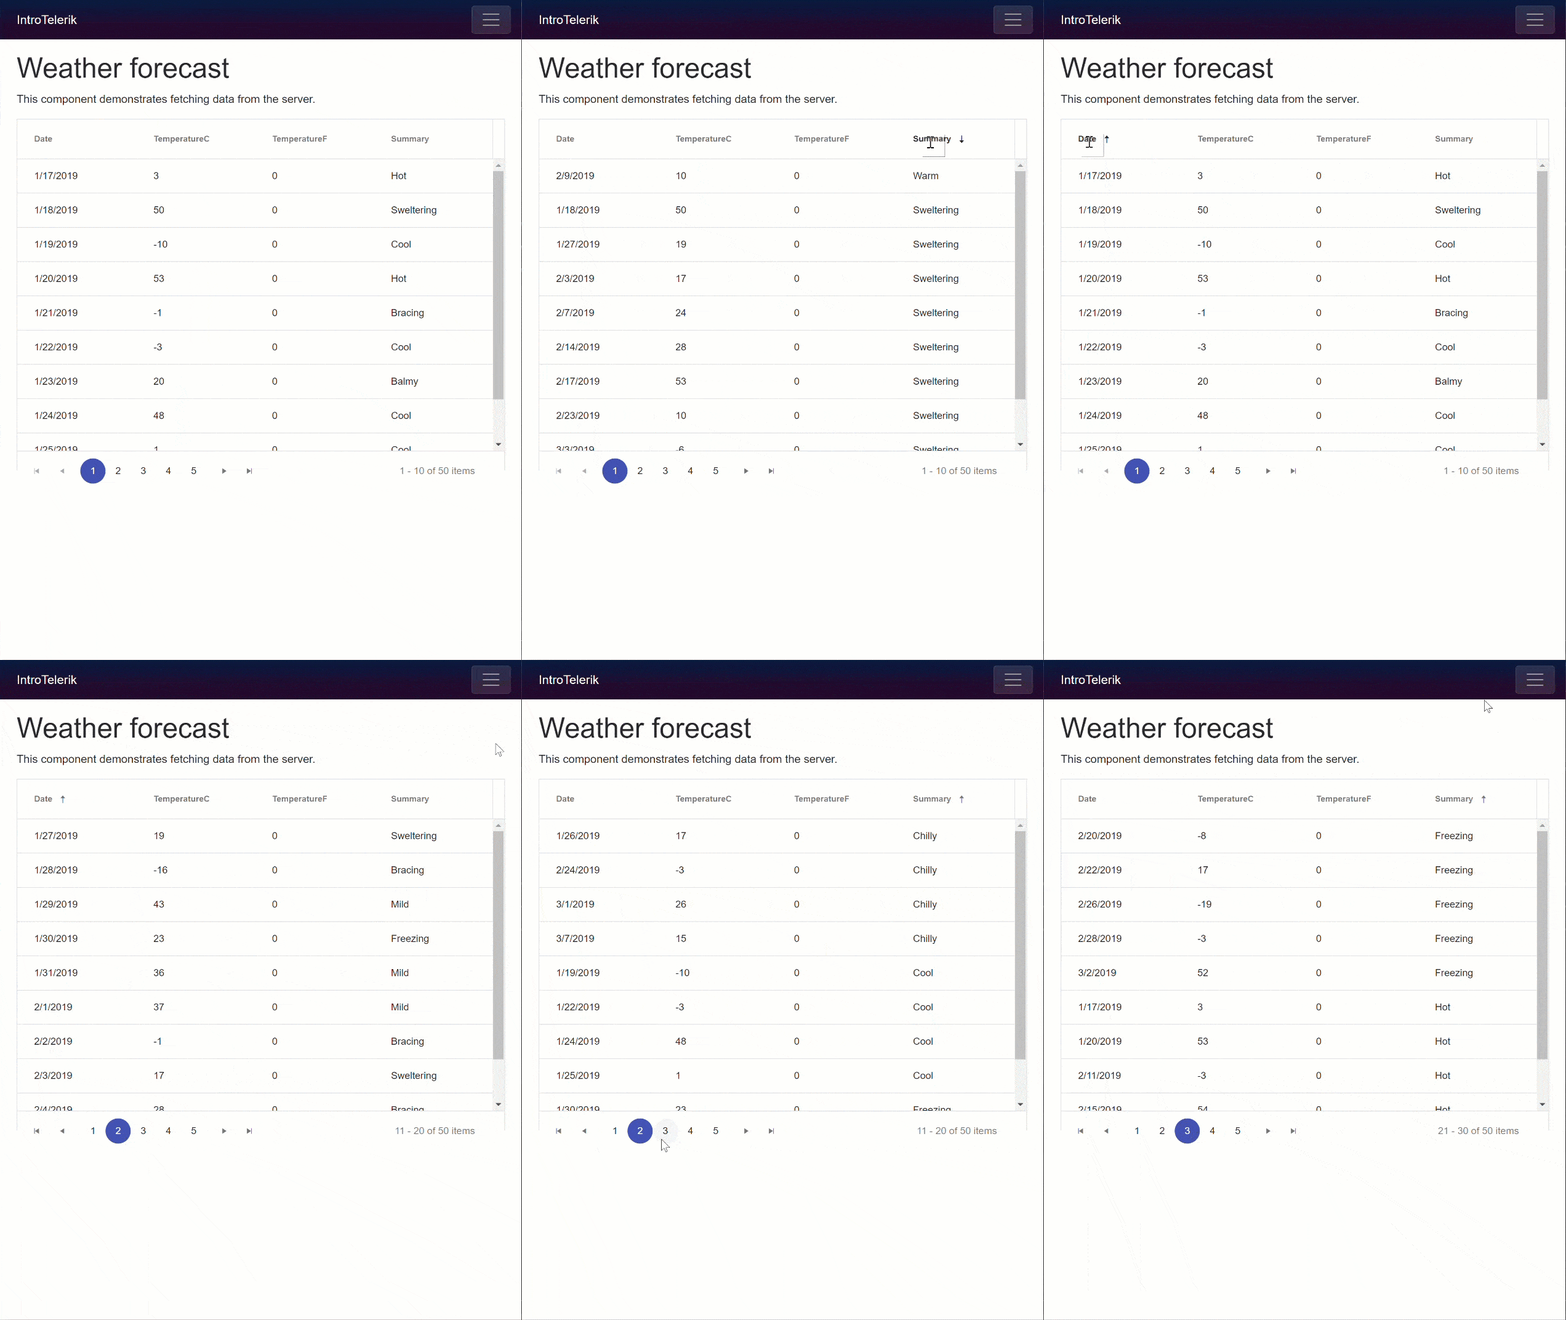
Besides supporting the new latest bits some small changes were made to the Grid component:

blazor-grid-sort-page

  • Grid columns are now better defined. In this version Grid columns have improved semantics through nesting. The KendoGridColumns container clearly defines where columns begin in the Grid and gives us a framework to build upon. In the example below the columns are clearly defined and have different nesting from the RowTemplate.
<KendoGrid Data=@GridData>
    <RowTemplate ... />
    <KendoGridColumns>
        <KendoGridColumn Field=@nameof(Product.ProductName)/>
        <KendoGridColumn Field=@nameof(Product.UnitPrice)/>
    </KendoGridColumns>
</KendoGrid>
  • Grid Height is now a supported parameter, which allows the grid height to be defined programmatically.
<KendoGrid Data=@GridData Height=@Height>
  • Code samples are here! We really wanted to help you hit the ground running. With the ecosystem changing rapidly, it's best to show solid examples of how to get things done. This is why we have released a new GitHub repository showing of our components doing cool things like: Templates, Editing, and swapping themes. You can clone the samples here: https://github.com/telerik/ui-for-blazor-examples

Stay Tuned

We're committed to Telerik UI for Blazor and plan to release more content in the form of video, blogs, and samples on GitHub. If you're watching with anticipation for what's coming next, make sure to visit our blogs frequently for news and announcements. For more insight into all things Blazor, you can watch me (Ed Charbeneau, Progress developer advocate), each week Friday at 12pm EST on Twitch.

Join the Early Preview

We're excited to be part of the next generation of ASP.NET applications by supporting Blazor. Telerik UI for Blazor Early Preview is available for free today. The package currently includes Data Grid, Tab Set, and Button components written from the gound up to take advantage of Blazor without legacy JavaScript dependencies (there's no jQuery this time folks). Throughout the year Microsoft will be working on Blazor (aka Razor Components) as part of ASP.NET Core 3.0. We plan on keeping Telerik UI for Blazor up to date as the project progresses and look forward to hearing your feedback, see what you've built, and know what components you need for your next app.

A Special Installation Note

For the Telerik UI for Blazor version 0.2.0 to show in your NuGet feed, you must visit the download page and create an account, or sign in. You will need to repeat this process even if you already have early preview 0.1.0. Visiting this page will activate your NuGet feed. For more information about adding the Telerik NuGet feed please see our documentation.

Using Telerik Reporting in .NET Core Applications

$
0
0

In R1 2019 we introduced support in Telerik Reporting for .NET Core applications running on Windows, Linux and macOS. Give it a try and leave your feedback!

In the last couple of years .NET Core has grown from a modularized fork of .NET Framework to a fully functional platform that allows you to build and run the same applications on Windows, Linux, and macOS. With each release .NET Core delivers new APIs and adds many optimizations, ultimately positioning itself as a framework-of-choice for more and more .NET Developers. So it's not surprising that the most demanded feature in the Feedback Portal for Telerik Reporting was to provide support for .NET Core applications.

Being naturally curious, we on the Reporting team have long been keeping an eye on the .NET Core evolution, and we recently decided that the framework was mature enough to fit most of our needs. And, lo and behold, in R1 2019 we introduced .NET Core support for the Telerik Reporting runtime. 

Built up to the Standards 

Telerik Reporting assemblies can be referenced via NuGet packages from our Telerik NuGet private feed or through assembly references to local .dll files. If you check the installation directory of our product you will notice that the last release brought a new addition – a netstandard2.0 subfolder. It contains the assemblies you would reference when building a .NET Core application, but the assemblies themselves target .NET Standard 2.0. .NET Standard is a set of fundamental APIs that are available in all .NET implementations. Designed as a formal specification, it determines a base set of functionalities for the .NET ecosystem.

Essentially, the main advantage of targeting .NET Standard is that our assemblies will work in all .NET applications on all supported operating systems.

dotnet-frameworks-diagram

image obtained from blogs.msdn.microsoft.com

A nice feature of the unification of cross-platform development is that the .NET Standard assemblies can be referenced even in your current .NET Framework application. But why would I? – you may ask. Well, it is not mandatory, since we already provide Telerik Reporting assemblies targeting the full .NET Framework. But this approach may have at least two major advantages: it delivers the optimization benefits in .NET Standard and helps to ease the eventual migration process of your application to .NET Core.

What’s Included? 

All the major Telerik Reporting functionalities work in .NET Core command-line and web applications. On Windows, the reporting engine still relies on the GDI+ library because it provides the fastest and most convenient way to process text and images, which is essential to the product. In Windows environments .NET Core runtime manages to resolve the GDI+ calls natively, but for Linux and macOS, one or more additional libraries need to be installed, depending on your distribution (explained in details later in this article). Almost all the processing and rendering features that work in a .NET Framework application will work in .NET Core projects with the new .NET Standard assemblies.

Here is a more detailed list of supported functionalities: 

  • All rendering extensions except MHTML and XPS are supported on Windows.
  • HTML, PDF and OpenXML-based renderings are supported on Linux/macOS.
  • All report items except the obsolete Chart item are supported.
  • The supported report definition types are TRDX, TRDP and report classes, created in Visual studio without the VS designer-specific code.
  • New JSON-based reporting configuration is introduced for both CLI and web applications. For CLI projects the JSON configuration has precedence over the current XML-based reporting configuration. Check here for more details.

What’s not Included?

To design reports for a .NET Core project we recommend using the Standalone Report Designer. Its report definitions are stored in a portable .trdx/.trdp format and can be utilized with UriReportSource where needed.

The Visual Studio Report Designer is available only for class libraries that target the full .NET framework. We cannot provide design-time support for reports in .NET Core or .NET Standard libraries, because we are limited by the current state of the framework and the Visual Studio toolset. For example, the ComponentDesigner class, which is used as a base class for our components, is not yet available in .NET Core. As for migrating the existing report libraries, this KB article will help you pick the right strategy.

How do I Run it on Linux?

When deploying to a Linux machine, make sure it has installed the libgdiplus library, which is a Mono implementation of GDI+ API for non-Windows operating systems. The following snippet performs an update and installs the necessary libraries on Ubuntu/Debian:

sudo apt-get update
sudo apt-get install libc6-dev
sudo apt-get install libgdiplus
Since libgdiplus is not an exact replacement for the Windows graphics library, the rendered reports might not have the same text positioning, word-wrapping and aligning, compared to rendered reports on Windows. We did a lot of improvements to the text and graphics rendering engine, but slight differences are to be expected.  

And How do I Run it on macOS? 

The same way you did on Linux - the difference is only the script that installs the libgdiplus library:
brew install mono-libgdiplus

Wow. What about Containers? 

No problem, as long as the container image meets the GDI+ requirements. The microsoft/windowsservercore images distributed by Microsoft contain the graphics library, but their size is significantly bigger compared to the size of the dotnet runtime in a Linux container. Such container only needs the libgdiplus and its accompanying libraries installed, which can be done through the following dockerfile snippet:
FROM microsoft/dotnet:2.1-runtime AS base 
RUN apt-get update \ 
    && apt-get install -y --allow-unauthenticated \ 
        libc6-dev \ 
        libgdiplus \ 
        libx11-dev \ 
    && rm -rf /var/lib/apt/lists/*

Having these three libraries installed ensures that Telerik Reporting will run on the produced Docker image.

Amazing, but how do I Start? 

Telerik Reporting ships with a ready-made ASP.NET Core example that demonstrates how to show our sample reports in an ASP.NET Core application. The example also shows how to inject an appsettings.json configuration file to the controller and how to initialize a WebHostBuilder so it runs under WindowsLinux, and macOS. The project can be found in the %programfiles(x86)%\Progress\Telerik Reporting R1 2019\Examples\CSharp\Asp.NetCoreDemo directory.

Conclusion 

Building Telerik Reporting for .NET Core was a huge feat for our team. It will allow us to reach to a broader audience of developers that want to build modern cross-platform applications. Adding support for the most rapidly evolving development platform is another step towards delivering a top-quality product to our users.

Try it Out and Share Your Feedback

If you are new to our tools or have only tried some, make sure you download the trial and take them for a spin. You can either download just the Reporting and Report Server tools, or download a trial of our entire set of .NET and JavaScript tools with the DevCraft bundle.

We're eager to hear what you think, so please don't forget to share your feedback as well and help us make Telerik Reporting even better.

Telerik UI for Blazor: Grid Component Basics

$
0
0

The Telerik UI for Blazor data grid features functionality like paging, sorting, templates, and themes out of the box. Learn how to get started with the grid's basic features today.

Telerik UI for Blazor is a brand new library of UI components for the Razor Components and Blazor frameworks. Even though Telerik UI for Blazor is in an "Early Preview" stage it ships with one of the most popular and versatile UI components, the data grid. The data grid features out-of-the-box functionality like paging, sorting, templates, and themes. In this article we will focus how to get started with the grid's basic features.

Grid animated showing paging and sorting

Prerequisites

Since the ASP.NET Preview's are moving at a rapid place, it's best to update your bits. Make sure you're on the current version of Razor Components (server-side) and Blazor (client-side) since we'll be working with both. Detailed installation instructions for both frameworks can be found on the Blazor getting started page.

Also be sure that you have enabled the Telerik UI for Blazor free early preview. Even if you have previously enrolled in the preview you may need to revisit this page for the latest version to appear in your feed. With this free account you'll be able to add the Telerik NuGet Package Source.

Before we begin, you may wonder why the Kendo namespace appears when using Telerik UI for Blazor. That's because the Telerik UI for Blazor shares web resources (HTML & CSS) with our Kendo UI brand of components.

Installation

Installing Telerik UI for Blazor requires just a few simple steps. First we'll need to install the package binaries. We'll be using the Telerik NuGet Package Source to install the package. If you don't have the Telerik Package Source already please see the Prerequisites section above.

If you have multiple solutions in your project, install the package to the project which contains the "Pages" folder. These are the views for your application.

We can use the Package Manager dialog, command line, or directly edit the .csproj file of the application.

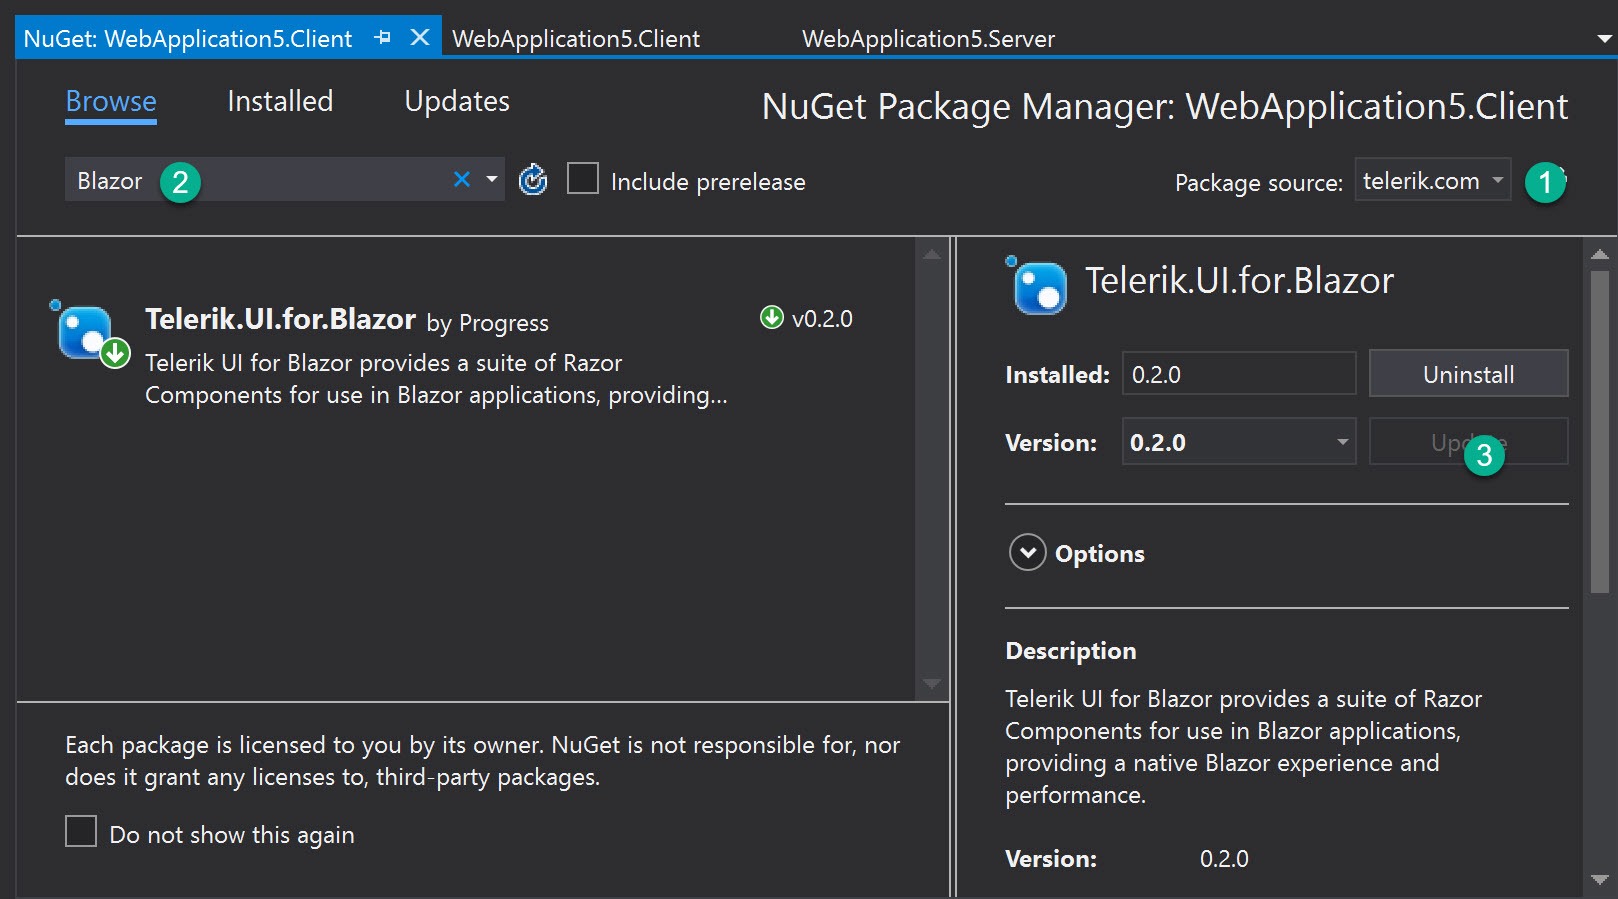
NuGet

Telerik UI for Blazor Nuget

Command line

$ dotnet add package Telerik.UI.for.Blazor

Edit .csproj

<PackageReference Include="Telerik.UI.for.Blazor" Version="0.2.0" />

Once the Telerik UI for Blazor package has been installed, we'll need to make a reference to the components in the package. This will act as a global using statement for our application. Open the root _ViewImports file and add the @addTagHelper *, Kendo.Blazor directive.

_ViewImports.cshtml

@addTagHelper *,Kendo.Blazor

We also need to register the the library with dependency injection. This will resolve any dependencies needed by the components. In the same solution, open the Startup class and register the AddKendoBlazor service.

services.AddKendoBlazor();

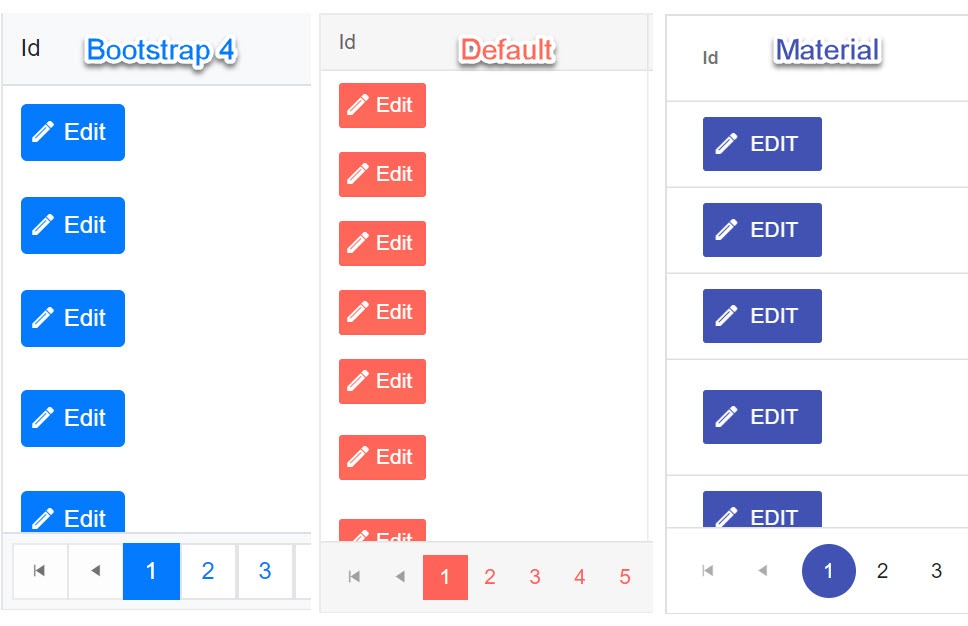
Next we'll need to add the CSS theme files to the application. At the time of writing Telerik UI for Blazor supports three of the Kendo UI themes: Default, Bootstrap 4, and Material Design.

Grid themes

If you have multiple solutions in your project, find the project which contains the "wwwroot" folder. These are the static resources for your application. In the root of the project, add a file named libman.json. LibMan is a client-side library manager built into Visual Stuido (with CLI support) that will fetch static resources and save them to your project.

Add the following configuration to your libman.json file. Save the file and all three component themes will be copied to your wwwroot folder.

{
  "version": "1.0",
  "defaultProvider": "unpkg",
  "libraries": [
    {
      "library": "@progress/kendo-theme-default@3.0.0",
      "destination": "wwwroot/css/kendo-themes/default",
      "files": [
        "dist/all.css"
      ]
    },
    {
      "library": "@progress/kendo-theme-bootstrap@3.0.0",
      "destination": "wwwroot/css/kendo-themes/bootstrap",
      "files": [
        "dist/all.css"
      ]
    },
    {
      "library": "@progress/kendo-theme-material@2.0.0",
      "destination": "wwwroot/css/kendo-themes/material",
      "files": [
        "dist/all.css"
      ]
    }
  ]
}

With the themes installed, reference the desired theme from your application's index.html file.

wwwroot/Index.html

<head>
    ...
    <!-- <link rel="stylesheet" href="/css/kendo-themes/material/dist/all.css" />
    <link rel="stylesheet" href="/css/kendo-themes/default/dist/all.css" /> -->
    <link rel="stylesheet" href="/css/kendo-themes/bootstrap/dist/all.css" />
</head>

That's it! Now we're ready to begin building Razor Components or Blazor applications using Telerik UI for Blazor.

The Grid Component

The The Telerik UI for Blazor KendoGrid (Grid) is a data grid component that is compatible with both Razor Components and client-side Blazor. Thanks to these new breakthrough frameworks, the Grid does not require any JavaScript. The grid component is simple to implement, yet has a robust set of features like data binding, paging, sorting and templates. In addition, Razor Components and Blazor offer unique capabilities for bringing data into the grid. Depending on the mode of operation the data source can pull directly from Entity Framework (Razor Components), or via remote HTTP request (Blazor).

The basic Grid is made up of a few components that define the grid and its columns. The grid itself and its columns have parameters which are used to enable/disable functionality.

<KendoGrid parameters...>
    <RowTemplate/>
    <KendoGridColumns>
       <KendoGridColumn parameters.../>
    </KendoGridColumns>
</KendoGrid>

Let's start with the basic properties and then we'll learn about the different data sources we can use.

Properties

Height

When the height of the Grid is set, it calculates the appropriate height of its scrollable data area, so that the sum of the header rows, filter row, data, footer, and pager is equal to the expected height of the component. If the height of the Grid is changed through code after it's created the Grid it recalculates the height of its data area.

In some special scenarios it is possible to set a height style to the scrollable data area of the Grid by external CSS, which is a div.k-grid-content element.

<KendoGrid Height=@Height ... >

Data

The Grid's data plays a central role in practically all web applications built with Telerik UI for Blazor. The Data parameter accepts any data source that implements the IEnumerable interface. The data may be supplied from sources such as Entity Framework, local arrays and lists, and remote sources like HTTP requests via HttpClient.

@inject WeatherForecastService ForecastService
<KendoGrid Data=@GridData ... >
    <KendoGridColumns>
    ...
    </KendoGridColumns>
</KendoGrid>

@functions {
    public IEnumerable<WeatherForecast> GridData { get; set; }
    protected override async Task OnInitAsync()
    {
        GridData = await ForecastService.GetForecastAsync(DateTime.Now);
    }
}

Columns

The KendoGridColumns component is the root level configuration of the grid columns. Nested beneath KendoGridColumns are individual KendoGridColumn components. These components are interpreted as column configurations where the Field parameter is a string to which the column is bound. The column will use the property name as the column header by default, but this can be explicitly set using the Title parameter. In the example below, the nameof operator is used to get the string representation of the ProductName property. Since we're dealing with C#, the nameof operator provides better tooling support for refactoring.

<KendoGrid parameters...>
     <KendoGridColumns>
       <KendoGridColumn Field=@nameof(Product.ProductName) Title="Product Name"/>

Title-set

Sortable

To enable sorting on all Grid columns, simply set the Sortable parameter. When the Sortable parameter is set to true, users can easily click the column headers to change how the data is sorted in the Grid.

<KendoGrid Sortable=bool parameters...>

Paging

With the Grid we have full control over the Pager. The pager can be enabled/disabled through the Pageable parameter. We can also define a PageSize and set the initial Page value.

<KendoGrid Pageable=bool PageSize=int Page=int parameters...>`

pager

Templates

When we would like more flexibility in how our data is displayed, we can tap into the template features of the Grid. Within any column we can simply open a Template component and access an object reference to the current item bound to a given row. The Template content can contain HTML markup, Razor code, or even other Components.

<KendoGrid Data=@GridData>
    <KendoGridColumns>
        <KendoGridColumn Field=@nameof(Product.ProductId) Title="Id"/>
        <KendoGridColumn Field=@nameof(Product.ProductName) Title="Product Name"/>
        <KendoGridColumn Field=@nameof(Product.UnitPrice) Title="Unit Price">
            <Template>
                @(String.Format("{0:C2}", (context as Product).UnitPrice))
            </Template>
        </KendoGridColumn>
    </KendoGridColumns>
</KendoGrid>

@functions {
    public IEnumerable<Product> GridData { get; set; }

    protected override async Task OnInitAsync()
    {
        GridData = await nwContext.Products.ToListAsync();
    }
}

Getting Data

Because the Grid uses the IEnumerable interface for its data source, it has very flexible data binding. Depending on what context your application runs in, either Razor Components (server-side) or Blazor (client-side), you may have different requirements for connecting to data. Let's look at how dependency injection helps connect our Grid to a data source.

Razor Components (server-side operation)

Since Razor Components run in the context of the server, we can connect to directly to data through Entity Framework. One of the benefits to working with Razor Components is that our application doesn't need to create an HTTP request to connect to data.

We'll be using dependency injection to reference an instance of our database context, so we will need to register our service on startup. In the ConfigureServices method of the Startup class:

public void ConfigureServices(IServiceCollection services)
{
    var connection = "my-connection-string";
    var options = new DbContextOptionsBuilder<NorthwindContext>()
                        .UseSqlServer(connection)
                        .Options;
    services.AddSingleton(new NorthwindContext(options));
    ...
}

With our DbContext registered with dependency injection we can now inject the context on our page using the @inject directive. Inject will resolve a reference to an instance of the NorthwindContext and assign it to the nwContext variable. When the page initializes we call ToListAsync on the Products data set and update the GridData property with the results. Since the GridData property is bound to the Grid it will update when OnInitAsync completes.

@using TelerikBlazor.App.Models // Product is defined here
@inject NorthwindContext nwContext


<KendoGrid Data=@GridData>
    <KendoGridColumns>
        <KendoGridColumn Field=@nameof(Product.ProductId) Title="Id"/>
        <KendoGridColumn Field=@nameof(Product.ProductName) Title="Product Name"/>
        <KendoGridColumn Field=@nameof(Product.UnitPrice) Title="Unit Price">
            <Template>
                @(String.Format("{0:C2}", (context as Product).UnitPrice))
            </Template>
        </KendoGridColumn>
    </KendoGridColumns>
</KendoGrid>

@functions {
    public IEnumerable<Product> GridData { get; set; }
    int PageSize = 10;
    bool Pageable = false;
    bool Sortable = false;
    decimal Height = 400;

    protected override async Task OnInitAsync()
    {
        GridData = await nwContext.Products.ToListAsync();
    }
}

Now that we've seen how server-side operation works, let's take a look at using the Grid with Blazor.

Blazor (client-side operation)

Telerik UI for Blazor is compatible on the client, but currently has a known issue which requires disabling the Blazor IL Linker. Without digging into IL Linking too deep, the result of disabling it only results in a larger payload size. This is a temporary situation that will be resolved in later versions of the framework.

To disable IL Linker, open the .csproj file and add <BlazorLinkOnBuild>false</BlazorLinkOnBuild> to the top most property group.

<PropertyGroup>
    ...
    <LangVersion>7.3</LangVersion>
    <!-- add the line below to disable IL Linker -->
    <BlazorLinkOnBuild>false</BlazorLinkOnBuild>
  </PropertyGroup>

Similar to server-side operation, we'll be using the @inject directive. On the client our app is disconnected from the database and we'll need to make an HTTP request for data. Instead of injecting our DbContext we will instead resolve an instance of HttpClient. When the page initializes we'll make an HTTP request using GetJsonAsync and update the GridData property with the results. Since the GridData property is bound to the Grid it will update when OnInitAsync completes.

@using WebApplication6.Shared // WeatherForecast is defined here
@inject HttpClient Http

<KendoGrid Data=@forecasts>
    <KendoGridColumns>
        <KendoGridColumn Field="@nameof(WeatherForecast.TemperatureC)" Title="Temp. ℃"/>
        <KendoGridColumn Field="@nameof(WeatherForecast.Summary)"/>
    </KendoGridColumns>
</KendoGrid>


@functions {
    WeatherForecast[] forecasts;

    protected override async Task OnInitAsync()
    {
        forecasts = await Http.GetJsonAsync<WeatherForecast[]>("api/SampleData/WeatherForecasts");
    }
}

The Grid works with both Razor Components and Blazor using the same markup. The only aspect of the code that changes is how the data is retrieved.

Wrapping Up

The Telerik UI for Blazor Early Preview kicked off with one of the most popular and powerful components, the Grid. We saw how the Grid can quickly make use of paging, sorting, templates, and themes. Leveraging the Razor Components or Blazor frameworks, we can fetch data directly from our database or HTTP and easily bind the data source.

We covered just the basic features of the Grid, but there's much more we can do with templates. In an upcoming article we'll take a closer look at row and column templates to see what is possible.

GitHub-examples

If you're ready to try Razor Components and Blazor then create an account for the Telerik UI for Blazor free early preview. Once you've signed up feel free to explore our extensive examples on GitHub, and happy coding.

Telerik UI for WPF R1'19 SP: VS19 Preview 3 Support & 80+ Improvements

$
0
0

The R1 2019 Service Pack for Telerik UI for WPF and Telerik UI for Silverlight includes over 80 improvements and cool new features, as well as support for Visual Studio 2019 Preview 3. Dive in and check out some of the top highlights coming to the suites.

Fluent Theme: New ScrollBarMode property

Using the ScrollBarMode property of the FluentPallete youcan now modify the appearance of the scrollbars of all controls that are using ScrollViewer in the ControlTemplate. By design the scrollbars in the theme appear over the content, they are really narrow (compact), and get bigger on mouse over. However, in specific scenarios this behaviour might not be convenient and this is where the new property comes in handy – you can have the ScrollBars always compact, always with their full size or as it is by default in the theme. See the differences between the different modes below and make sure to read the Fluent theme article for more details:

Fluent-ScrollBarMode

SpreadProcessing: New Chart Customization Options

With this version, we added several properties enabling you to customize the look of a chart and its axes. Now you are able to change the outline and fill of the chart shape as well as the outline and major gridlines of the axes. Here is a bit of a code showing the new properties exposed:

FloatingChartShape chartShape = new FloatingChartShape(workbook.ActiveWorksheet, new CellIndex(2, 7), new CellRange(0, 0, 4, 3), ChartType.Column)
{
    Width = 480,
    Height = 288,
};
  
chartShape.Chart.Legend = new Legend() { Position = LegendPosition.Right };
chartShape.Chart.Title = new TextTitle("Test Category Chart");
  
chartShape.Outline.Fill = new SolidFill(new ThemableColor(Colors.SlateGray));
chartShape.Outline.Width = 5;
chartShape.Fill = new SolidFill(new ThemableColor(Colors.Cornsilk));
  
chartShape.Chart.PrimaryAxes.ValueAxis.Outline.Fill = new SolidFill(new ThemableColor(Colors.Blue));
chartShape.Chart.PrimaryAxes.ValueAxis.Outline.Width = 5;
  
chartShape.Chart.PrimaryAxes.ValueAxis.MajorGridlines.Outline.Fill = new SolidFill(new ThemableColor(Colors.LightGreen));
chartShape.Chart.PrimaryAxes.ValueAxis.MajorGridlines.Outline.Width = 2;
  
workbook.ActiveWorksheet.Shapes.Add(chartShape);

And here is how the code would change the chart:

Spread-Charts

MultiColumnComboBox: New DropDownElementStyle and IsReadOnly Properties

We added two new properties to the MultiColumnComboBox control:

  • DropDownElementStyle– this allows you to set a custom style for the control in the drop down (GridView by default) and apply all the needed properties. For more info check out this article.
  • IsReadOnly– this is a property of the GridViewItemsSourceProvider, and by using it you can control the IsReadOnly property of the GridView in the drop down. Check out the GridViewItemsSourceProvider article here.

GridView: New MouseOverBackground Property and SpreadsheetStreamingExport Enhancements

  • GridView gets a new MouseOverBackground that allows you to easily customize the background color of the GridView Cell. You can set this property per cell or per GridView.
  • SpreadsheetStreamingExport gets many improvements as well as a new ExportOptions.ColumnWidth property, which allows you to specify a concrete width for the columns when exporting.

TabControl: Access Text Support

The Header of the TabItem now allows you to set access text as a direct string. For example:

<telerik:RadTabControl>
  <telerik:RadTabItem Header="_File" />
  <telerik:RadTabItem Header="_Edit" />
  <telerik:RadTabItem Header="_View" />
</telerik:RadTabControl>

And when the Alt key on the keyboard is pressed the access keys are displayed in the TabItem Header as shown below:

TabControl-AccessText

GanttView: Shift and Tab Navigation

The user can now navigate backwards when editing cells in the grid part of the control by pressing the Shift and Tab keys on the keyboard.

.NET Core 3 Preview 2

The second preview of the latest .NET Core version was recently introduced by Microsoft and I'm happy to share that the Telerik UI for WPF .NET Core 3 binaries are now built against it! Make sure to play around with them and please share any feedback that you have.

VisualStudio 2019 Preview 3

I have good news for all of tech enthusiasts already on VisualStudio 2019 – UI for WPF is compatible to the latest update of latest preview version of VisualStudio 2019. As always, we are providing immediate support for the newest VisualStudio versions, making sure you can always able to benefit from all the cool new features of the IDE.

Check Out the Detailed Release Notes

To get an overview of all the latest features and improvements we’ve made, check out the release notes for the products below:

Share Your Feedback.

Feel free to drop us a comment below sharing your thoughts. Or visit our Feedback portals about Telerik UI for WPF, Silverlight and Document Processing Libraries and let us know if you have any suggestions or if you need any particular features/controls.

And if you haven’t already had a chance to try our UI toolkits, simply download a trial from the links below:

Telerik UI for WPF  Telerik UI for Silverlight

In case you missed it, here are some of the updates from our last release.

Telerik UI WinForms R1'19 SP: Support for Visual Studio 2019 (Preview 3) & Many Improvements

$
0
0

The Telerik UI for WinForms R1'19 service pack brings Visual Studio 2019 Preview 3 Support and a variety of new features and improvements.

As usual we focused on fixes and improvements in the suite for the service pack release of Telerik UI for WinForms. We are happy that we managed to introduced new features as well as important bug fixes in various controls. We also tested it against the latest Visual Studio 2019 (preview 3) and we can confirm that the entire suite is fully compatible.

We managed to deliver 37 fixes and features. Below are some of the improvements that are part of the service pack release:

GridView

AutoFilterDelay

A property defined on the base column affecting how the filtering is executed. Up until now, every key stroke in the filter cell resulted in updating the applied filter. This can lead to a delay in grids having many records. As a result the cursor in the filter can start lagging while typing. The AutoFilterDelay property sets a value in milliseconds that indicates the delay between the last key press and the filtering operation.

filtering

Header Checkbox Performance

The performance has been improved many times over, and toggling the header checkbox in a grid with 100,000 rows now takes less than 2 seconds.

LayoutControl

AllowHide

Now the LayoutItemControlBase class has the AllowHide property, determining whether the item can be hidden by the end-user from the Customize dialog.

layout-control

PdfViewer

Editing Fields Navigation

The text fields can now be navigated forwards and backwards using the Tab and Shift + Tab keys.

Visual Studio 2019

We tested the controls with Visual Studio 2019 (preview 3) and we are happy to confirm that they are fully compatible.

Try It Out and Share Your Feedback

You can learn more about the Telerik UI for WinForms suite via the product page. It comes with a 30-day free trial, giving you some time to explore the toolkit and consider how it can help you with your current or upcoming WinForms development.

We would love to hear what you think, so should you have any questions and/or comments, please share them to our Feedback Portal or in the comment section below.

Telerik UI for Xamarin R1'19 SP: PDFViewer, VS2019 Preview 3 Support and Many Fixes

$
0
0

With the R1'19 Service Pack release of Telerik UI for Xamarin, we've added a few new features to our PDF Viewer, Visual Studio 2019 Preview 3 support and a variety of improvements across the suite.

With the first major release of the year of Telerik UI for Xamarin, we released the PdfViewer - a component to display PDF documents right within your app. With the service pack release, we built on top of it and have included some more nifty features:

  • FileDocumentSource - you can now point RadPdfViewer to a file on your device. Moreover, it is smart enough to allow you to provide it through a string:
    <telerikPdfViewer:RadPdfViewer x:Name="pdfViewer"  Source="{Binding FilePath}" />
    Where FilePath is a string property in your viewmodel:
    string FilePath {get;}
  • RadPdfViewer.Document property is now public, so you can easily track when the document is loaded/changed
  • When a new document is loaded, it is automatically adjusted to fit the current width for best viewing experience
  • ByteArrayDocumentSource.IsImportAsync is now true by default and available for configuration

VisualStudio 2019 Preview 3

I have good news for all of tech enthusiasts already on VisualStudio 2019 – Telerik UI for Xamarin is compatible with the latest version of VisualStudio 2019 (Preview 3). You can take advantage of the convenient project template which creates a project ready to accommodate all Telerik controls...

Telerik Project Template in VS 2019

... or any of the ItemTemplates that allow you head start in complex screen creation.

Telerik Xamarin Item Template in VS 2019

Of course, all the controls are available and ready to use in the Telerik UI for Xamarin Toolbox in your Visual Studio 2019.

Telerik UI for Xamarin controls in VS 2019 Toolbox


We have introduced a number of improvements to the rest of the Xamarin controls in the suite too:

Calendar:

  • AppointmentTapped and TimeSlotTapped events are not fired when one clicks on All-day appointment
  • Start and End Time is shown for all-day appointment in the default Scheduling screens
  • DaysOfMonth collection is cleared when changing the repeat rule
  • Fixed a wrong date shown when clicking on a recurring appointment
  • MultiDayView now respects the device settings for time format

Chart:

  • Fixed an exception when values have decimal point and the CultureInfo is one which uses comma as decimal separator (e.g. Russian) on Android
  • Fixed incorrectly applied colors in PieChart with custom palette on Android

Chat:

  • Entry is now shifted up correctly when software keyboard is used on iOS
  • Fixed an exception, thrown when ItemsSource is set to null

Checkbox:

  • Fixed state not updated correctly when in ListView on iOS
  • Fixed transparent check rectangle when IsTransparent is set to false

 NuGet:

  • Fixed a compilation error when using lite NuGet package
  • Fixed a problem with DataGrid nuget package, requiring an obsoleted dependency

Entry:

  • Fixed NullReferenceException when WatermarkText is set to null

ListView:

  • Fixed an exception thrown when setting BindingContext to null after navigating back from a page (Prism-style navigation) on iOS
  • ScrollIntoView now works correctly when control is in NavgationPage

NumericInput:

  • Fixed an exception when two buttons are pressed at a time on UWP

Popup:

  • Fixed cannot type in Entry when it is in a modal popup

SideDrawer:

  • Fixed inconsistently updated IsOpen property when an animation is interrupted

SlideView:

  • Fixed SelectedIndex incorrectly updated when swiping left in specific scenarios on iOS
  • Fixed SelectedIndex not updated on first time swipe on iOS
  • Fixed SlideView's ContentOptions overriding the LayoutOptions of the Views inside the control

TreeView:

  • Fixed a NullReferenceException when collapsing items

Share Your Feedback

Feel free to drop us a comment below sharing your thoughts. Or visit our Feedback portal for Telerik UI for Xamarin and let us know if you have any suggestions or if you need any particular features/controls.

And if you haven’t already had a chance to try the Xamarin UI toolkit, go straight to the product page to learn more and download a fresh trial

Learn More

In case you missed it, here are some of the updates from our last release.


Custom Exceptions in C#

$
0
0

Learn how to implement custom exceptions in C# and why they're useful.

An exception is a runtime error in a program that violates a system or application constraint, or a condition that is not expected to occur during normal execution of the program. Possible causes of exceptions include attempting to connect to a database that no longer exists, when a program tries to divide a number by zero, or opening a corrupted XML file. When these occur, the system catches the error and raises an exception.

Exception Classes in .NET

In .NET, an exception is represented by an object instance with properties to indicate where in the code the exception was encountered and a brief description of what caused the exception. We have different exception classes representing different types of errors and they all inherit from the System.Exception base class. The SystemException class inherits from the Exception base class. The OutOfMemoryException, StackOverflowException, and ArgumentException classes inherit from SystemException. The ArgumentException class has two other classes which derive from it: the ArgumentNullException and ArgumentOutOfRangeException classes. The ArithmeticException class derives from the Exception base class. The OverflowException and DivideByZero exceptions then inherit from the ArithmeticException class. We also have the ApplicationException class, which is derived from Exception base class.

Additionally, we can define our own exception classes and they can derive from the Exception base class. The exceptions we define in our projects are called user-defined or custom exceptions. A use case for creating our own exception class is when you’re interfacing with some external service that returns error codes to indicate errors. You can then have a way to translate the error codes into custom exceptions using something like the Gateway or Facade design patterns.

Defining Custom Exception

When creating custom exception classes, they should inherit from the System.Exception class (or any of your other custom exception classes from the previous section). The class name should end with the word Exception, and it should implement at least the three common constructors of exception types.

Let’s look at an example application that should raise an exception when an account balance is less than the transaction amount. Create a new console application project. Add a file InsufficientFuncException.cs with the following class definition:

[System.Serializable]publicclassInsufficientFuncException: System.Exception
{privatestaticreadonlystring DefaultMessage ="Account balance is insufficient for the transaction.";publicstring AccountName {get;set;}publicint AccountBalance {get;set;}publicint TransactionAmount {get;set;}publicInsufficientFuncException():base(DefaultMessage){}publicInsufficientFuncException(string message):base(message){}publicInsufficientFuncException(string message, System.Exception innerException):base(message, innerException){}publicInsufficientFuncException(string accountName,int accountBalance,int transactionAmount):base(DefaultMessage){
        AccountName = accountName;
        AccountBalance = accountBalance;
        TransactionAmount = transactionAmount;}publicInsufficientFuncException(string accountName,int accountBalance,int transactionAmount, System.Exception innerException):base(DefaultMessage, innerException){
        AccountName = accountName;
        AccountBalance = accountBalance;
        TransactionAmount = transactionAmount;}protectedInsufficientFuncException(
        System.Runtime.Serialization.SerializationInfo info,
        System.Runtime.Serialization.StreamingContext context):base(info, context){}}

We defined an exception class named InsufficientFuncException which derives from the System.Exception base class. It contains the properties TransactionAmount, AccountBalance and AccountName, which will help provide more info about the error. We also have a default message variable which will be set as the Message property when no message argument is supplied from the constructor. The first three public constructors are the three standard constructors for exception types. The other constructors accept arguments accountName to indicate the owner of the account, accountBalance to indicate the current account balance, and transactionAmount so we know how much was requested for the transaction. We also marked the class as serializable so it can be used across app domains.

Using Custom Exception

Custom exceptions are thrown and caught the same way as built-in exception types in .NET. To use the custom exception we defined, add a new file Account.cs with the following content:

classAccount{publicAccount(string name,int balance){
        Name = name;
        Balance = balance;}publicstring Name {get;privateset;}publicint Balance {get;privateset;}publicvoidDebit(int amount){if(Balance < amount)thrownewInsufficientFuncException(Name, Balance, amount);
        Balance = Balance - amount;}publicvoidCredit(int amount)=> Balance = amount + Balance;}

This class holds the account details with methods to add and subtract from the balance. The InsufficientFuncException exception is thrown when the Debit() method is called with a transaction amount lower than the account balance.

We will now use this class and perform a debit transaction and see this exception class being utilized. Update Program.cs with the code below.

using System;namespace MyApp
{classProgram{staticvoidMain(string[] args){
            Console.WriteLine("Hello World Bank!");var account =newAccount("James Beach",150);try{
                account.Debit(200);}catch(InsufficientFuncException ex){
                Console.WriteLine("Encountered exception \nException Message: "+ ex.Message);
                Console.WriteLine("Account Balance: "+ ex.AccountBalance);
                Console.WriteLine("Transaction Amount: "+ ex.TransactionAmount);}

            Console.Read();}}}

The code above creates an Account object with a balance of 150. Then it calls the Debit() method with an amount of 200, which is higher than the balance. This should throw an exception, and we’ll log that information to the console. When you run the program, you should get the following in the console.

Hello World Bank!
Encountered exception
Exception Message: Account balance is insufficient for the transaction.
Account Balance: 150
Transaction Amount: 200

You should notice that it catches the exception, and the properties of the exception type we defined makes it easy to tell which account had this error, the account balance, and the requested transaction amount.

That’s A Wrap!

Custom exceptions are exception types you define in your project. They’re useful when the built-in exception types don’t meet your needs. For example, if you’re building a library or framework, and you want consumers of that library to react to exceptions from the library differently than they would for built-in exception types. These user-defined exception classes should inherit from the System.Exception base class and implement the three common constructors found in exception types.

How to: Modify Requests with Fiddler

$
0
0

In part one of this Fiddler series, we focused the basic Composer functionality. Now it's time to focus on how it makes your life better.

Ever tried to test your API or a website with the UI? You click again and again, only to miss the breakpoint on the desired method or selected the wrong option. Fiddler makes this easier, allowing you to modify and execute existing request the same way your application would.

Modifying Existing Requests

Modifying an existing request and executing it again is pretty straightforward:

  1. Drag the session from the sessions list and drop it on the Composer tab
  2. Change the desired values
  3. Click the Execute button in order to execute the request

modfiy-1

In the sessions list, you can find the newly executed request and the response from the server.

Options

The Options tab exposes options that allow you to customize the behavior of the Composer.

  • Inspect Session - selects the new session and activates the Inspectors tab when the request is issued.
  • Fix Content-Length Header - adjusts the value of the Content-Length request header (if present) to match the size of the request body.
  • Follow Redirects - causes a HTTP/3xx redirect to trigger a new request, if possible. The Composer will follow up to fiddler.composer.followredirects.max default redirections.
  • Automatically Authenticate - causes Fiddler to automatically respond to HTTP/401 and HTTP/407 challenges that use NTLM or Negotiate protocols using the current user's Windows credentials.

Conclusion

The Composer tab in Telerik Fiddler can help you build your REST API with ease, while focusing on the responses rather than how to simulate it.

Don’t hesitate to drop a line or two below, If you have any questions or comments. Your feedback is highly appreciated.

P.S. You can follow us on Twitter, where you can find the latest news, tips & tricks, highlights and more. 

Converting Visual Basic to C#

$
0
0

Follow John Browne on a brief history of Visual Basic and learn how to convert VB code to C# easily.

BASIC as a programming language dates back to 1964 when Dartmouth professors John Kemeny and Thomas Kurtz decided to create a very, well, “basic” programming language to teach students how to program. At the time, the existing languages were either extremely low-level or, like COBOL, too ugly to look at.

In 2014 Dartmouth celebrated the 50th anniversary of the creation of BASIC:

  • If BASIC were a human, its kids would be middle-aged.
  • If BASIC were a US President, it would be in Lyndon Johnson’s grave.
  • If BASIC were a pop song, it would be “I want to hold your hand.”

BASIC is OLD

But it was popular. All those cute little home computers, like the Apple II and the Commodore 64—and even the original IBM PC—came with BASIC. And lo and behold, the masses took to BASIC like my Border Collie takes to leftovers. And after all those minions learned to program by writing silly games, many turned their attention to serious business problems and wrote more code.

Then in the 80s along came Microsoft Windows with a GUI and mouse events and bitmapped graphics. But writing Windows code was really really hard. It was like assembly language but more mean-spirited. Everything was a pointer, you had a message pump (whatever the heck that was), you had to manage your memory, and the documentation read like Sanskrit. So when Visual Basic arrived on the scene in 1991, all those BASIC developers jumped on it like my Border Collie on medium rare prime rib.

No more line numbers, no more PRINT statements to debug, easy form design... it was heaven. The boxes flew off the shelves. A huge ecosystem of libraries and tools sprung up. People who had never written a program turned in to software developers overnight.

And we all know what happened next. With the release of .NET, Microsoft turned the beloved VB into VB.NET, which looked alarmingly like a “real” programming language—in fact, it suspiciously resembled the C# language that had been created for the sole purpose of writing apps for .NET.

Goodbye Visual Basic. Hello VB.NET.

The thing is, the two languages (VB.NET and C#) are NOT interchangeable. They both have access to the entire .NET framework, and they both use the same compiler and IL, but there are syntactic differences that persist. Enough people think VB.NET is still more approachable and “human readable” than C# to keep it alive. But the times, they are a-changin’.

Microsoft has laid out the roadmap for all their .NET languages, and C# got in the driver’s seat and VB.NET is in the back seat. C# will forever be a first-class language and VB will be the runt of the litter. Improvements will happen first in C# and later—if at all—incorporated into VB. As Microsoft turns its focus from the .NET framework to .NET Core, VB will get implemented after C# support is rolled out. And so on.

VB.NET or C#? You choose.

Which brings me to this cool tool from my buds on the Telerik team. You can paste your VB.NET code in and boom! It’s converted to C#. (Ok, you can go the other direction, too, but really who would do that?) I think this could be pretty helpful for folks who are used to VB and want to see how different the same function or sub procedure would look in C# (hint: it won’t be a sub…end sub anymore).

A quick check on my part shows this little snippet here (C#):

int i =0;
fgOrders.RowsCount = modConnection.rs.RecordCount +1;if(fgOrders.RowsCount ==1){
fgOrders.FixedRows =0;}else{
fgOrders.FixedRows =1;}
i =1;while(!modConnection.rs.EOF){int tempForEndVar = modConnection.rs.FieldsMetadata.Count -1;for(int j =0; j <= tempForEndVar; j++){if(modConnection.rs.GetField(j)!=null){
fgOrders[i, j].Value = Convert.ToString(modConnection.rs[j]);}}
modConnection.rs.MoveNext();
i++;}

When pasted into their converter, yields this (VB.NET):

Dim i AsInteger=0
        fgOrders.RowsCount = modConnection.rs.RecordCount +1If fgOrders.RowsCount =1Then
            fgOrders.FixedRows =0Else
            fgOrders.FixedRows =1EndIf

        i =1WhileNot modConnection.rs.EOF
            Dim tempForEndVar AsInteger= modConnection.rs.FieldsMetadata.Count -1For j AsInteger=0To tempForEndVar

                If modConnection.rs.GetField(j)IsNotNothingThen
                    fgOrders(i, j).Value = Convert.ToString(modConnection.rs(j))EndIfNext

            modConnection.rs.MoveNext()
            i +=1EndWhile

Other than converting (blessed and deeply loved) tabs into (hated and horrid) spaces, this conversion seems pretty solid. Admittedly this isn’t a particularly difficult example to test with.

What about VB6?

It does, however, leave open the issue of dealing with the mother of VB.NET: VB6. Or, as some people call it, Real Visual Basic. VB6 is NOT VB.NET —different syntax, different runtime library, and different forms package. VB6 is out of support—has been for years now—and it’s getting harder and harder to find people who can or will work on VB6 applications. And believe it or not, there are still millions of lines of VB6 code running in the real world, in many cases as mission-critical applications inside the enterprise.

Fortunately, when VB.NET was released, Microsoft hired Mobilize.Net to build a migration tool to convert VB6 code to .NET code. That tool—which used to be included with Visual Studio but alas, isn’t anymore—has, over the subsequent years, been improved until it is the most widely-used conversion tool for VB6 to .NET. It quickly and easily converts VB6 code, forms, and runtime to C# or VB.NET using the .NET Framework and Windows Forms. It will even let VB6 developers convert their app into a modern Angular-based web application with ASP.NET Core on the back end, using a follow-on tool called WebMAP from the same company. And you can try it out on your own code for free.

If you’re still in the Visual Basic world—whether VB6 or VB.NET—consider moving to C#. Among other reasons, new stuff like Blazor—which Telerik has a cool new UI toolset for—are C#-based, not VB.NET. Frankly, if you’ve already learned VB.NET, C# will be an easy transition. And if you’re still on VB6, you might as well jump to C# and say adios to Visual Basic.

New Features & Fixes in Telerik Reporting & Report Server R1'19 SP

$
0
0

With the R1'19 Service Pack release, we've added support for Font discovery under Linux and macOS, a brand new Crystal Dark theme for our WPF Report Viewer and a variety of improvements and fixes across the products.

As usual, we focused on fixes and improvements in the suite for the service pack release of Telerik Reporting and Telerik Report Server. We are happy to share that we've introduced new features as well as important bug fixes. We also tested against the latest Visual Studio 2019 (preview 3) and we can confirm that the Telerik Reporting components are fully compatible.

Below are some of the improvements that are part of our brand-new service pack release:

Font Discovery Support

Introducing a new Telerik Reporting setting called fontLibrary will help the rendering engine to search for a specific font. In other words, the reporting engine will be able to skip searching the default font folders and declares a folder to be used for font resolving. 

This element is respected only when the PDF rendering extension is used in .NET Core applications under Linux or macOS.  It is defined in the application's configuration file.

The XML-based configuration would look like:

<?xml version="1.0"?>
<configuration>
   ...
  <Telerik.Reporting>
    <fontLibrary useDefaultLocations="false">
      <fontLocations>
        <add path="/usr/customFonts/trueType" searchSubfolders="true"></add>
      </fontLocations>
    </fontLibrary>   
  </Telerik.Reporting>
   ...
</configuration>

And the JSON-based configuration file:

"telerikReporting": {
  "fontLibrary": {
    "useDefaultLocations": "false",
    "fontLocations": [
      {
        "path": "/usr/customFonts/trueType",
        "searchSubfolders": "true"
      }
    ]
  }
}
 

WPF Report Viewer Crystal Dark Theme

Have you heard the phrase "don't judge a book by its cover"? Yet the reality is that apps are firstly judged by their appearance. That's why with the SP release we'd like to give you more theming options and introduce you to a new Crystal Dark theme for the WPF suite.

Crystal Dark Theme

Enhanced Support for Database Providers in .NET Core Projects

In .NET Framework projects we rely on a special class named DbProviderFactories to instantiate a provider that will manage a database connection. Since this class is not available in .NET Standard 2.0, initially we had limited the supported database providers to MSSQL Server only. Things have improved with our SP release which extends the range of supported databases with some of the most prominent database engines: Oracle, MySQL, PostgreSQL, and SQLite. We expect the DbProviderFactories class to be added in .NET Standard 2.1, allowing you to use virtually any .NET Core data provider with Telerik Reporting.

Visual Studio 2019

We tested the suite with Visual Studio 2019 (preview 3) and we are happy to confirm that they are fully compatible.

Report Server

From now on, the administrator can unlock a report previously locked by another user. Furthermore, there are numerous UI enhancements introduced in Report Server Manager as well.

Other Important Fixes

  • The ability to Render multiple viewers on a single page was introduced in an earlier release. The SP release further improves the user experience by fixing report area issues.

Multiple Viewers

  • Starting with Telerik Reporting R1 2018 SP3 (12.0.18.416), the report rendering operation is performed asynchronously in a dedicated worker thread. To access the current user context you had to use the Telerik.Reporting.Processing.UserIdentity.Current static property. However, from now on all calls of the ReportResolver (either built-in resolvers or custom report resolver) will be performed in the service request thread. This means that the calls will have access to eventual dependencies coming from the ReportsControlleras well as to the built-in dependencies like HttpContext.Current.

Multiple issues got addressed as well. For the full list, please refer to the respective release notes for Telerik Reporting and Telerik Report Server.

Try it Out and Share Feedback

We want to know what you think—you can download a free trial of Telerik Reporting or Telerik Report Server today and share your thoughts in ourFeedback Portal, or right in the comments below.

Start your trial today: Reporting TrialReport Server Trial

Tried DevCraft?

You can get Reporting and Report Server with Telerik DevCraft. Make sure you’ve downloaded a trial or learn more about DevCraft bundles. DevCraft gives you access to all our toolsets, allowing you to say “no” to ugly apps for the desktop, web or mobile.


Serverless and Blazor: Talking Next Gen Apps with Jeremy Likness

$
0
0

On this episode of Eat Sleep Code, we talk about building next generation serverless web apps with Blazor.

Join us as we talk with Jeremy Likness about creating next gen web applications using Blazor & Serverless with Azure. Jeremy shares his interest in Blazor. We also discuss how to implement serverless using the Azure serverless platform that includes Azure Functions, Logic Apps, and Event Grid.

You can listen to the entire show and catch past episodes on SoundCloud. Or just click below.

Jeremy Likness

Jeremy Likness

Jeremy is a Cloud Developer Advocate for Azure at Microsoft. Jeremy wrote his first program in 1982, was recognized in the "who's who in Quake" list for programming the first implementation of "Midnight Capture the Flag" in Quake C and has been developing enterprise applications for 25 years with a primary focus on web-based delivery of line of business applications. Jeremy is the author of four technology books, a former 8-year Microsoft MVP for Developer Tools and Technologies, an international and keynote speaker and writes regularly on cloud and container development. Jeremy follows a plant-based diet and spends most of his free time running, hiking and camping, and playing 9-ball and one pocket.

Show Notes

Viewing all 1954 articles
Browse latest View live


Latest Images